您好,登录后才能下订单哦!
密码登录
登录注册
点击 登录注册 即表示同意《亿速云用户服务条款》
本文实例为大家分享了WinForm实现鼠标拖动控件跟随效果的具体代码,供大家参考,具体内容如下
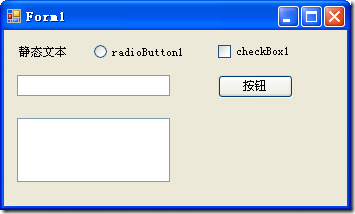
1. 运行初始窗口如下:

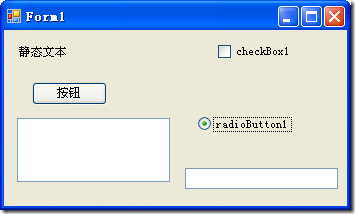
2. 拖动后效果如下:

3. 代码如下:
public partial class Form1 : Form
{
  /*
   * 理解了下面的几个概念,就能完全明白相对坐标的变化.
   * MouseEventArgs e 为事件鼠标参数,因此,e.Location 指示了位于事件源上的光标坐标
   * Cursor.Position 获取的是相对于用户屏幕的光标坐标
   * PointToClient() 方法可将屏幕坐标 Cursor.Position 换算成工作区的坐标
   * 因此,换算后的 Cursor.Position 减去 e.Location 得到的始终是事件源的 Location
  */

  /// <summary>
  /// 鼠标按下为true
  /// </summary>
  private bool Mousedown;

  /// <summary>
  /// 鼠标在事件源的位置
  /// </summary>
  private int CurX = 0;
  private int CurY = 0;

  public Form1()
  {
    InitializeComponent();
  }

  private void Controls_MouseDown(object sender, MouseEventArgs e)
  {
    CurX = e.X;
    CurY = e.Y;
    Mousedown = true;
    if (sender is TextBox)
    {
      ((TextBox)sender).Cursor = Cursors.Arrow;
    }
  }

  private void Controls_MouseMove(object sender, MouseEventArgs e)
  {
    if (Mousedown)
    {
      // 获取当前屏幕的光标坐标
       Point pTemp = new Point(Cursor.Position.X, Cursor.Position.Y);
      // 转换成工作区坐标
       pTemp = this.PointToClient(pTemp);
      // 定位事件源的 Location
      Control control = sender as Control;
      control.Location = new Point(pTemp.X - CurX, pTemp.Y - CurY);
    }
  }

  private void Controls_MouseUp(object sender, MouseEventArgs e)
  {
    Mousedown = false;
    if (sender is TextBox)
    {
      ((TextBox)sender).Cursor = Cursors.IBeam;
    }
  }
}
以上就是本文的全部内容,希望对大家的学习有所帮助,也希望大家多多支持亿速云。
免责声明:本站发布的内容(图片、视频和文字)以原创、转载和分享为主,文章观点不代表本网站立场,如果涉及侵权请联系站长邮箱:is@yisu.com进行举报,并提供相关证据,一经查实,将立刻删除涉嫌侵权内容。