您好,登录后才能下订单哦!
这篇文章给大家分享的是有关微信小程序如何自定义模态对话框的内容。小编觉得挺实用的,因此分享给大家做个参考,一起跟随小编过来看看吧。
由于官方API提供的显示模态弹窗,只能简单地显示文字内容,不能对对话框内容进行自定义,欠缺灵活性,所以自己从模态弹窗的原理角度来实现了自定义的模态对话框。
wx.showModal(OBJECT)
自定义
模态对话框
涉及文件
界面 wxml
样式 wxcss
事件及方法 js
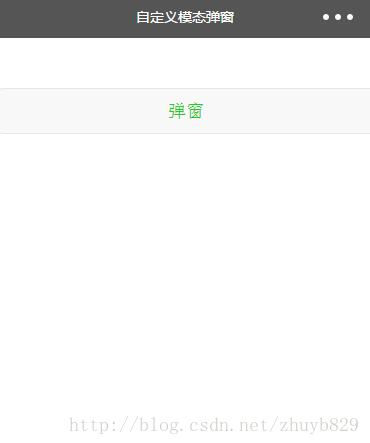
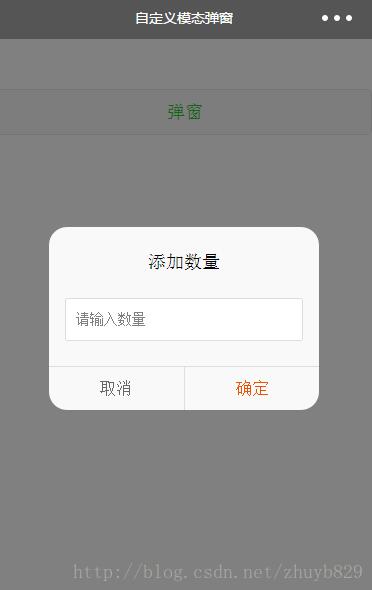
效果图


界面代码 .wxml
<button class="show-btn" bindtap="showDialogBtn">弹窗</button>

<!--弹窗-->
<view class="modal-mask" bindtap="hideModal" catchtouchmove="preventTouchMove" wx:if="{{showModal}}"></view>
<view class="modal-dialog" wx:if="{{showModal}}">
 <view class="modal-title">添加数量</view>
 <view class="modal-content">
 <view class="modal-input">
  <input placeholder-class="input-holder" type="number" maxlength="10" bindinput="inputChange" class="input" placeholder="请输入数量"></input>
 </view>
 </view>
 <view class="modal-footer">
 <view class="btn-cancel" bindtap="onCancel" data-status="cancel">取消</view>
 <view class="btn-confirm" bindtap="onConfirm" data-status="confirm">确定</view>
 </view>
</view>
样式 .wxss
.show-btn {
 margin-top: 100rpx;
 color: #22cc22;
}

.modal-mask {
 width: 100%;
 height: 100%;
 position: fixed;
 top: 0;
 left: 0;
 background: #000;
 opacity: 0.5;
 overflow: hidden;
 z-index: 9000;
 color: #fff;
}

.modal-dialog {
 width: 540rpx;
 overflow: hidden;
 position: fixed;
 top: 50%;
 left: 0;
 z-index: 9999;
 background: #f9f9f9;
 margin: -180rpx 105rpx;
 border-radius: 36rpx;
}

.modal-title {
 padding-top: 50rpx;
 font-size: 36rpx;
 color: #030303;
 text-align: center;
}

.modal-content {
 padding: 50rpx 32rpx;
}

.modal-input {
 display: flex;
 background: #fff;
 border: 2rpx solid #ddd;
 border-radius: 4rpx;
 font-size: 28rpx;
}


.input {
 width: 100%;
 height: 82rpx;
 font-size: 28rpx;
 line-height: 28rpx;
 padding: 0 20rpx;
 box-sizing: border-box;
 color: #333;
}

input-holder {
 color: #666;
 font-size: 28rpx;
}

.modal-footer {
 display: flex;
 flex-direction: row;
 height: 86rpx;
 border-top: 1px solid #dedede;
 font-size: 34rpx;
 line-height: 86rpx;
}

.btn-cancel {
 width: 50%;
 color: #666;
 text-align: center;
 border-right: 1px solid #dedede;
}

.btn-confirm {
 width: 50%;
 color: #ec5300;
 text-align: center;
}
事件及方法 .js
Page({
 data: {
  showModal: false,
 },
 onLoad: function () {
 },
 /**
  * 弹窗
  */
 showDialogBtn: function() {
  this.setData({
  showModal: true
  })
 },
 /**
  * 弹出框蒙层截断touchmove事件
  */
 preventTouchMove: function () {
 },
 /**
  * 隐藏模态对话框
  */
 hideModal: function () {
  this.setData({
  showModal: false
  });
 },
 /**
  * 对话框取消按钮点击事件
  */
 onCancel: function () {
  this.hideModal();
 },
 /**
  * 对话框确认按钮点击事件
  */
 onConfirm: function () {
  this.hideModal();
 }
})
实现思路解读及原理
界面解读:
用一个蒙层+弹窗来组成,用绑定的数据{{showModal}}来控制弹窗的显示和隐藏
事件及方法解读:
让弹窗显示的方法:
showDialogBtn: function() {
  this.setData({
  showModal: true
  })
 }
让弹窗消失的方法:
hideModal: function () {
  this.setData({
  showModal: false
  });
 }
这里有个要特别注意的地方,就是下面这个方法:
preventTouchMove: function () {
}为什么是空方法?因为要结合界面wxml看,蒙层view里有一个事件绑定catchtouchmove="preventTouchMove"。这养写的原因是阻断事件向下传递,避免在弹窗后还可以点击或者滑动蒙层下的界面。如果不这样写的话,如果主界面是一个可以滚动的界面,想想看,当弹窗弹出的时候用户还可以操作滚动列表,我想你的产品经理会来找你的。
3. 样式解读:(这个标题没加代码块标识,但还是像代码块一样被显示了,这是个bug!!!- -)
.modal-mask和.modal-dialog样式的写法需要特别注意。
主要是层级关系,弹窗要保证在最上层,不被界面遮挡,然后蒙层要遮挡住界面,但是不可遮挡弹窗。所以.modal-mask和.modal-dialog的z-index值要注意。
以上就是本文的全部内容,希望对大家的学习有所帮助,也希望大家多多支持亿速云。
感谢各位的阅读!关于“微信小程序如何自定义模态对话框”这篇文章就分享到这里了,希望以上内容可以对大家有一定的帮助,让大家可以学到更多知识,如果觉得文章不错,可以把它分享出去让更多的人看到吧!
免责声明:本站发布的内容(图片、视频和文字)以原创、转载和分享为主,文章观点不代表本网站立场,如果涉及侵权请联系站长邮箱:is@yisu.com进行举报,并提供相关证据,一经查实,将立刻删除涉嫌侵权内容。