您好,登录后才能下订单哦!
密码登录
登录注册
点击 登录注册 即表示同意《亿速云用户服务条款》
这篇文章主要为大家展示了“如何实现基于vue2.0+vuex的日期选择组件功能”,内容简而易懂,条理清晰,希望能够帮助大家解决疑惑,下面让小编带领大家一起研究并学习一下“如何实现基于vue2.0+vuex的日期选择组件功能”这篇文章吧。
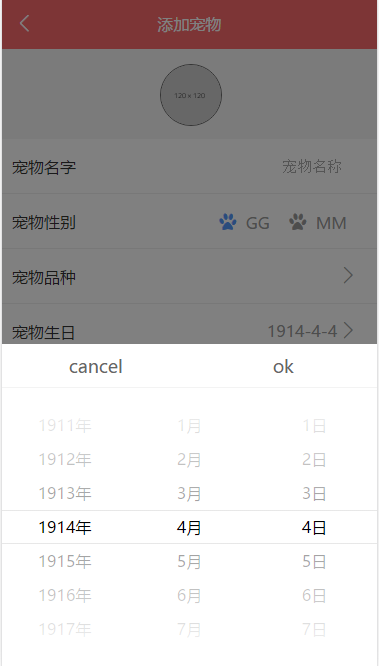
calendar vue日期选择组件
一个选择日期的vue组件
基于vue2.0 + vuex
原本是想找这样的一个组件的,查看了vuex后,发现vuex的写法还不是基于2.0的,所以就自己动手做了
demo展示&&项目中的使用

目录结构
demo 用vue-cli 的webpack-simple构建的
calendar
 |--dist build生成的目录
 |--doc  展示图片
 |--src
   |--assets 资源
   |--components
     |--calendar  日期组件
     |--dateScroll 滚动的子组件
   |--css
   |store  vuex目录
     |--modules
       |--calendar
     |--mutation   组件的一些状态
     |--store
   |App.vue  入口
   |main.js
组件使用
组件可以传入一个年份的范围,startTime 和 endTime 都是数字, 默认是1900 - 2050
触发组件 this.$store.dispatch('calendarStatus',true)
  <template>
   <div id="app">
    <p @click = "setDate">点击设置日期</p>
     <!--显示返回的日期-->
    <p>{{date}}</p>
     <!--组件-->
    <com-calendar :style = "calendar" :startTime = "start" :endTime="end"></com-calendar>
      <!--遮罩-->
    <div v-show = "mark" class="mark" @touchmove.stop.prevent ="" @touchstart.stop.prevent ="" @touchend.stop.prevent =""></div>

   </div>
  </template>

  <script>
   require('./css/style.scss');
  import calendar from './components/calendar';
  export default {
   name: 'app',
   data () {
    return {
     //选择日期的开始返回,默认是1900 - 2050
      start:1950,
      end:2030
    }
   },
   components:{
    comCalendar:calendar
   },
   methods:{
    setDate:function () {
     //触发日期组件
     this.$store.dispatch('calendarStatus',true);
    }
   },
    computed:{
     //遮罩状态
     mark:function () {
      return this.$store.getters.markStatus
     },
     //组件状态
     calendar:function () {
      return this.$store.getters.getCalendarStatus?{ display:'block'}:{ display:'none'};
     },
     //返回的日期
     date:function () {
      return this.$store.getters.getCalendarDate;
     }

    }

  }
  </script>
运行
# install dependencies
npm install

# serve with hot reload at localhost:8081
npm run dev

# build for production with minification
npm run build
以上是“如何实现基于vue2.0+vuex的日期选择组件功能”这篇文章的所有内容,感谢各位的阅读!相信大家都有了一定的了解,希望分享的内容对大家有所帮助,如果还想学习更多知识,欢迎关注亿速云行业资讯频道!
免责声明:本站发布的内容(图片、视频和文字)以原创、转载和分享为主,文章观点不代表本网站立场,如果涉及侵权请联系站长邮箱:is@yisu.com进行举报,并提供相关证据,一经查实,将立刻删除涉嫌侵权内容。