您好,登录后才能下订单哦!
这篇文章主要为大家展示了“IDEA下如何实现Gradle多模块”,内容简而易懂,条理清晰,希望能够帮助大家解决疑惑,下面让小编带领大家一起研究并学习一下“IDEA下如何实现Gradle多模块”这篇文章吧。
我们在新起一个项目的时候,一般都会建多个子项目(IDEA里面称之为Module模块)。通过Gradle构建,多个Module之间需要将公用的配置抽取到全局,子项目中只写差异化的配置,以便于维护。
多模块项目的Gradle目录结构
示例:我的示例项目demo,我需要有一个common模块用于公用代码,一个rest模块用于提供rest接口,rest依赖common,如果用gradle构建,目录树会是这样:
demo
├── build.gradle   -- 全局配置
├── settings.gradle  -- 全局配置
├── common      -- 子模块1目录
│  └── build.gradle -- 子模块1配置
├── rest       -- 子模块2配置
│  └── build.gradle -- 子模块2配置
...
IDEA下初始创建root目录结构
A. IDEA本地创建项目并定义项目名
如果是通过IDEA新建一个本地项目,可按照如下步骤先创建root项目:
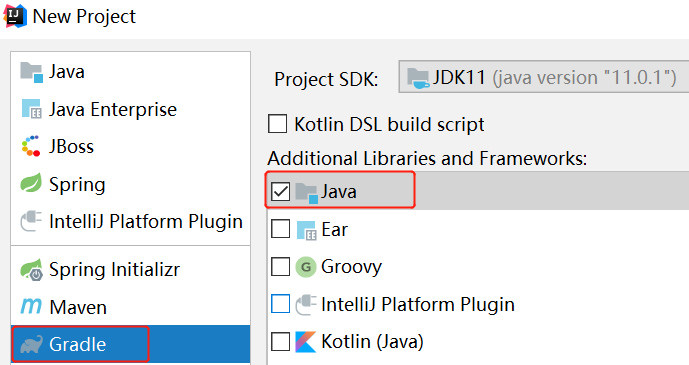
1、File -> New -> Project: 选择Gradle->Java

2、Next, 填写GroupId和ArtifactId:
GroupId: 如com.diboot
ArtifactId:如demo
3、Next, 指定Gradle home和JVM等
4、Next, 选择项目存放路径。完成之后IDEA会创建相关文件
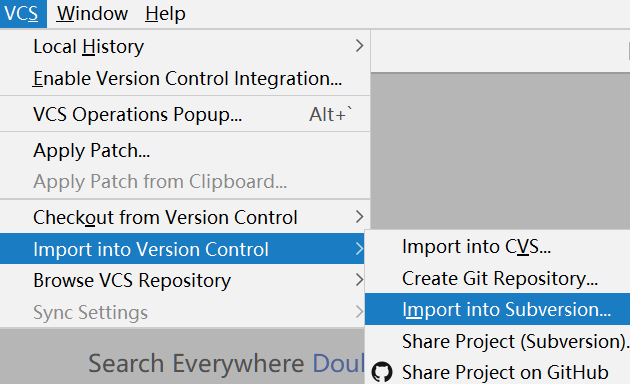
接下来如果你需要将本地新项目代码上传到代码仓库,可以通过VCS菜单导入:

B. 基于代码仓库指定的项目名创建root项目
而如果项目名已经在仓库中定义,你需要基于仓库名初始项目的gradle配置,则项目的初始创建是通过VCS导入,然后用命令行初始化gradle:
File -> New -> Project from Version Control -> ...
切换到Terminal命令行,输入 gradle init,按照操作提示进行root项目的初始化。
创建子模块/项目
在根目录demo文件夹右键选择 New -> Module -> Gradle -> Java, 指定子模块ArtifactId名称,依次添加common模块和rest模块后,gradle相关的目录结构就跟我们期望的一致了。
全局gradle配置
在demo根目录下:
settings.gradle中的结构定义如下
rootProject.name = 'demo'
include 'common'
include 'rest'
build.gradle中可以定义全局公用的构建配置,以Spring Boot项目配置示例:
buildscript {
  ext {
    springBootVersion = '2.1.2.RELEASE'
  }
  repositories {
    maven{ url 'http://maven.aliyun.com/nexus/content/groups/public/'}
  }
  dependencies {
    classpath("org.springframework.boot:spring-boot-gradle-plugin:${springBootVersion}")
  }
}
// 所有模块/项目的通用配置
allprojects {
  group 'com.diboot'
  version '1.0-SNAPSHOT'
  apply plugin: 'idea'
}
// 子模块/项目的统一配置
subprojects {
  apply plugin: 'java'
  // 指定JDK版本
  sourceCompatibility = 1.8
  targetCompatibility = 1.8
  // 指定编码格式
  [compileJava,compileTestJava,javadoc]*.options*.encoding = 'UTF-8'
  repositories {
    maven{ url 'http://maven.aliyun.com/nexus/content/groups/public/'}
  }
  ext {//依赖版本
    springBootVersion = "2.1.2.RELEASE"
    mysqlConnectorVersion = "8.0.13"
    mybatisStarterVersion = "1.3.2"
    fastjsonVersion = "1.2.54"
  }
  dependencies {
    compile("javax.servlet:javax.servlet-api:4.0.1")
    compile("org.springframework.boot:spring-boot-starter-web:$springBootVersion")
    // Mybatis
    compile("org.mybatis.spring.boot:mybatis-spring-boot-starter:$mybatisStarterVersion")
    // Log4j2
    compile("org.springframework.boot:spring-boot-starter-log4j2:$springBootVersion")
    // JDBC Driver
    compile("mysql:mysql-connector-java:$mysqlConnectorVersion")
    // JSON
    compile("com.alibaba:fastjson:$fastjsonVersion")
    // Apache Commons
    compile("org.apache.commons:commons-lang3:3.8.1")

    // 单元测试
    testCompile("org.springframework.boot:spring-boot-starter-test:$springBootVersion")
    testCompile("junit:junit:4.12")
  }
  configurations {
    //移除spring boot 默认logger依赖
    all*.exclude module: 'spring-boot-starter-logging'
  }
}
子模块/项目gradle配置
通用的依赖配置可以在根目录下的build.gradle中,子模块/项目仅配置差异化的部分即可,如子项目特定的依赖。
common下的build.gradle示例:
dependencies {
  // 配置该项目特有的依赖
}
rest下的build.gradle示例(rest项目依赖common项目):
dependencies {
  // 依赖common项目
  compile project(":common")
  // 配置该项目特有的依赖
}
以上是“IDEA下如何实现Gradle多模块”这篇文章的所有内容,感谢各位的阅读!相信大家都有了一定的了解,希望分享的内容对大家有所帮助,如果还想学习更多知识,欢迎关注亿速云行业资讯频道!
免责声明:本站发布的内容(图片、视频和文字)以原创、转载和分享为主,文章观点不代表本网站立场,如果涉及侵权请联系站长邮箱:is@yisu.com进行举报,并提供相关证据,一经查实,将立刻删除涉嫌侵权内容。