您好,登录后才能下订单哦!
一、在pom.xml中配置jetty插件:
 <build>
  <plugins>
   <plugin>
    <groupId>org.eclipse.jetty</groupId>
    <artifactId>jetty-maven-plugin</artifactId>
    <version>9.1.0.v20131115</version>
   </plugin>
  </plugins>
 </build>
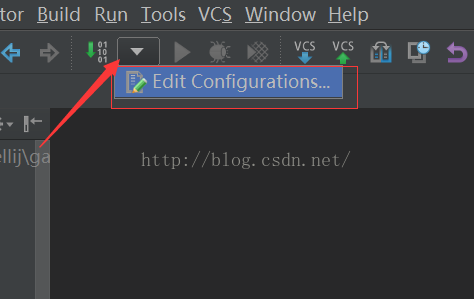
二、在顶部导航栏,如图点击打开Edit Configurationns…:

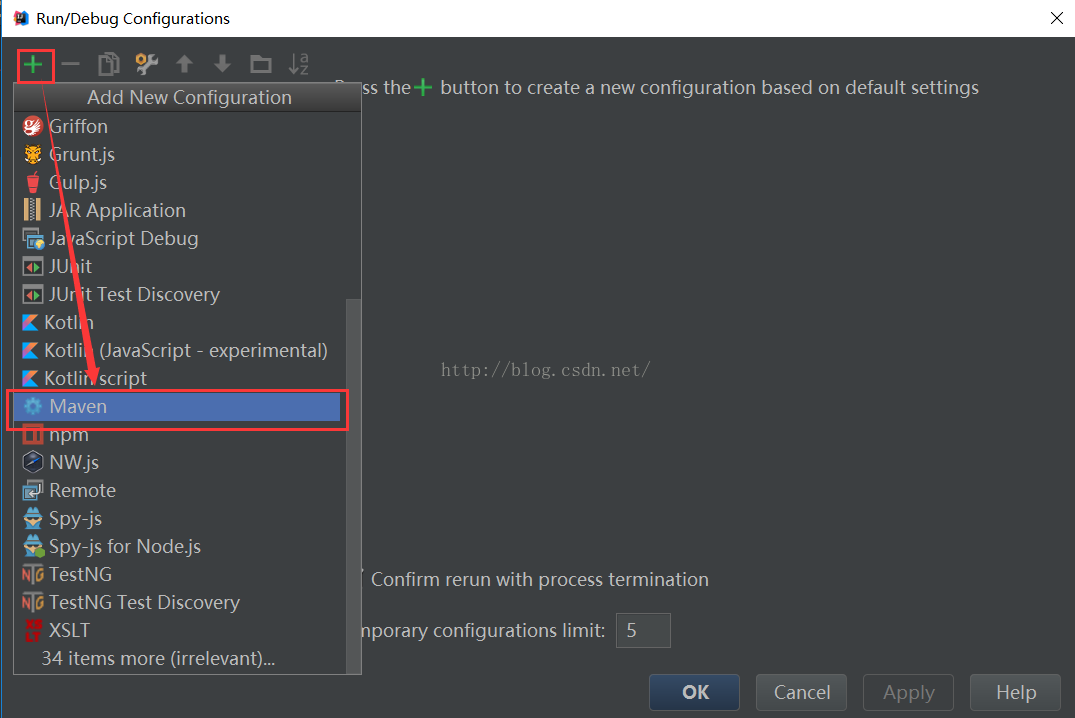
三、点击左上角绿色加号,选择Maven,然后进行相关配置。

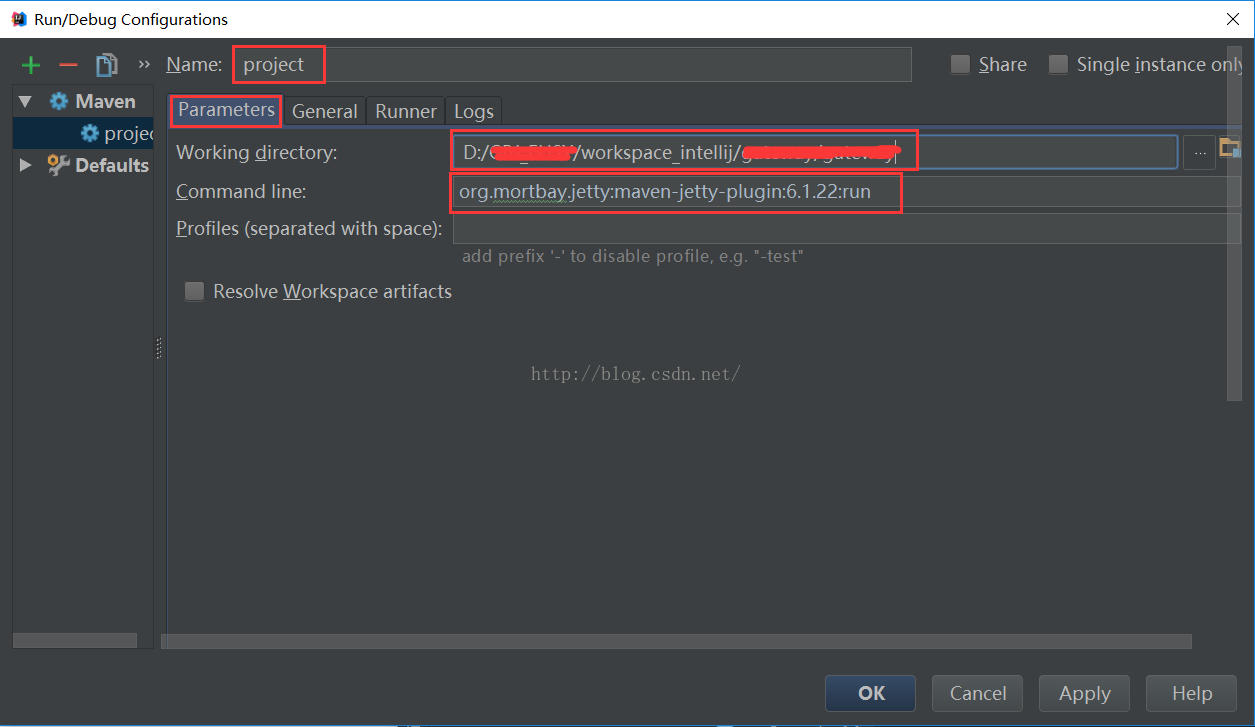
四、在Name中编辑一个自己的名字,在Parameters中,Working directory选中自己项目,在Command line中输入org.mortbay.jetty:maven-jetty-plugin:6.1.22:runPS:如果是多模块项目,需要勾选Resolve Workspace artifacts

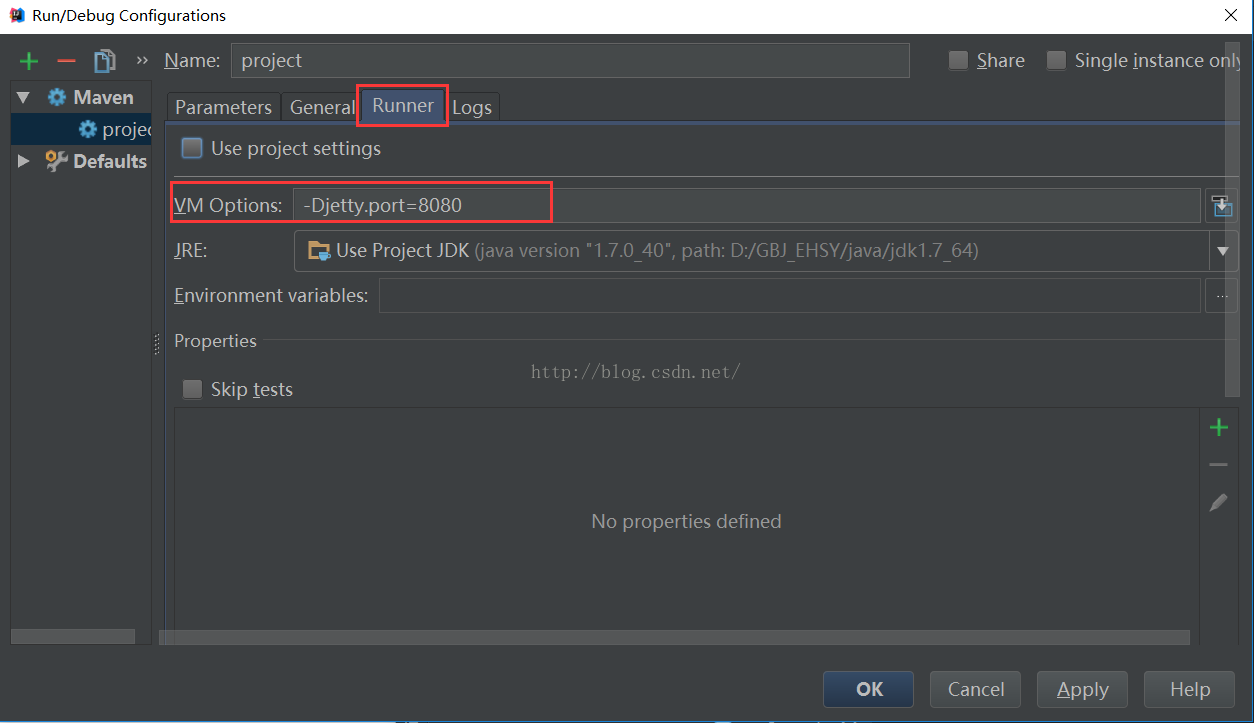
五、在Runner选项下,在VM Options中配置启动端口号:-Djetty.port=8081

六、点击Apply,OK。完成配置
下面是在一个idea中同时运行两个jetty的配置方法:
在idea中运行一个web项目,我们不必要用tomcat服务器,我们可以直接在pom.xml中配置jetty插件,部署在jetty上即可。
在<project></project>里面配置
第一个:
<build>
<plugins>

<!-- jetty插件, 设定context path与spring profile -->
<plugin>
<groupId>org.mortbay.jetty</groupId>
<artifactId>jetty-maven-plugin</artifactId>
<version>8.1.5.v20120716</version>
<configuration>
<jvmArgs>-XX:PermSize=512m -XX:MaxPermSize=512m
-XX:+CMSPermGenSweepingEnabled
-XX:+CMSClassUnloadingEnabled</jvmArgs>
<!-- <reload>automatic</reload> -->
<!-- <scanIntervalSeconds>2</scanIntervalSeconds> -->
<reload>manual</reload>
<webAppConfig>
<contextPath>/</contextPath> <!--注释一 此处为项目的上下文路径-->
</webAppConfig>
<stopKey>foo</stopKey>
<stopPort>9998</stopPort>
<connectors>
<connector implementation="org.eclipse.jetty.server.nio.SelectChannelConnector">
<port>8088</port> <!--注释二 此处配置了访问的端口号-->
<maxIdleTime>60000</maxIdleTime>
</connector>
</connectors>

</configuration>
</plugin>
</plugins>
</build>
第二个
<build>
<plugins>

<!-- jetty插件, 设定context path与spring profile -->
<plugin>
<groupId>org.mortbay.jetty</groupId>
<artifactId>jetty-maven-plugin</artifactId>
<version>8.1.5.v20120716</version>
<configuration>
<jvmArgs>-XX:PermSize=512m -XX:MaxPermSize=512m
-XX:+CMSPermGenSweepingEnabled
-XX:+CMSClassUnloadingEnabled</jvmArgs>
<!-- <reload>automatic</reload> -->
<!-- <scanIntervalSeconds>2</scanIntervalSeconds> -->
<reload>manual</reload>
<webAppConfig>
<contextPath>/</contextPath> <!--注释一 此处为项目的上下文路径-->
</webAppConfig>
<stopKey>foo</stopKey>
<stopPort>9999</stopPort>
<connectors>
<connector implementation="org.eclipse.jetty.server.nio.SelectChannelConnector">
<port>8080</port> <!--注释二 此处配置了访问的端口号-->
<maxIdleTime>60000</maxIdleTime>
</connector>
</connectors>

</configuration>
</plugin>
</plugins>
</build>
唯一的不同点在port端口号的配置上。
然后在idea的右部有一个maven project,里面的plugins、jetty、run exploded,运行即可。
有的标签我也不太懂,但是能运行就是不错的,全懂不现实。
maven的dependency和plugin都是先从本地respository,如果没有再去私服或远程仓库下载。
以上就是本文的全部内容,希望对大家的学习有所帮助,也希望大家多多支持亿速云。
免责声明:本站发布的内容(图片、视频和文字)以原创、转载和分享为主,文章观点不代表本网站立场,如果涉及侵权请联系站长邮箱:is@yisu.com进行举报,并提供相关证据,一经查实,将立刻删除涉嫌侵权内容。