您好,登录后才能下订单哦!
使用Java怎么模拟行星运动?相信很多没有经验的人对此束手无策,为此本文总结了问题出现的原因和解决方法,通过这篇文章希望你能解决这个问题。
一、类的设计:
Star继承自JPanel。Star类是行星的基类,所有运动的行星都是继承自Star类。内部draw()方法主要绘制了一个实心圆形,目的是在每次绘制时,可以保证中心行星始终显示。paintComponent()方法重写了JPanel的绘制方法,目的是保证继承自Star类的Stars类的实例对象可以绘制出自己的行星。如下:
package Star;
import java.awt.Color;
import java.awt.Graphics;
import javax.swing.JPanel;
public class Star extends JPanel{
  /**
   * 基本的行星类
   */
  private static final long serialVersionUID = 1L;
  int x,y;
  int width,height;
  public Star() {
    width = 10;
    height = 10;
  }
  public Star(int x, int y){
    this.x = x;
    this.y = y;
    width = 10;
    height = 10;
  }
  public void draw(Graphics g){
    g.setColor(Color.blue);
    g.fillOval(x, y, width, height);
  }
  protected void paintComponent(Graphics g){
    super.paintComponent(g);
    g.fillOval(x, y, width, height);
  }
}
Stars类继承自Star类,是对Star类的进一步细化,表示运动的行星。Stars类中的alfa表示运动行星的运动起始角度,speed表示运动速度,可对其进行修改。Long,Short分别表示椭圆轨迹的长轴与短轴。center表示其实例化对象的中心行星。paintComponent()函数重写了paintComponent(),内部引用了父类的draw()函数,并且根据Long,,Short绘制了椭圆轨道,Long、Short由实例化对象调用构造方法来决定。move()函数描述了x,y的变化方程,即围绕着椭圆轨道变化,同时规定了alfa的变化方式。start()函数表示线程开始,pause()函数表示线程暂停,accelerate()函数表示对行星的加速操作,decelerate()函数表示对行星减速的操作。
Pthread类目的是控制线程,即通过对Pthread类的实例化可以控制行星的开始运动,暂停运动,加速,减速。Pthread类继承自Thread类,且包含于Starts类中,因而,PThread类不能被定义为共有类。PThread类提供了run()方法,不断调用repaint()方法,对画面进行重新绘制。setsuspend()方法利用改变boolean变量对线程进行暂停操作(调用notifyall()方法)。因为Pthread类是Starts的内部类,所以之后Starts类中将生成一个PThread类的对象,并且利用该对象,对线程进行操作。
设计如下:
package Star;
import java.awt.Color;
import java.awt.Graphics;
public class Stars extends Star{
  /**
   * 运动的行星
   */
  private static final long serialVersionUID = 1L;
  double alfa ;
  double speed ;
  Star center;
  int Long ; //长轴
  int Short;//短轴
  public Stars(int Px,int Py,Star center){
    super(Px,Py);
    this.center = center;
    Long = (Px - center.x)*2;
    Short = (Py - center.y)*2;
    this.setOpaque(true);
//   move();
    alfa = 0;
    speed = 0.001;
  }
  protected void paintComponent(Graphics g){
    super.paintComponent(g);
    center.draw(g);//画出中心点
    move();
    g.setColor(Color.GREEN);
    g.drawOval(center.x-Long/2, center.y-Short/2, Long, Short);
  }
  public void move(){
    x = center.x + (int)(Long/2*Math.cos(alfa));
    y = center.y + (int)(Short/2*Math.sin(alfa));
    //沿椭圆轨迹运行
    alfa += speed;
    //角度不断变化
  }
  class PThread extends Thread{
  //重画线程类
    private boolean suspend = true;
    private String control = "";
    public void run(){
      while(true){
        synchronized (control) {
          if(suspend){
            //move();
            repaint();
          }
        }
      }
    }
    public void setsuspend(boolean s){
      //设置线程暂停方法
       if (!suspend) {
         synchronized (control) {
           control.notifyAll();
         }
       }
      this.suspend = s;
    }
  }
  public PThread pt = new PThread();
  public void start(){
    pt.setsuspend(true);
    pt.start();
  }
  public void pause(){
    pt.setsuspend(false);
  }
  public void accelerate(){
    //加速的方法
    if(speed > 0){
      //角度每次加速0.0002
      speed += 0.0002;
    }
    else
      speed = 0.001;
  }
  public void decelerate(){
    //减速的方法
    if(speed > 0){
      speed -= 0.0002;
      //角度每次减速0.0002
    }
    //若减速到0,则不能继续减速,另速度为0,停止运动
    else speed = 0;
  }
}
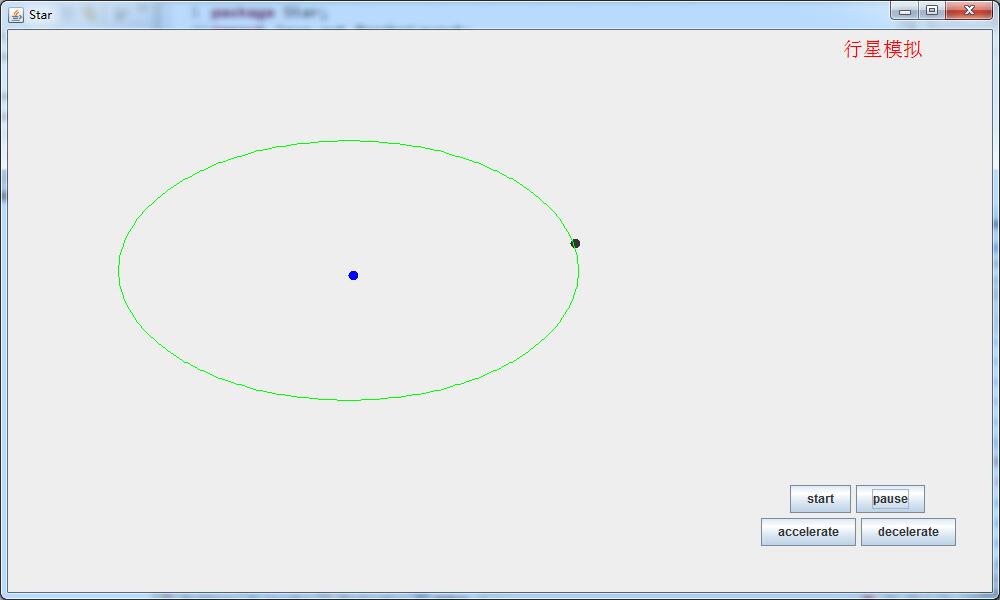
StarFrame类是本程序的启动面板,通过实例化该类,生成主程序界面,并且将行星部件,按钮,标签添加进面板。内部的getPanel()方法对两个按钮进行了设置,并且返回一个JPanel(将四个按钮添加进该JPanel中)。getLabel()方法返回一个文字描述的JLabel。Center对象是Star类的实例化,p1是Stars类的实例化,分别表示中心行星与环绕行星。jb1,jb2,jb3,jb4分别是行星的启动,暂停,加速,减速的控制按钮。image表示界面背景图,LayeredPanel是界面的层次面板,方便背景图的设置。jp,jl是设置背景图的部件。设计如下:
package Star;
import java.awt.BorderLayout;
import java.awt.Color;
import java.awt.Font;
import java.awt.event.ActionEvent;
import java.awt.event.ActionListener;
import javax.swing.ImageIcon;
import javax.swing.JButton;
import javax.swing.JFrame;
import javax.swing.JLabel;
import javax.swing.JLayeredPane;
import javax.swing.JPanel;
public class StarFrame extends JFrame{
  /**
   *行星模拟启动面板
   */
  private static final long serialVersionUID = 1L;
  Star center = new Star(300,200);//定义中心行星
  Stars p1 = new Stars(300+230,200+130,center);//环绕中心的行星
  Stars p2 = new Stars(300+230+20,200+130+20,p1);
  JButton jb1 = new JButton("start");
  JButton jb2 = new JButton("pause");
  JButton jb3 = new JButton("accelerate");
  JButton jb4 = new JButton("decelerate");
  ImageIcon image=new ImageIcon("timg.jpg");//背景图,利用相对路径定义
  JLayeredPane layeredPane; //定义一个层次面板,用于放置背景图片
  JPanel jp;
  JLabel jl;
  public StarFrame(){
    //为p1设置位置,与大小
    p1.setBounds(40,40,600,400);
//   p2.setBounds(40,40,600,400);
    //定义背景图,将背景图放于JLabel中,将JLabel放于JPanel中
    layeredPane = new JLayeredPane();
    jp = new JPanel();
    jp.setBounds(0,0,image.getIconWidth(),image.getIconHeight());
    jl=new JLabel(image);
    jp.add(jl);
    //将jp放到最底层。
    layeredPane.add(jp,JLayeredPane.DEFAULT_LAYER);
    //将jb放到高一层的地方
    layeredPane.add(p1,JLayeredPane.MODAL_LAYER);
//   layeredPane.add(p2,JLayeredPane.MODAL_LAYER);
    layeredPane.add(getPanel(),JLayeredPane.MODAL_LAYER);
    layeredPane.add(getLabel(),JLayeredPane.MODAL_LAYER);
    //分别为jb1、jb2、jb3、jb4设置相关动作
    jb1.addActionListener(new ActionListener(){
      public void actionPerformed(ActionEvent e) {
        // TODO Auto-generated method stub
        p1.start();
      }
    }
    );
    jb2.addActionListener(new ActionListener(){
      public void actionPerformed(ActionEvent e) {
        // TODO Auto-generated method stub
        p1.pause();
      }
    });
    jb3.addActionListener(new ActionListener(){
      public void actionPerformed(ActionEvent e) {
        // TODO Auto-generated method stub
        p1.accelerate();
      }
    });
    jb4.addActionListener(new ActionListener(){
      public void actionPerformed(ActionEvent e) {
        // TODO Auto-generated method stub
        p1.decelerate();
      }
    });
    this.setLayeredPane(layeredPane);
    this.setTitle("Star");
    this.setBounds(100,100,1000, 600);
    this.setDefaultCloseOperation(JFrame.EXIT_ON_CLOSE);
    this.setVisible(true);
  }
  private JPanel getPanel(){
    //返回定义的四个按钮
    JPanel jp = new JPanel();
    jp.add(jb1);
    jp.add(jb2);
    jp.add(jb3);
    jp.add(jb4);
    jp.setBounds(750,450,200,70);
    return jp;
  }
  private JPanel getLabel(){
    //返回文字描述
    JLabel jl = new JLabel("行星模拟");
    jl.setForeground(Color.RED);//设置字体颜色
    jl.setFont(new Font("Dialog",0,20));//设置字体
    JPanel jp = new JPanel();
    jp.add(jl,BorderLayout.CENTER);
    jp.setBounds(800,0,150,40);
    return jp;
  }
  public static void main(String[] args) {
    @SuppressWarnings("unused")
    StarFrame f = new StarFrame();
  }
}
运行效果:

二、对象:
因为java是面向对象的语言,当然不能像c语言一样,仅仅靠函数实现,课设里岂能没有对象?
主要对象:
对象center,即中心行星
对象p1,即环绕行星
对象pt,即负责控制线程的对象
对象f,即程序启动面板
三、对象之间的关系(交互)
p1与center的关系:Star类是行星的基类,继承自JPanel,其内部定义了基本的半径与坐标,其实例化对象center即是运动行星的中心行星。而继承自Star的Stars类表示运动行星,是其进一步的细化,因此其实例化对象p1表示运动的行星1,且围绕着center运动,同时center作为参数传递给p1的构造方法,完成二者交互。对象p1与center便是这样的关系。实例化对象center后,便会在指定坐标下绘制实心圆形,center对象的x,y坐标不会变化。而对象p1在实现绘制实心圆形的基础上,又根据center的坐标绘制了指定长轴,短轴的椭圆轨道,同时其内部实现了Thread类,不中断的执行线程。相互的继承关系,使得center和p1可以互不干扰的绘制图形,值得一提的是,在Stras类中的paintComponent()方法中,仍需要调用center对象的draw()方法,因为线程开始时会调用repaint()方法,如果不实现center的draw()方法,那么最终结果将不会显示中心行星。
pt与p1的关系:PThread类继承自Thread类,定义了run()方法,通过其实例化对象p1,可以调用start()方法启动线程,而PThread类在Starts类内部,因而通过p1内的方法可以控制线程,即控制其速度,加速减速,控制其运行与否。
f与各对象的关系:StarFrame继承自JFrame,其实例化对象f将各对象添加进绘画布里,制作了界面,并控制了每个部件的大小、位置,是程序运行的关键。
看完上述内容,你们掌握使用Java怎么模拟行星运动的方法了吗?如果还想学到更多技能或想了解更多相关内容,欢迎关注亿速云行业资讯频道,感谢各位的阅读!
免责声明:本站发布的内容(图片、视频和文字)以原创、转载和分享为主,文章观点不代表本网站立场,如果涉及侵权请联系站长邮箱:is@yisu.com进行举报,并提供相关证据,一经查实,将立刻删除涉嫌侵权内容。