您好,登录后才能下订单哦!
小编给大家分享一下Xamarin XAML语言中如何在页面级别中构建ControlTemplate控件模板,相信大部分人都还不怎么了解,因此分享这篇文章给大家参考一下,希望大家阅读完这篇文章后大有收获,下面让我们一起去了解一下吧!
2.在页面级别中构建控件模板
如果开发者要在页面级别中构建控件模板,首先必须将ResourceDictionary添加到页面中,然后在ResourceDictionary中实现模板的构建即可,其语法形式如下:
<Page>
<Page.Resources>
<ResourceDictionary>
<ControlTemplate x:Key="KeyName">
……
</ControlTemplate>
</ResourceDictionary>
</Page.Resources>
</Page>
其中,Page表示的是页面以及页面的子类。KeyName用来指定一个字典键,此键指代的就是控件模板。
【示例14-4:ControlTemplateContentPage】以下将在内容页面中构建控件模板。代码如下:
<?xml version="1.0" encoding="utf-8" ?>
<ContentPage xmlns="http://xamarin.com/schemas/2014/forms"
xmlns:x="http://schemas.microsoft.com/winfx/2009/xaml"
xmlns:local="clr-namespace:ControlTemplateContentPage"
x:Class="ControlTemplateContentPage.MainPage">
<ContentPage.Resources>
<ResourceDictionary>
<!--构建控件模板-->
<ControlTemplate x:Key="TealTemplate">
<StackLayout VerticalOptions="CenterAndExpand"
Spacing="20"
Padding="20">
<Entry Placeholder="Username" />
<Entry Placeholder="Password"
IsPassword="True"/>
<Button Text="Click Here To Log In" />
<ContentPresenter />
</StackLayout>
</ControlTemplate>
</ResourceDictionary>
</ContentPage.Resources>
<ContentView x:Name="contentView"
Padding="0,20,0,0"
ControlTemplate="{StaticResource TealTemplate}">
<Frame OutlineColor="Accent">
<Label Text="请在确认环境安全后,输入账号和对应的密码"
FontAttributes="Bold"
FontSize="18"/>
</Frame>
</ContentView>
</ContentPage>
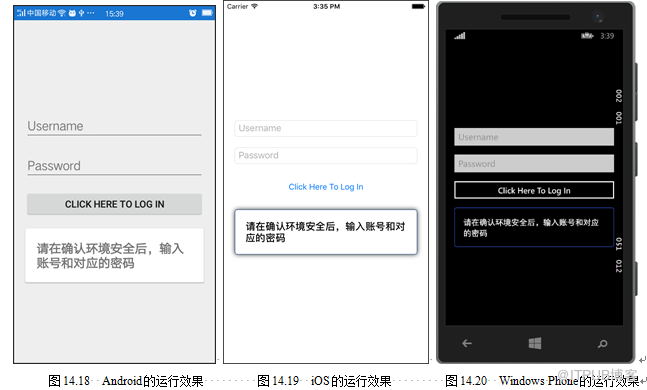
此时运行程序,会看到如图14.18~14.20所示的效果。
以上是“Xamarin XAML语言中如何在页面级别中构建ControlTemplate控件模板”这篇文章的所有内容,感谢各位的阅读!相信大家都有了一定的了解,希望分享的内容对大家有所帮助,如果还想学习更多知识,欢迎关注亿速云行业资讯频道!
免责声明:本站发布的内容(图片、视频和文字)以原创、转载和分享为主,文章观点不代表本网站立场,如果涉及侵权请联系站长邮箱:is@yisu.com进行举报,并提供相关证据,一经查实,将立刻删除涉嫌侵权内容。