жӮЁеҘҪпјҢзҷ»еҪ•еҗҺжүҚиғҪдёӢи®ўеҚ•е“ҰпјҒ
Springmvc DispatcherServletзҡ„еҺҹзҗҶи§ЈжһҗпјҹеҫҲеӨҡж–°жүӢеҜ№жӯӨдёҚжҳҜеҫҲжё…жҘҡпјҢдёәдәҶеё®еҠ©еӨ§е®¶и§ЈеҶіиҝҷдёӘйҡҫйўҳпјҢдёӢйқўе°Ҹзј–е°ҶдёәеӨ§е®¶иҜҰз»Ҷи®Іи§ЈпјҢжңүиҝҷж–№йқўйңҖжұӮзҡ„дәәеҸҜд»ҘжқҘеӯҰд№ дёӢпјҢеёҢжңӣдҪ иғҪжңүжүҖ收иҺ·гҖӮ
DispatcherServlet жҳҜеүҚз«ҜжҺ§еҲ¶еҷЁи®ҫи®ЎжЁЎејҸзҡ„е®һзҺ°пјҢжҸҗдҫӣ Spring Web MVC зҡ„йӣҶдёӯи®ҝй—®зӮ№пјҢиҖҢдё”иҙҹиҙЈиҒҢиҙЈзҡ„еҲҶжҙҫпјҢиҖҢдё”дёҺ Spring IoC е®№еҷЁж— зјқйӣҶжҲҗпјҢд»ҺиҖҢеҸҜд»ҘиҺ·еҫ— Spring зҡ„жүҖжңүеҘҪеӨ„гҖӮDispatcherServlet дё»иҰҒз”ЁдҪңиҒҢиҙЈи°ғеәҰе·ҘдҪңпјҢжң¬иә«дё»иҰҒз”ЁдәҺжҺ§еҲ¶жөҒзЁӢпјҢдё»иҰҒиҒҢиҙЈеҰӮдёӢпјҡ
DispathcherServletй…ҚзҪ®иҜҰи§Ј
		<servlet>
    <servlet-name>SpringMVC</servlet-name>
    <servlet-class>org.springframework.web.servlet.DispatcherServlet</servlet-class>
    <init-param>
      <param-name>contextConfigLocation</param-name>
      <param-value>classpath:spring-mvc.xml</param-value>
    </init-param>
    <load-on-startup>1</load-on-startup>
  </servlet>
  <!-- servlet-mapping -->
  <servlet-mapping>
    <servlet-name>SpringMVC</servlet-name>
    <url-pattern>/</url-pattern>
  </servlet-mapping>
Springй…ҚзҪ®
е…Ҳж·»еҠ дёҖдёӘserviceеҢ…пјҢжҸҗдҫӣдёҖдёӘHelloServiceзұ»пјҢеҰӮдёӢпјҡ
@Service
public class HelloService {
	public String hello(String name) {
		return "hello " + name;
		}
}ж·»еҠ applicationContext.xml
<?xml version="1.0" encoding="UTF-8"?>
<beans xmlns="http://www.springframework.org/schema/beans"
xmlns:xsi="http://www.w3.org/2001/XMLSchema-instance"
xmlns:context="http://www.springframework.org/schema/context"
xsi:schemaLocation="http://www.springframework.org/schema/beans
http://www.springframework.org/schema/beans/spring-beans.xsd
http://www.springframework.org/schema/context
https://www.springframework.org/schema/context/spring-context.xsd">
<context:component-scan base-package="org.javaboy" use-default-filters="true">
<context:exclude-filter type="annotation"
expression="org.springframework.stereotype.Controller"/>
</context:component-scan>
</beans>иҝҷдёӘй…ҚзҪ®ж–Ү件й»ҳи®Өжғ…еҶөдёӢпјҢ并дёҚдјҡиў«иҮӘе®ҡеҠ иҪҪпјҢжүҖжңүпјҢйңҖиҰҒжҲ‘们еңЁweb.xmlеҜ№е…¶иҝӣиЎҢй…ҚзҪ®
<context-param>
	<param-name>contextConfigLocation</param-name>
	<param-value>classpath:applicationContext.xml</param-value>
</context-param>
<listener>
	<listener-class>org.springframework.web.context.ContextLoaderListener</listener-class> </listener>
йҰ–е…ҲйҖҡиҝҮ context-param жҢҮе®ҡ Spring й…ҚзҪ®ж–Ү件зҡ„дҪҚзҪ®пјҢиҝҷдёӘй…ҚзҪ®ж–Ү件д№ҹжңүдёҖдәӣй»ҳи®Ө规еҲҷпјҢе®ғзҡ„й…ҚзҪ®ж–Ү件еҗҚй»ҳи®Өе°ұеҸ« applicationContext.xml пјҢ并且пјҢеҰӮжһңдҪ е°ҶиҝҷдёӘй…ҚзҪ®ж–Ү件ж”ҫеңЁ WEB-INF зӣ®еҪ•дёӢпјҢйӮЈд№ҲиҝҷйҮҢе°ұеҸҜд»ҘдёҚз”ЁжҢҮе®ҡй…ҚзҪ®ж–Ү件дҪҚзҪ®дәҶпјҢеҸӘйңҖиҰҒжҢҮе®ҡзӣ‘еҗ¬еҷЁе°ұеҸҜд»ҘдәҶгҖӮиҝҷж®өй…ҚзҪ®жҳҜ Spring йӣҶжҲҗ Web зҺҜеўғзҡ„йҖҡз”Ёй…ҚзҪ®пјӣдёҖиҲ¬з”ЁдәҺеҠ иҪҪйҷӨ Web еұӮзҡ„ BeanпјҲеҰӮDAOгҖҒService зӯүпјүпјҢд»ҘдҫҝдәҺдёҺе…¶д»–д»»дҪ•WebжЎҶжһ¶йӣҶжҲҗгҖӮ
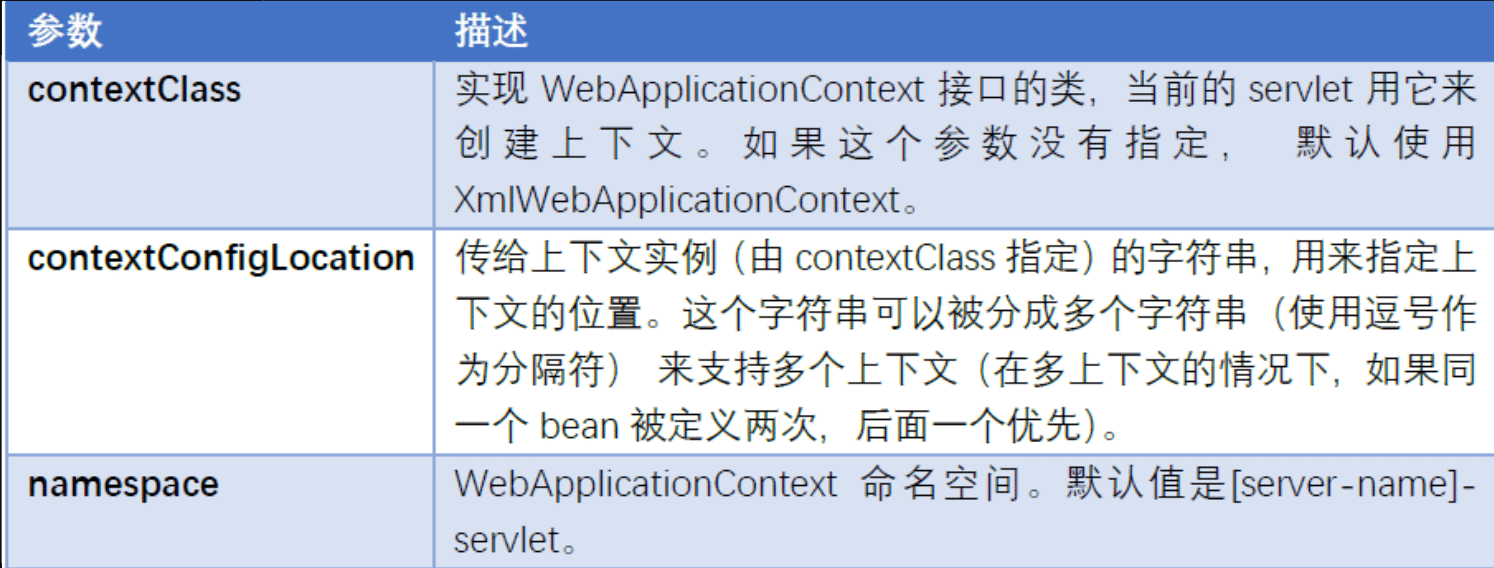
contextConfigLocation: иЎЁзӨәз”ЁдәҺеҠ иҪҪBeanзҡ„й…ҚзҪ®ж–Ү件
contextClass: иЎЁзӨәз”ЁдәҺеҠ иҪҪ Beanзҡ„ ApplicationContext е®һзҺ°зұ»пјҢй»ҳи®Ө WebApplicationContextгҖӮ
еңЁMyControllerдёӯжіЁе…ҘHelloService:
@org.springframework.stereotype.Controller("/hello")
public class MyController implements Controller {
@Autowired
HelloService helloService;
/**
* иҝҷе°ұжҳҜдёҖдёӘиҜ·жұӮеӨ„зҗҶжҺҘеҸЈ
* * @param req иҝҷе°ұжҳҜеүҚз«ҜеҸ‘йҖҒжқҘзҡ„иҜ·жұӮ
* * @param resp иҝҷе°ұжҳҜжңҚеҠЎз«Ҝз»ҷеүҚз«Ҝзҡ„е“Қеә”
* * @return иҝ”еӣһеҖјжҳҜдёҖдёӘ ModelAndViewпјҢModel зӣёеҪ“дәҺжҳҜжҲ‘们зҡ„ж•°жҚ®жЁЎеһӢпјҢ
* View жҳҜжҲ‘们зҡ„и§Ҷеӣҫ * @throws Exception
*/
public ModelAndView handleRequest(HttpServletRequest req, HttpServletResponse resp) throws Exception {
System.out.println(helloService.hello("javaboy"));
ModelAndView mv = new ModelAndView("hello");
mv.addObject("name", "javaboy");
return mv;
}
}дёәдәҶеңЁ SpringMVC е®№еҷЁдёӯиғҪеӨҹжү«жҸҸеҲ° MyController пјҢиҝҷйҮҢз»ҷ MyController ж·»еҠ дәҶ @Controller жіЁи§ЈпјҢеҗҢж—¶пјҢз”ұдәҺжҲ‘们зӣ®еүҚйҮҮз”Ёзҡ„ HandlerMapping жҳҜ BeanNameUrlHandlerMappingпјҲж„Ҹе‘ізқҖиҜ·жұӮең°еқҖе°ұжҳҜеӨ„зҗҶеҷЁ Bean зҡ„еҗҚеӯ—пјүпјҢжүҖд»ҘпјҢиҝҳйңҖиҰҒжүӢеҠЁжҢҮе®ҡ MyController зҡ„еҗҚеӯ—гҖӮ
жңҖеҗҺпјҢдҝ®ж”№ SpringMVC зҡ„й…ҚзҪ®ж–Ү件пјҢе°Ҷ Bean й…ҚзҪ®дёәжү«жҸҸеҪўејҸпјҡ
<context:component-scan base-package="org.javaboy.helloworld" use-default-filters="false">
		<context:include-filter type="annotation" expression="org.springframework.stereotype.Controller"/>
</context:component-scan>
<!--иҝҷдёӘжҳҜеӨ„зҗҶеҷЁжҳ е°„еҷЁпјҢиҝҷз§Қж–№ејҸпјҢиҜ·жұӮең°еқҖе…¶е®һе°ұжҳҜдёҖдёӘ Bean зҡ„еҗҚеӯ—пјҢ然еҗҺж №жҚ®иҝҷдёӘ bean зҡ„еҗҚеӯ—жҹҘжүҫеҜ№еә”зҡ„еӨ„зҗҶеҷЁ--> <bean class="org.springframework.web.servlet.handler.BeanNameUrlHandlerMapping" id="handlerMapping"> <property name="beanName" value="/hello"/> </bean> <bean class="org.springframework.web.servlet.mvc.SimpleControllerHandlerAdapter" id="handlerAdapter"/> <!--и§Ҷеӣҫи§ЈжһҗеҷЁ--> <bean class="org.springframework.web.servlet.view.InternalResourceViewResolver" id="viewResolver"> <property name="prefix" value="/jsp/"/> <property name="suffix" value=".jsp"/> </bean>
й…ҚзҪ®е®ҢжҲҗеҗҺпјҢеҶҚж¬ЎеҗҜеҠЁйЎ№зӣ®пјҢSpring е®№еҷЁд№ҹе°Ҷдјҡиў«еҲӣе»әгҖӮи®ҝй—® /hello жҺҘеҸЈпјҢHelloService дёӯзҡ„ hello ж–№жі•е°ұдјҡиҮӘеҠЁиў«и°ғз”ЁгҖӮ
дёӨдёӘе®№еҷЁ

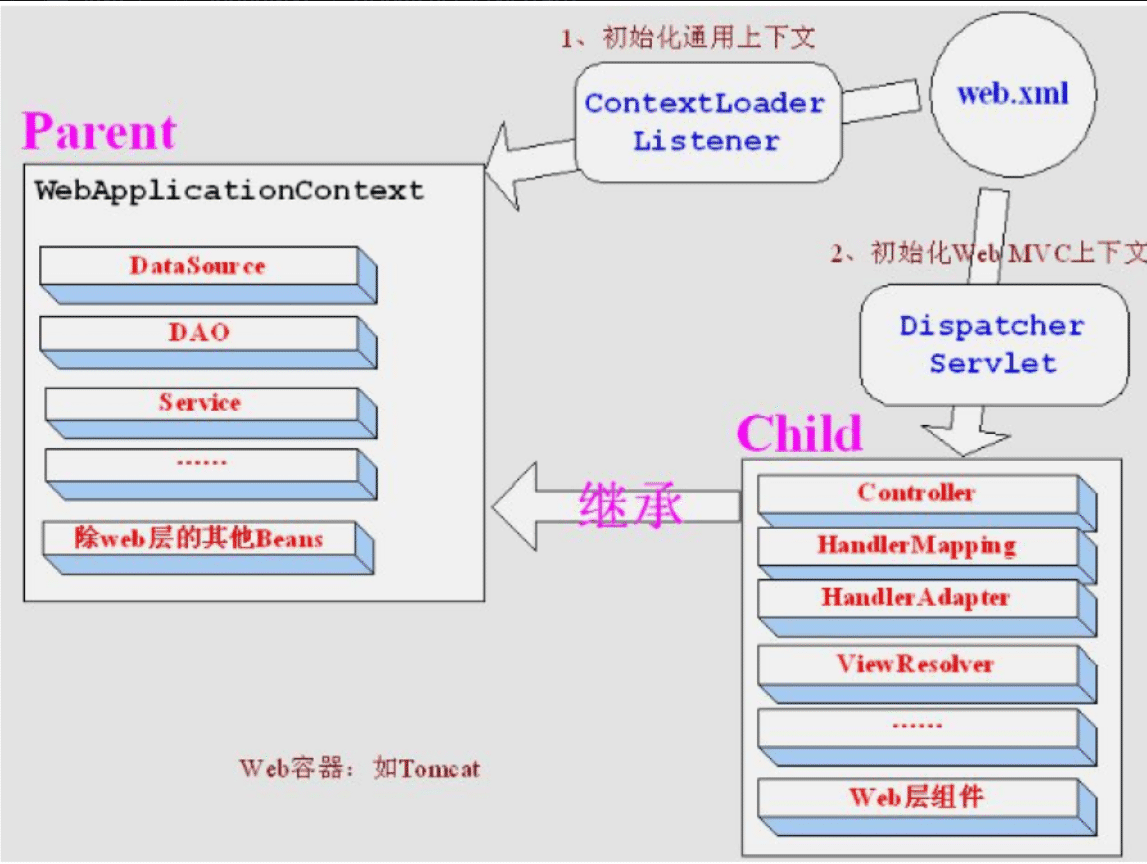
еҪ“ Spring е’Ң SpringMVC еҗҢж—¶еҮәзҺ°пјҢжҲ‘们зҡ„йЎ№зӣ®дёӯе°ҶеӯҳеңЁдёӨдёӘе®№еҷЁпјҢдёҖдёӘжҳҜ Spring е®№еҷЁпјҢеҸҰдёҖдёӘжҳҜ SpringMVC е®№еҷЁпјҢSpring е®№еҷЁйҖҡиҝҮ ContextLoaderListener жқҘеҠ иҪҪпјҢSpringMVC е®№еҷЁеҲҷйҖҡиҝҮ DispatcherServlet жқҘеҠ иҪҪпјҢиҝҷдёӨдёӘе®№еҷЁдёҚдёҖж ·пјҡ
д»ҺеӣҫдёӯеҸҜд»ҘзңӢеҮәпјҡ
иҝҷдёӘжҳҜдёҚеҸҜиғҪзҡ„гҖӮеӣ дёәиҜ·жұӮиҫҫеҲ°жңҚеҠЎз«ҜеҗҺпјҢжүҫDispatcherServlet еҺ»еӨ„зҗҶпјҢеҸӘдјҡеҺ» SpringMVC е®№еҷЁдёӯжүҫпјҢиҝҷе°ұж„Ҹе‘ізқҖController еҝ…йЎ»еңЁ SpringMVC е®№еҷЁдёӯжү«жҸҸгҖӮ
2.дёәд»Җд№ҲдёҚеңЁ SpringMVC е®№еҷЁдёӯжү«жҸҸжүҖжңү Beanпјҹ
иҝҷдёӘжҳҜеҸҜд»Ҙзҡ„пјҢеҸҜд»ҘеңЁSpringMVC е®№еҷЁдёӯжү«жҸҸжүҖжңү BeanгҖӮдёҚеҶҷеңЁдёҖиө·пјҢжңүдёӨдёӘж–№йқўзҡ„еҺҹеӣ пјҡ
зңӢе®ҢдёҠиҝ°еҶ…е®№жҳҜеҗҰеҜ№жӮЁжңүеё®еҠ©е‘ўпјҹеҰӮжһңиҝҳжғіеҜ№зӣёе…ізҹҘиҜҶжңүиҝӣдёҖжӯҘзҡ„дәҶи§ЈжҲ–йҳ…иҜ»жӣҙеӨҡзӣёе…іж–Үз« пјҢиҜ·е…іжіЁдәҝйҖҹдә‘иЎҢдёҡиө„и®Ҝйў‘йҒ“пјҢж„ҹи°ўжӮЁеҜ№дәҝйҖҹдә‘зҡ„ж”ҜжҢҒгҖӮ
е…ҚиҙЈеЈ°жҳҺпјҡжң¬з«ҷеҸ‘еёғзҡ„еҶ…е®№пјҲеӣҫзүҮгҖҒи§Ҷйў‘е’Ңж–Үеӯ—пјүд»ҘеҺҹеҲӣгҖҒиҪ¬иҪҪе’ҢеҲҶдә«дёәдё»пјҢж–Үз« и§ӮзӮ№дёҚд»ЈиЎЁжң¬зҪ‘з«ҷз«ӢеңәпјҢеҰӮжһңж¶үеҸҠдҫөжқғиҜ·иҒ”зі»з«ҷй•ҝйӮ®з®ұпјҡis@yisu.comиҝӣиЎҢдёҫжҠҘпјҢ并жҸҗдҫӣзӣёе…іиҜҒжҚ®пјҢдёҖз»ҸжҹҘе®һпјҢе°Ҷз«ӢеҲ»еҲ йҷӨж¶үе«ҢдҫөжқғеҶ…е®№гҖӮ
жӮЁеҘҪпјҢзҷ»еҪ•еҗҺжүҚиғҪдёӢи®ўеҚ•е“ҰпјҒ