您好,登录后才能下订单哦!
密码登录
登录注册
点击 登录注册 即表示同意《亿速云用户服务条款》
本篇文章给大家分享的是有关利用JS实现一个无限轮播图功能,小编觉得挺实用的,因此分享给大家学习,希望大家阅读完这篇文章后可以有所收获,话不多说,跟着小编一起来看看吧。
效果展示

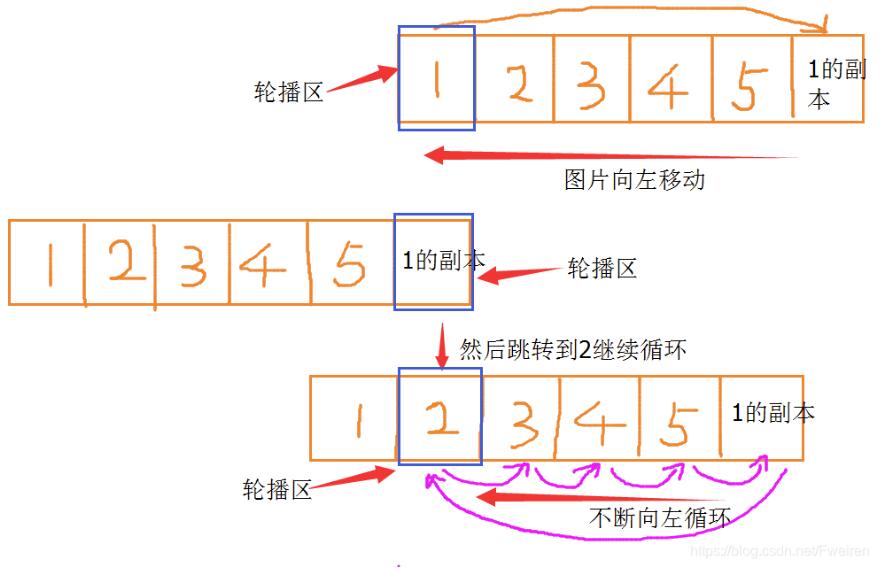
图片说明原理
轮播顺序:1–>2–>3–>4–>5–>1的副本–>2–>3–>4–>5–>1的副本–>2…一直循环
鼠标进入图片时自动轮播暂停,离开后恢复
代码
<!DOCTYPE html>
<html lang="en">
<head>
  <meta charset="UTF-8">
  <title>无限轮播</title>
  <style>
    * {
      margin: 0;
      padding: 0;
      list-style: none;
    }
    img {
      vertical-align: top;
    }
    #slider {
      width: 520px;
      height: 280px;
      border: 1px solid #000;
      padding: 10px;
      margin: 100px auto;
      position: relative;

    }
    #top {
      width: 100%;
      height: 100%;
      position: relative;
      overflow: hidden;
    }
    #top ul {
      width: 3120px;
      height: 100%;
      position: absolute;
      left: 0;
      top: 0;
    }
    #top ul li {
      width: 520px;
      height: 280px;
      float: left;
    }
    #slider ol {
      position: absolute;
      right: 10px;
      bottom: 10px;
    }
    #slider ol li {
      width: 20px;
      height: 20px;
      background-color: darkgrey;
      display: inline-block;
      border-radius: 50%;
      margin-right: 3px;
      cursor: pointer;
    }
    #slider ol li.current {
      background-color: orangered;
    }
  </style>
</head>
<body>
  <div id="slider">
    <div id="top">
      <ul id="ul">
        <li><img src="images/pic01.jpg" alt=""></li>
        <li><img src="images/pic02.jpg" alt=""></li>
        <li><img src="images/pic03.jpg" alt=""></li>
        <li><img src="images/pic04.jpg" alt=""></li>
        <li><img src="images/pic05.jpg" alt=""></li>
      </ul>
    </div>
    <ol id="ol">
    </ol>
  </div>
<script src="js/myFunc.js"></script>
<script>
  window.onload = function () {
    // 1.获取需要的标签
    var lis = $("ul").children;

    // 6.自动轮播参数定义(图片索引,圆点索引)
    var currentIndex = 0, indicatorIndex = 0;

    // 2.克隆li标签(将第一个li标签克隆一份到最后一个li标签后面)
    $("ul").appendChild(lis[0].cloneNode(true));

    // 3.动态创建右下角的圆点
    for(var i=0; i<lis.length-1; i++){ // 因为克隆了一个li,所以需要减1
      var li = document.createElement("li");
      $("ol").appendChild(li);
    }

    // 4.第一个圆点选中
    $("ol").children[0].className = "current";

    // 5.监听鼠标进入圆点
    var olLis = $("ol").children;
    for(var j=0; j<olLis.length; j++){
      (function (j) { // 闭包
        // 5.1 获取单独的li标签
        var li = olLis[j];

        // 5.2 鼠标进入
        li.onmouseover = function () {
          for(var i=0; i<olLis.length; i++){ // 排他思想
            olLis[i].className = "";
          }

          this.className = "current";

          // 5.3 轮播图动起来
          constant($("ul"), -(520 * j), 60);

          // 6.1
          currentIndex = indicatorIndex = j;
        }
      })(j)
    }

    // 7.自动轮播
    var timer = setInterval(autoPlay, 1000);

    // 8.清除和设置定时器
    $("slider").onmouseover = function () {
      clearInterval(timer);
    };

    $("slider").onmouseout = function () {
      timer = setInterval(autoPlay, 1000);
    };

    /**
     * 自动轮播函数
     */
    function autoPlay() {
      // 7.1 ul 滚动起来
      currentIndex++;
      if(currentIndex > lis.length-1){
        $("ul").style.left = 0;
        currentIndex = 1;
      }
      constant($("ul"), -currentIndex * 520, 60);

      // 7.2 圆点滚动起来
      indicatorIndex++;
      if(indicatorIndex > olLis.length-1){
        indicatorIndex = 0;
      }
      for(var i=0; i<olLis.length; i++){ // 排他思想
        olLis[i].className = "";
      }

      olLis[indicatorIndex].className = "current";
    }
  }
</script>
</body>
</html>
以上就是利用JS实现一个无限轮播图功能,小编相信有部分知识点可能是我们日常工作会见到或用到的。希望你能通过这篇文章学到更多知识。更多详情敬请关注亿速云行业资讯频道。
免责声明:本站发布的内容(图片、视频和文字)以原创、转载和分享为主,文章观点不代表本网站立场,如果涉及侵权请联系站长邮箱:is@yisu.com进行举报,并提供相关证据,一经查实,将立刻删除涉嫌侵权内容。