您好,登录后才能下订单哦!
密码登录
登录注册
点击 登录注册 即表示同意《亿速云用户服务条款》
这篇文章运用简单易懂的例子给大家介绍利用JS实现一个轮播图功能,内容非常详细,感兴趣的小伙伴们可以参考借鉴,希望对大家能有所帮助。
效果展示
1.页面截图
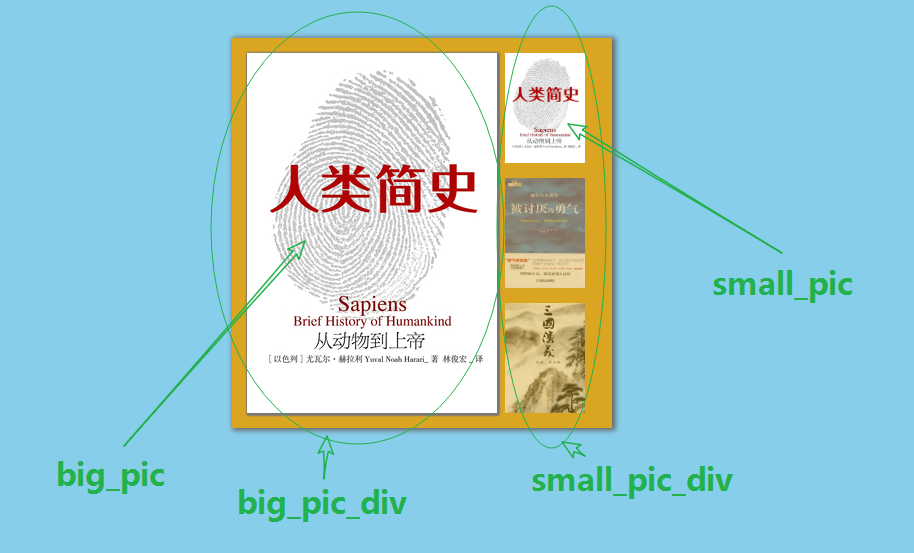
2.相关效果

html 页面
从微信读书上找了几张书籍封面来做轮播的图片。
index.html
<body>
 <div id="container">
  <div class="big_pic_div">
   <div class="prev"></div>
   <div class="next"></div>
   <a href="javascript:;" rel="external nofollow" rel="external nofollow" class="mark_left"></a>
   <a href="javascript:;" rel="external nofollow" rel="external nofollow" class="mark_right"></a>

   <div class="big_pic" ><img src="img/1.jpg" alt=""></div>
   <div class="big_pic"><img src="img/2.jpg" alt=""></div>
   <div class="big_pic"><img src="img/3.jpg" alt=""></div>
   <div class="big_pic"><img src="img/4.jpg" alt=""></div>
   <div class="big_pic"><img src="img/5.jpg" alt=""></div>
   <div class="big_pic"><img src="img/6.jpg" alt=""></div>
  </div>

  <div class="small_pic_div">
   <div class="small_pic" ><img src="img/1.jpg" alt=""></div>
   <div class="small_pic"><img src="img/2.jpg" alt=""></div>
   <div class="small_pic"><img src="img/3.jpg" alt=""></div>
   <div class="small_pic"><img src="img/4.jpg" alt=""></div>
   <div class="small_pic"><img src="img/5.jpg" alt=""></div>
   <div class="small_pic"><img src="img/6.jpg" alt=""></div>
  </div>
 </div>
</body>
css 样式
grid 布局的 gap 不兼容 IE,惹不起。
style.css
body {
 margin: 0;
 padding: 0;
 background: skyblue;
}

#container {
 position: relative;
 overflow: hidden;
 width: 350px;
 height: 390px;
 margin: 50px auto 0;
 padding: 0 15px;
 background: goldenrod;
 box-shadow: 2px 1px 5px 1px #666;
}

.mark_left {
 position: absolute;
 left: 0;
 z-index: 3000;
 width: 65px;
 height: 360px;
}

.mark_right {
 position: absolute;
 right: 0;
 z-index: 3000;
 width: 65px;
 height: 360px;
}

.prev {
 position: absolute;
 top: 150px;
 left: 5px;
 z-index: 3001;
 width: 60px;
 height: 60px;
 background: url(img/btn.gif) olivedrab;
 /* transform: translateY(50%); */
 /* alpha 兼容IE8及以下的IE浏览器 */
 filter: alpha(opacity=0);
 opacity: 0;
}

.next {
 position: absolute;
 top: 120px;
 right: 5px;
 z-index: 3001;
 width: 60px;
 height: 60px;
 background: url(img/btn.gif) olivedrab;
 background-position-y: 60px;
 transform: translateY(50%);
 filter: alpha(opacity=0);
 opacity: 0;
}

.big_pic_div {
 position: relative;
 width: 250px;
 height: 360px;
 padding: 15px 0;
}

.big_pic {
 position: absolute;
 /* height 从 0 到 360px 下滑 */
 overflow: hidden;
 height: 360px;
 box-shadow: 1px 1px 2px #777;
}

.small_pic_div {
 display: grid;
 grid-template: repeat(6, 110px) / 80px;
 gap: 15px;
 position: absolute;
 top: 0;
 left: 273px;
 padding: 15px 0;
}

.small_pic {
 height: 110px;
 filter: alpha(opacity = 60);
 opacity: 0.6;
}

.small_pic img {
 width: 80px;
 height: 100%;
}
JavaScript 实现
多物体运动框架
move.js
// 获取样式
function getStyle(obj, name) {
 if (obj.currentStyle) {
  // IE...
  return obj.currentStyle[name];
 } else {
  // Chrome...
  return getComputedStyle(obj, false)[name];
 }
}

function startMove(obj, attr, target) {
 clearInterval(obj.timer);

 obj.timer = setInterval(function () {
  var cur = 0;

  	// 透明度
  if (attr == 'opacity') {
   cur = Math.round(parseFloat(getStyle(obj, 'opacity')) * 100);
  } else {
   cur = parseInt(getStyle(obj, attr));
  }

  	// 缓冲运动,速度和距离成正比
  var speed = 0;
  speed = (target - cur) / 6;
  	// 1px 是最小的,1.9px 会被当做 1px;得把速度取整,不然并未真正到达目标值 target
  speed = speed > 0 ? Math.ceil(speed) : Math.floor(speed);

  if (cur == target) {
   clearInterval(obj.timer);
  } else {
   // 透明度没有单位,单独考虑
   if (attr == 'opacity') {
    obj.style.filter = 'alpha(opacity = ' + (cur + speed) + ')';
    obj.style.opacity = (cur + speed) / 100;
   } else {
    obj.style[attr] = cur + speed + 'px';
   }
  }
 }, 30);

}
轮播图功能实现
window.onload = function () {
 var markLeft = document.getElementsByClassName('mark_left')[0];
 var markRight = document.getElementsByClassName('mark_right')[0];
 var btnPrev = document.getElementsByClassName('prev')[0];
 var btnNext = document.getElementsByClassName('next')[0];
 var smallPicDiv = document.getElementsByClassName('small_pic_div')[0];
 var smallPic = document.getElementsByClassName('small_pic');
 var bigPic = document.getElementsByClassName('big_pic');
 var nowZIndex = 2;
 var now = 0;
 var container = document.getElementById('container');

 // 左右按钮透明度设置
 btnPrev.onmouseover = markLeft.onmouseover = function () {
  startMove(btnPrev, 'opacity', 100);
 };
 btnPrev.onmouseout = markLeft.onmouseout = function () {
  startMove(btnPrev, 'opacity', 0);
 };
 btnNext.onmouseover = markRight.onmouseover = function () {
  startMove(btnNext, 'opacity', 100);
 };
 btnNext.onmouseout = markRight.onmouseout = function () {
  startMove(btnNext, 'opacity', 0);
 };

 // 点击小图时,大图自动切换
 for (var i = 0; i < smallPic.length; i++) {

  smallPic[i].index = i;

  smallPic[i].onclick = function () {

   if (now == this.index) return;
   // 使用 now 来表示当前选择的小图,当前选中的小图再次点击时不会让大图下滑
   now = this.index;
   bigPic[this.index].style.zIndex = nowZIndex++;
   bigPic[this.index].style.height = 0;
   startMove(bigPic[this.index], 'height', 360);

   // 点击后其他小图变透明,当前选中的为不透明
   for (var i = 0; i < smallPic.length; i++) {
    startMove(smallPic[i], 'opacity', 60);
   }
   startMove(smallPic[this.index], 'opacity', 100);
  };

  // 鼠标移动到小图上时,淡入淡出
  smallPic[i].onmouseover = function () {
   startMove(this, 'opacity', 100);
  };
  smallPic[i].onmouseout = function () {
   if (now != this.index) {
    startMove(this, 'opacity', 60);
   }
  };

 }

 // tab 函数:当前选中图片不透明;图片下滑;小图区域的滚动
 function tab() {
  bigPic[now].style.zIndex = nowZIndex++;
  for (var i = 0; i < smallPic.length; i++) {
   startMove(smallPic[i], 'opacity', 60);
  }
  startMove(smallPic[now], 'opacity', 100);

  bigPic[now].style.height = 0;
  startMove(bigPic[now], 'height', 360);

  if (now == 0) {
   startMove(smallPicDiv, 'top', 0);
  } else if (now == smallPic.length - 1) {
   startMove(smallPicDiv, 'top', -(now - 2) * (smallPic[0].offsetHeight + 15));
  } else {
   startMove(smallPicDiv, 'top', -(now - 1) * (smallPic[0].offsetHeight + 15));
  }
 }

 // 左右按钮点击
 btnPrev.onclick = function () {
  now--;
  if (now == smallPic.length) {
   now = smallPic.length - 1;
  } else if (now < 0) {
   now = smallPic.length - 1;
   // return;
  }
  tab();
 };
 btnNext.onclick = function () {
  now++;
  if (now == smallPic.length) {
   now = 0;
  }
  tab();
 };
 var timer = setInterval(btnNext.onclick, 3000);
 container.onmouseover = function () {
  clearInterval(timer);
 };
 container.onmouseout = function () {
  timer = setInterval(btnNext.onclick, 3000);
 };
};
关于利用JS实现一个轮播图功能就分享到这里了,希望以上内容可以对大家有一定的帮助,可以学到更多知识。如果觉得文章不错,可以把它分享出去让更多的人看到。
免责声明:本站发布的内容(图片、视频和文字)以原创、转载和分享为主,文章观点不代表本网站立场,如果涉及侵权请联系站长邮箱:is@yisu.com进行举报,并提供相关证据,一经查实,将立刻删除涉嫌侵权内容。