您好,登录后才能下订单哦!
本文章向大家介绍利用ASP.NET实现一个个人信息注册页面的基本知识点总结和需要注意事项,具有一定的参考价值,需要的朋友可以参考一下。
ASP.NET 是开源,跨平台,高性能,轻量级的 Web 应用构建框架,常用于通过 HTML、CSS、JavaScript 以及服务器脚本来构建网页和网站。
题目
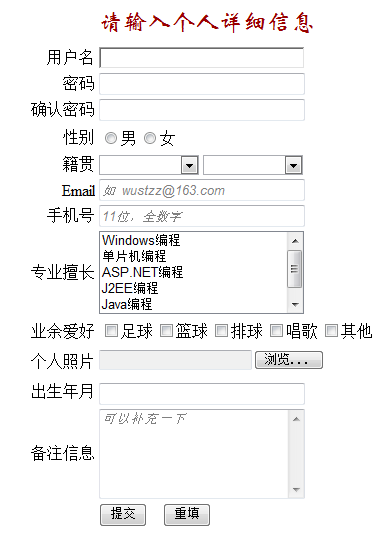
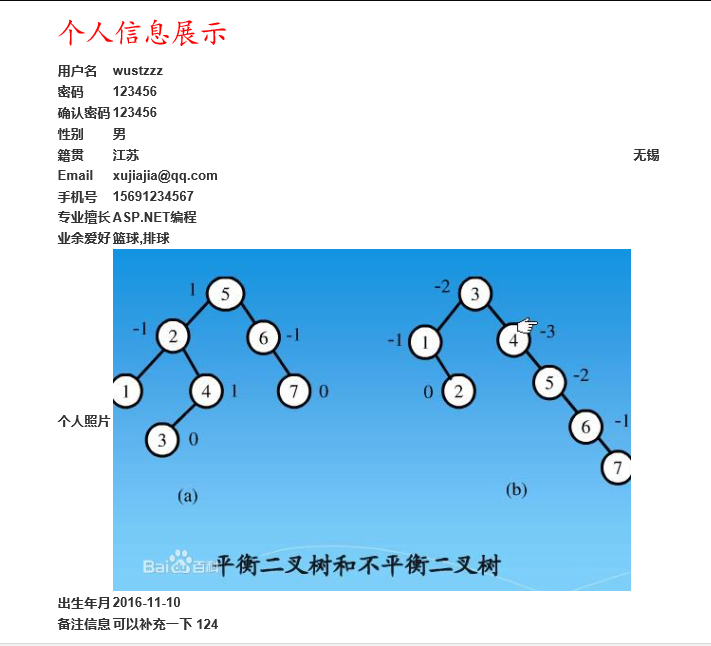
新建一个MVC项目,利用HTML、CSS、JS、jQuery、Ajax、jQuery UI等技术设计一个个人信息注册页面。当点击“提交”按钮时,跳转到新的页面显示录入信息。
基本要求:
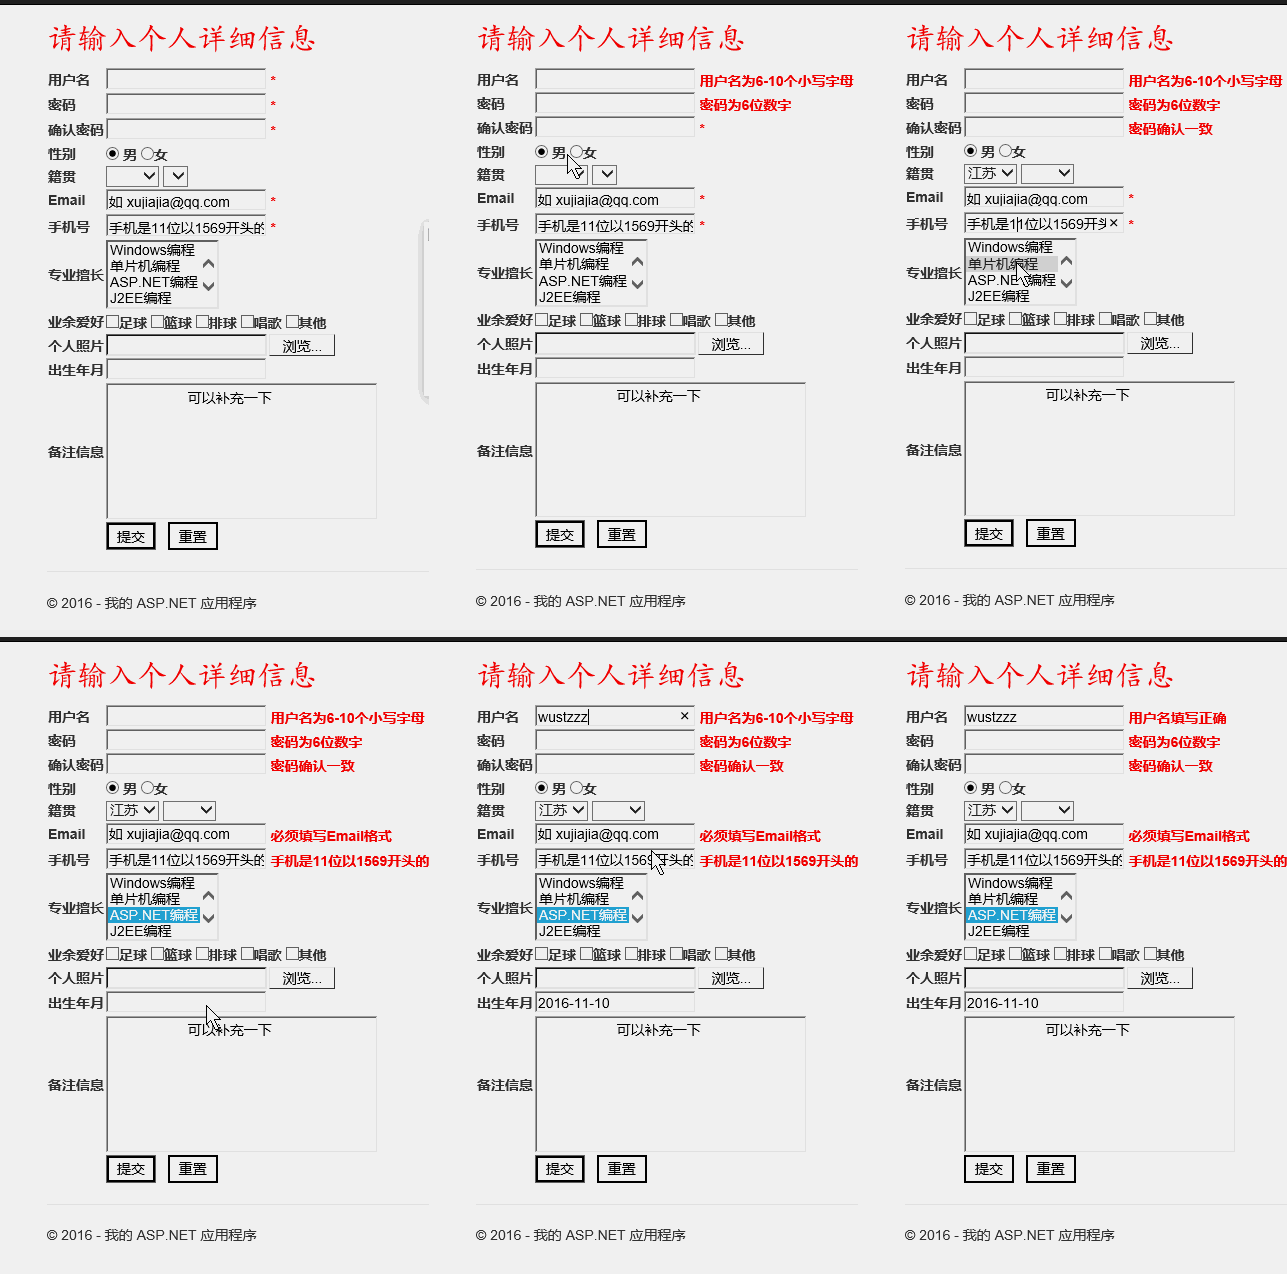
用户名为6-10个小写字母(小写使用正则式验证,且用户名不能为“wustzz” –用Ajax技术来检测);密码为6位数字,确认密码不一致时有提示;籍贯使用级联(jquery实现);Email必须符合Email格式;手机是11位(假设规定以1569开头);出生年月使用jQuery UI日历组件设置;图片要传递到新的页面显示。

实现效果
(源码在文章结尾)


主要涉及知识点
1、基本的html界面编程
2、JavaScript语言
3、jQuery、jQuery UI的使用
4、ASP.NET Request相关操作
5、了解ASP.Net WEB MVC下的目录结构以及基础编程
代码
ProjectController.cs
using System;
using System.Collections.Generic;
using System.Linq;
using System.Web;
using System.Web.Mvc;
namespace ProjectOne.Controllers
{
  public class ProjectController : Controller
  {
    // GET: Project
    public ActionResult Index()
    {
      return View();
    }
    public ActionResult Show()
    {
      //获取图片文件
      HttpPostedFileBase file = Request.Files["filename"];
      if(file != null)
      {
        //将图片存储在/Content/UpLoad/目录下,名字为111.png
        var fileName = Request.MapPath("~/Content/UpLoad/") + "111.png";
        file.SaveAs(fileName);
      }
      return View();
    }
  }
}
Index.cshtml
@{
ViewBag.Title = "Index";
}
<script src="~/Scripts/my_script.js"></script>
<script src="~/jquery-ui-1.11.1.custom/external/jquery/jquery.js"></script>
<script>
$(document).ready(function () {
$("#native_place").change(function () {
switch ($("#native_place").val()) {
case "江苏":
$("#major").empty();
$("#major").append("<option value=''></option>");
$("#major").append("<option value='江阴'>江阴</option>");
$("#major").append("<option value='无锡'>无锡</option>");
$("#major").append("<option value='常州'>常州</option>");
break;
case "湖北":
$("#major").empty();
$("#major").append("<option value=''></option>");
$("#major").append("<option value='武汉'>武汉</option>");
$("#major").append("<option value='武昌'>武昌</option>");
$("#major").append("<option value='荆州'>荆州</option>");
break;
}
});
});
</script>
@section scripts{
<script src="~/jquery-ui-1.11.1.custom/jquery-ui.min.js"></script>
<link href="~/jquery-ui-1.11.1.custom/jquery-ui.min.css" rel="stylesheet" />
<script>
$(document).ready(function () {
$("#birthday").datepicker({
dateFormat: "yy-mm-dd",
inline: true
});
});
</script>
}
<h3 >请输入个人详细信息</h3>
<form onsubmit="return checkAll()" action="~/Project/Show" method="post" enctype="multipart/form-data">
<table>
<tr>
<th>用户名</th>
<th>
<input type="text" onblur="checkName()" name="username" id="username" />
<span id="tip_name">*</span>
</th>
</tr>
<tr>
<th>密码</th>
<th>
<input type="text" onblur="checkPassword()" name="psd" id="psd" />
<span id="tip_psd">*</span>
</th>
</tr>
<tr>
<th>确认密码</th>
<th>
<input type="text" onblur="checkPasswordAgain()" name="psd_again" id="psd_again" />
<span id="tip_psd_again">*</span>
</th>
</tr>
<tr>
<th>性别</th>
<th>
<input type="radio" name="gender" value="男" checked="checked" /> 男
<input type="radio" name="gender" value="女" />女
</th>
</tr>
<tr>
<th>籍贯</th>
<th>
<select id="native_place" name="native_place">
<option value=""></option>
<option value="江苏">江苏</option>
<option value="湖北">湖北</option>
</select>
<select id="major" name="major"></select>
</th>
</tr>
<tr>
<th>Email</th>
<th>
<input type="text" onblur="checkEmail()" id="email" name="email" value="如 xujiajia@qq.com" />
<span id="tip_email">*</span>
</th>
</tr>
<tr>
<th>手机号</th>
<th>
<input type="text" onblur="checkPhone()" id="phone" name="phone" value="手机是11位以1569开头的数字" />
<span id="tip_phone">*</span>
</th>
</tr>
<tr>
<th>专业擅长</th>
<th>
<select name="speciality" multiple="multiple">
<option value="Windows编程">Windows编程</option>
<option value="单片机编程">单片机编程</option>
<option value="ASP.NET编程">ASP.NET编程</option>
<option value="J2EE编程">J2EE编程</option>
<option value="JAVA编程">JAVA编程</option>
</select>
</th>
</tr>
<tr>
<th>业余爱好</th>
<th>
<input type="checkbox" name="hobby" value="足球" />足球
<input type="checkbox" name="hobby" value="篮球" />篮球
<input type="checkbox" name="hobby" value="排球" />排球
<input type="checkbox" name="hobby" value="唱歌" />唱歌
<input type="checkbox" name="hobby" value="其他" />其他
</th>
</tr>
<tr>
<th>个人照片</th>
<th>
<input type="file" id="filename" name="filename" />
</th>
</tr>
<tr>
<th>出生年月</th>
<th>
<input type="text" id="birthday" name="birthday" readonly="readonly" />
</th>
</tr>
<tr>
<th>备注信息</th>
<th>
<textarea name="more_info" cols="40" rows="8">
可以补充一下
</textarea>
</th>
</tr>
<tr>
<th></th>
<th>
<input type="submit" value="提交" />
<input type="reset" value="重置" />
</th>
</tr>
</table>
</form>Show.cshtml
@{
  ViewBag.Title = "Show";
}
<h3 >个人信息展示</h3>
<table>
  <tr>
    <th>用户名</th>
    <th>@Request["username"]</th>
  </tr>
  <tr>
    <th>密码</th>
    <th>@Request["psd"]</th>
  </tr>
  <tr>
    <th>确认密码</th>
    <th>@Request["psd_again"]</th>
  </tr>
  <tr>
    <th>性别</th>
    <th>@Request["gender"]</th>
  </tr>
  <tr>
    <th>籍贯</th>
    <th>@Request["native_place"]</th>
    <th>@Request["major"]</th>
  </tr>
  <tr>
    <th>Email</th>
    <th>@Request["email"]</th>
  </tr>
  <tr>
    <th>手机号</th>
    <th>@Request["phone"]</th>
  </tr>
  <tr>
    <th>专业擅长</th>
    <th>@Request["speciality"]</th>
  </tr>
  <tr>
    <th>业余爱好</th>
    <th>@Request["hobby"]</th>
  </tr>
  <tr>
    <th>个人照片</th>
    <th><img id="img" src="~/Content/UpLoad/111.png" alt="" /></th>
  </tr>
  <tr>
    <th>出生年月</th>
    <th>@Request["birthday"]</th>
  </tr>
  <tr>
    <th>备注信息</th>
    <th>@Request["more_info"]</th>
  </tr>
</table>
my_script.js
function checkName() {
  var u = document.getElementById("username");
  var t = document.getElementById("tip_name");
  var reg = /^[a-z]{6,10}$/;
  if (!reg.test(u.value)) {
    t.innerHTML = "用户名为6-10个小写字母";
    return false;
  } else {
    if (u.value == "wustzz") {
      t.innerHTML = "用户名不可以为wustzz";
      return false;
    }
    t.innerHTML = "用户名填写正确";
    return true;
  }
}
function checkPassword() {
  var p = document.getElementById("psd");
  var t = document.getElementById("tip_psd");
  var reg = /^\d{6}$/;
  if (!reg.test(p.value)) {
    t.innerHTML = "密码为6位数字";
    return false;
  } else {
    t.innerHTML = "密码填写正确";
    return true;
  }
}
function checkPasswordAgain() {
  var p1 = document.getElementById("psd");
  var p2 = document.getElementById("psd_again");
  var t = document.getElementById("tip_psd_again");
  if (p1.value != p2.value) {
    t.innerHTML = "密码前后不一致"
    return false;
  } else {
    t.innerHTML = "密码确认一致";
    return true;
  }
}
function checkEmail() {
  var e = document.getElementById("email");
  var t = document.getElementById("tip_email");
  var reg = /^[\w-]+(\.[\w-]+)*@[\w-]+(\.[\w-]+)+$/;
  if (!reg.test(e.value)) {
    t.innerHTML = "必须填写Email格式";
    return false;
  } else {
    t.innerHTML = "Email填写正确";
    return true;
  }
}
function checkPhone() {
  var p = document.getElementById("phone");
  var t = document.getElementById("tip_phone");
  var reg = /^1569\d{7}$/;
  if (!reg.test(p.value)) {
    t.innerHTML = "手机是11位以1569开头的数字";
    return false;
  } else {
    t.innerHTML = "填写手机正确";
    return true;
  }
}
function checkAll() {
  if (checkName() && checkPassword() && checkPasswordAgain() &&
    checkEmail() && checkPhone()) {
    return true;
  }
  return false;
}
以上就是小编为大家带来的利用ASP.NET实现一个个人信息注册页面的全部内容了,希望大家多多支持亿速云!
免责声明:本站发布的内容(图片、视频和文字)以原创、转载和分享为主,文章观点不代表本网站立场,如果涉及侵权请联系站长邮箱:is@yisu.com进行举报,并提供相关证据,一经查实,将立刻删除涉嫌侵权内容。