您好,登录后才能下订单哦!
这篇文章给大家分享的是有关ASP.NET 2.0之如何在TableAdapters中使用JOINs的内容。小编觉得挺实用的,因此分享给大家做个参考,一起跟随小编过来看看吧。
导言:
在关系数据库里,我们处理的数据通常跨越了几个数据表。举例:当展示产品信息时我们很可能想列出每个产品相应的category以及供应商的名称等.诚然,Products表里包含有CategoryID 和SupplierID值,但是事实上的category以及supplier names分别定义在Categories表和Suppliers表里. 要从其它的相关表里获取信息,我们可以使用correlated subqueries或JOINs.一条correlated subquerie就是一个镶套的SELECT,引用外部查询(outer query)的列.比如在第一章《创建一个数据访问层》里我们在ProductsTableAdapter的主查询里使用2条correlated subqueries来返回每个产品的category 以及supplier names.而JOIN是一SQL构造,将2个不同的表的相关联的rows进行合并.在第46章《使用SqlDataSource控件检索数据》里,我们使用JOIN来显示每个产品的category信息.
我们避免在TableAdapters里使用JOIN是由于TableAdapter向导自动生成的INSERT, UPDATE,以及DELETE statements有其局限性.具体来说,如果TableAdapter的主查询里包含了任何的JOIN,那么TableAdapter就不能为它的InsertCommand, UpdateCommand,以及DeleteCommand属性自动地创建 ad-hoc SQL statements或存储过程.在开始之前,我们先简要地对correlated subqueries和JOIN进行比较.
比较Correlated Subqueries和JOINs
我们知道在第一章的Northwind DataSet数据集里创建的ProductsTableAdapter使用correlated subqueries来返回每个产品对应的category 和 supplier name。该ProductsTableAdapter的主查询如下:
SELECT ProductID, ProductName, SupplierID, CategoryID,
 QuantityPerUnit, UnitPrice, UnitsInStock, UnitsOnOrder,
 ReorderLevel, Discontinued,
 (SELECT CategoryName FROM Categories WHERE Categories.CategoryID =
  Products.CategoryID) as CategoryName,
 (SELECT CompanyName FROM Suppliers WHERE Suppliers.SupplierID =
  Products.SupplierID) as SupplierName
FROM Products
我们注意这2个correlated subqueries——“(SELECT CategoryName FROM Categories WHERE Categories.CategoryID = Products.CategoryID)” 以及“(SELECT CompanyName FROM Suppliers WHERE Suppliers.SupplierID = Products.SupplierID),都是一个SELECT查询,返回一个单一值,并作为外部SELECT statement的额外的列.
此外,我们可以使用JOIN来返回每个产品的supplier 以及category name,下面的查询与上面的代码效果一样,不过用的是JOIN:
SELECT ProductID, ProductName, Products.SupplierID, Products.CategoryID,
 QuantityPerUnit, UnitPrice, UnitsInStock, UnitsOnOrder,
 ReorderLevel, Discontinued,
 Categories.CategoryName,
 Suppliers.CompanyName as SupplierName
FROM Products
 LEFT JOIN Categories ON
 Categories.CategoryID = Products.CategoryID
 LEFT JOIN Suppliers ON
 Suppliers.SupplierID = Products.SupplierID
JOIN基于某种标准将一个表的记录与另一个表的记录合并起来.比如上述代码中,“LEFT JOIN Categories ON Categories.CategoryID = Products.CategoryID”就指示SQL Server将每一条product记录与category记录合并起来,标准是category记录的CategoryID值与product记录CategoryID值相吻合.在合并的结果里,我们可以对每个产品相应的category fields进行处理(比如CategoryName).
注意:JOIN通常用来从相关的数据库查询数据.如果你对JOIN语法比较陌生或者对其用法复习提高,我推荐你阅读W3 Schools论坛上的文章《SQL Join tutorial》(http://www.w3schools.com/sql/sql_join.asp);此外你还可以阅读SQL Books Online的《JOIN Fundamentals》和《Subquery Fundamentals》部分.
当使用类型化的数据集(Typed DataSets)来构建数据访问层时,使用correlated subqueries要好一些。具体来说,如果主查询里包含任何的JOIN时,TableAdapter的设置向导就不会自动生成相应的INSERT, UPDATE, 以及DELETE statements.相反,使用correlated subqueries的话就可以.
为验证这一点,我们在~/App_Code/DAL文件夹里创建一个临时的类型化的数据集.在TableAdapter设置向导里选择使用ad-hoc SQL statements,并键入如下的SELECT查询(如图1):
SELECT ProductID, ProductName, Products.SupplierID, Products.CategoryID,
 QuantityPerUnit, UnitPrice, UnitsInStock, UnitsOnOrder,
 ReorderLevel, Discontinued,
 Categories.CategoryName,
 Suppliers.CompanyName as SupplierName
FROM Products
 LEFT JOIN Categories ON
 Categories.CategoryID = Products.CategoryID
 LEFT JOIN Suppliers ON
 Suppliers.SupplierID = Products.SupplierID
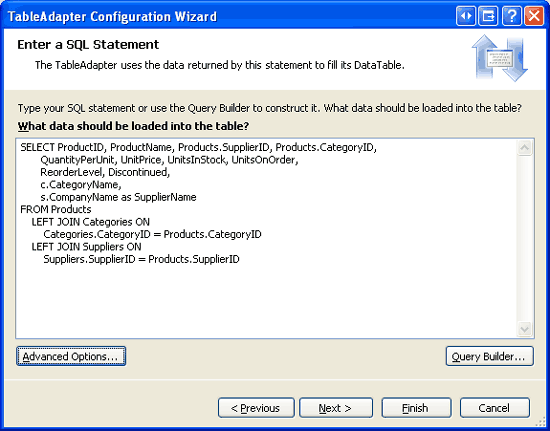
图1:键入一个包含JOIN的主查询
默认情况下,TableAdapter在主查询的基础上自动地创建INSERT, UPDATE, 以及DELETE statements.如果你点击“Advanced”按钮的话,你将看到该功能是激活的.不理会这些设置的话,TableAdapter将不能创建INSERT, UPDATE,以及DELETE statements因为主查询包含了JOIN.
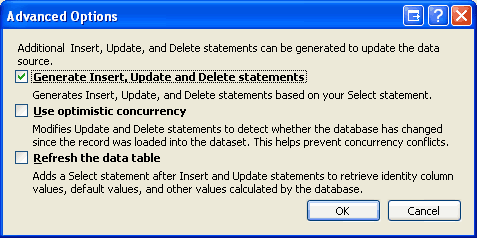
图2:键入一个包含JOIN的主查询
点Finish完成向导。此时在DataSet设计器里将只包含一个TableAdapter,其包含的DataTable列出了SELECT查询返回的列.包括CategoryName 和 SupplierName,如图3所示.

图3:DataTable包含了返回的列
此外,TableAdapter的InsertCommand, UpdateCommand, 和DeleteCommand属性为空。你可以在设计器里选中TableAdapter,查看属性窗口.你将看到InsertCommand, UpdateCommand, 和DeleteCommand属性设置为“(None)”.
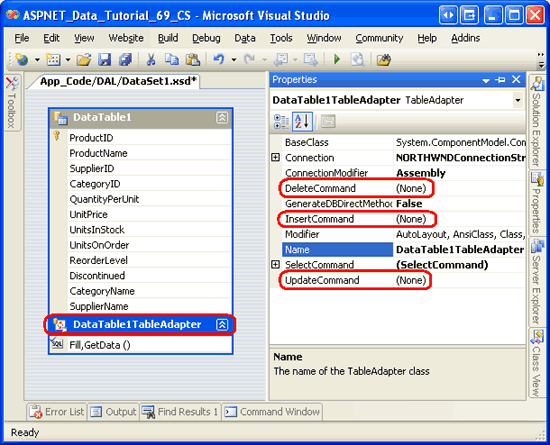
图4: InsertCommand, UpdateCommand,DeleteCommand属性为“(None)”
为了验证该缺点,我们可以通过属性窗口为InsertCommand, UpdateCommand,以及 DeleteCommand属性手动写入SQL statements以及参数.最开始我们可以设置TableAdapter的主查询不包含任何JOIN,这将允许自动生成INSERT, UPDATE,以及DELETE statements.完成向导设置后,我们可以通过属性窗口手动修改TableAdapter的SelectCommand以包含JOIN语法.
虽然这种方法工作正常,但很脆弱.因为我们可以在任何时候通过向导设置重新设置主查询,重新自动生成INSERT, UPDATE,以及DELETE statements.这意味着我们刚刚进行的用户定制可以很容易地就被丢失了.
好在TableAdapter自动生成的INSERT, UPDATE,以及DELETE statements的脆弱性仅仅针对ad-hoc SQL statements而言.如果你的TableAdapter使用的是存储过程的话,你可以自定义SelectCommand, InsertCommand, UpdateCommand,或DeleteCommand存储过程.重新运行TableAdapter设置向导时不用担心存储过程会被修改.
在接下来的几个步骤里我们将创建一个TableAdapter,最初我们使用一个不含JOIN的主查询,以便自动生成相应的insert, update,和delete存储过程.接着,我们将更新该SelectCommand以使用JOIN来从相关表返回额外的列. 最后,我们将创建一个对应的Business Logic Layer class类,在ASP.NET页面上使用该TableAdapter.
第1步:使用简单的主查询创建一个TableAdapter
在本文,我们将为NorthwindWithSprocs DataSet数据集的Employees表添加一个TableAdapter以及一个强类型的DataTable.该Employees表包含一个ReportsTo列,它指定了该雇员的经理的EmployeeID值.比如:雇员Anne Dodsworth的ReportTo值为5,也就是Steven Buchanan的EmployeeID值.因此,雇员Anne Dodsworth的经理就是Steven Buchanan.除了返回每个雇员的ReportsTo值外,我们也想返回他们经理的名字.为此,我们可以使用JOIN.但是我们知道,在最初创建TableAdapter时使用JOIN的话向导将不能够自动生成相应的insert, update,delete属性. 因此,我们在最初创建 TableAdapter的时候不在其主查询里包含任何的JOIN.在第2步里,我们将对主查询存储过程进行更新,通过使用JOIN来获取经理的名字.
我们打开~/App_Code/DAL文件夹里的NorthwindWithSprocs DataSet数据集.在设计器里单击右键,选择“Add”项,再选" TableAdapter",这将打开TableAdapter设置向导.如图5所示,让向导创建一个新的存储过程,再点Next.具体的相关细节请参阅第65章《在TableAdapters中创建新的存储过程》
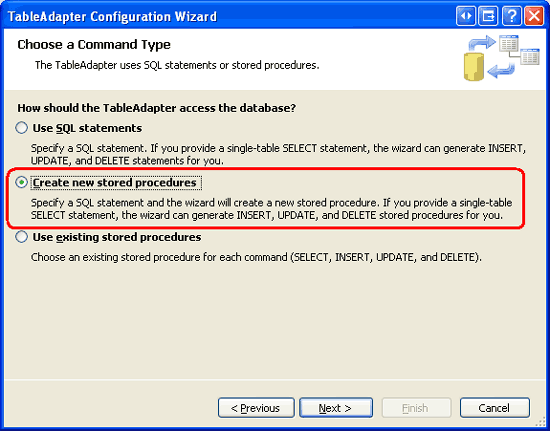
图5:选择“Create new stored procedures”项
该TableAdapter的主查询的SELECT statement如下:
SELECT EmployeeID, LastName, FirstName, Title, HireDate, ReportsTo, Country
FROM Employees
由于该查询没有包含任何的JOIN,因此TableAdapter向导将用相应的INSERT, UPDATE, DELETE statements来创建存储过程.
接下来向导要我们为存储过程命名。用Employees_Select, Employees_Insert, Employees_Update, and Employees_Delete来命名,如图6所示。
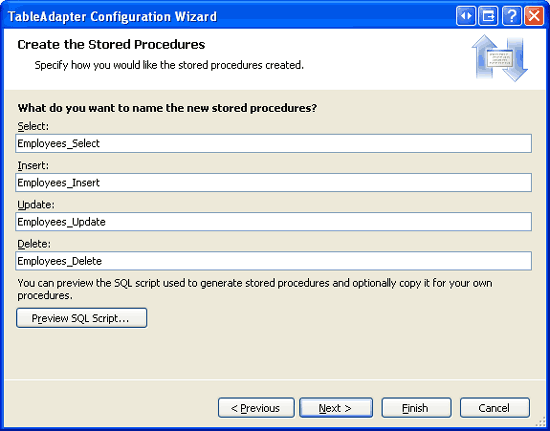
图6:对TableAdapter的存储过程命名
最后向导要我们为TableAdapter的方法命名,我们命名为Fill 和 GetEmployees.同时选中“Create methods to send updates directly to the database (GenerateDBDirectMethods)”选项.
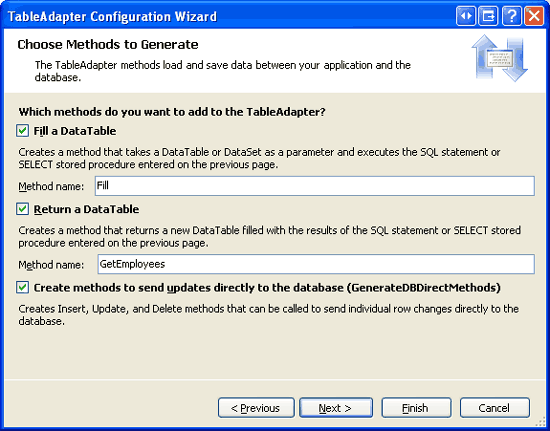
图7:将TableAdapter的方法命名为Fill和GetEmployees
完成设置后,花点时间检查数据库里的存储过程,你可以看到4个新的存储过程:Employees_Select, Employees_Insert, Employees_Update,Employees_Delete.接下来,考察我们刚刚创建创建的EmployeesDataTable 和 EmployeesTableAdapter.该DataTable包含了主查询返回的每列。选中TableAdapter并进入属性窗口,你将看到InsertCommand, UpdateCommand,DeleteCommand属性调用相应的存储过程.
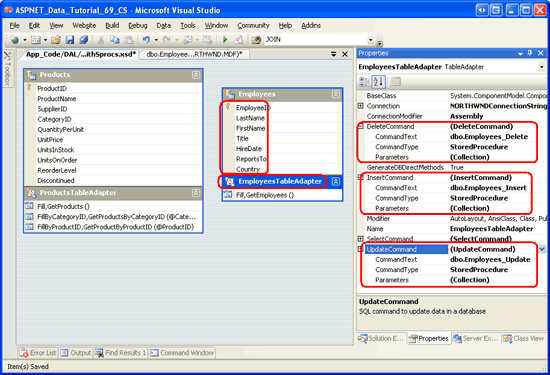
图8:TableAdapter包含Insert, Update,Delete属性
当自动的生成insert, update,delete存储过程,并恰当的设置好InsertCommand, UpdateCommand,DeleteCommand属性后我们就可以对SelectCommand的存储过程进行用户定制,以返回雇员的经理这些信息.具体来说,我们需要更新Employees_Select存储过程,使用JOIN返回经理的FirstName 和 LastName值。完成后,我们要更新DataTable以使其包含这些额外的列.我们将在第2和3步实现.
第2步:用JOIN定制存储过程
在服务器资源管理器里,展开Northwind数据库的存储过程文件夹,打开存储过程Employees_Select。如果你没有找到该存储过程,右击存储过程文件夹选“刷新”.更新该存储过程,以使其用一个LEFT JOIN来返回经理的first 和last name:
SELECT Employees.EmployeeID, Employees.LastName,
 Employees.FirstName, Employees.Title,
 Employees.HireDate, Employees.ReportsTo,
 Employees.Country,
 Manager.FirstName as ManagerFirstName,
 Manager.LastName as ManagerLastName

FROM Employees
 LEFT JOIN Employees AS Manager ON
 Employees.ReportsTo = Manager.EmployeeID
完成对SELECT statement的更新后,在“文件”菜单里选“Save Employees_Select”来保存所做的修改. 当然,你也可以点击工具栏的保存图标或按下Ctrl+S键.保存后,在服务器资源管理器里右击存储过程Employees_Select,选“执行”。这将执行存储过程并在输出窗口里显示结果,如图9所示。
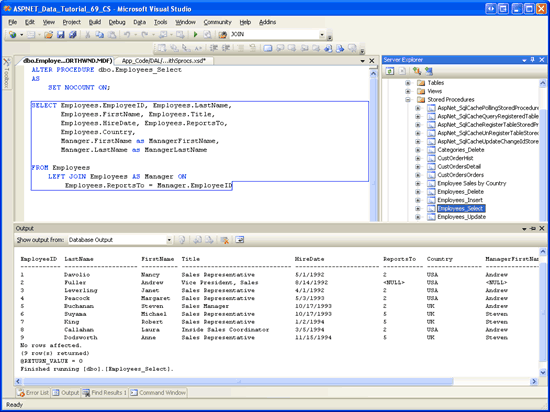
图9:存储过程的结果显示在输出窗口里
第3步:更新DataTable的列
此时,Employees_Select存储过程返回ManagerFirstName 和ManagerLastName值。但在EmployeesDataTable里并不包含这2列.可以通过下面的方法来进行添加:
.手动——在设计器里右键单击DataTable,在“Add”菜单里选“Column”.然后对列命名并设置其属性.
.自动——TableAdapter设置向导会更新DataTable的列以映射SelectCommand存储过程返回的列(field).如果使用的是ad-hoc SQL statements的话,向导会移除InsertCommand, UpdateCommand,以及 DeleteCommand属性,因为SelectCommand现在包含了一个JOIN. 但若使用存储过程的话,这些command属性将依然存在.
我们在前面的第35章《使用Repeater和DataList单页面实现主/从报表》以及第52章《使用FileUpload上传文件》里考察过手动添加列的情况,我们在以后的文章里也会看到该过程的更多的细节,不过在本文,我们通过使用TableAdapter设置向导来自动添加.
右键单击EmployeesTableAdapter,并选择“配置”。这将开启TableAdapter设置向导,它列出了用于select, insert, updat,delet的存储过程,同时还有其返回的值和参数(如果有的话).如图10所示,我们可以看到Employees_Select存储过程现在返回了ManagerFirstName 和 ManagerLastName列
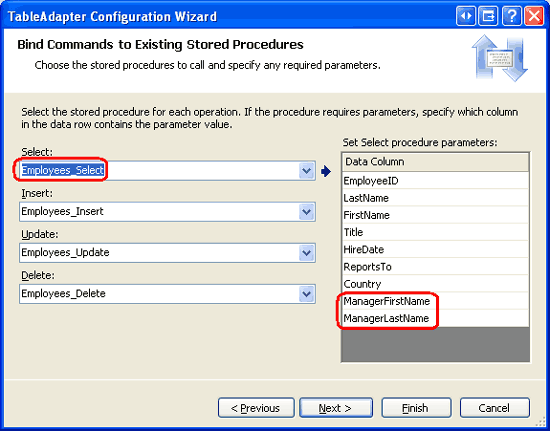
图10:向导显示了Employees_Select存储过程更新后的列
点Finish完成设置,回到DataSet设计器里,该EmployeesDataTable现在包含了2个新添的列ManagerFirstName 和 ManagerLastName.
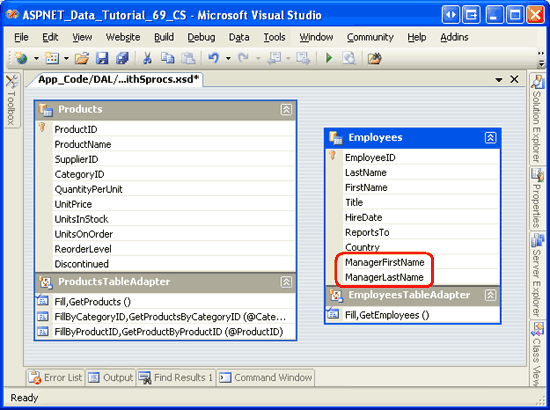
图11:该EmployeesDataTable现在包含了2个新列
为了验证更新后的Employees_Select存储过程是否起作用,以及该TableAdapter的insert, update,delete功能,我们要创建一个web页面来允许用户查看并删除employees.不过在此之前,我们要先在业务逻辑层里创建一个新类来处理NorthwindWithSprocs DataSet数据集里的employees.在第4步,我们将创建一个EmployeesBLLWithSprocs class类,在第5步,我们将在一个ASP.NET页面里使用该类.
第4步:更新Business Logic Layer
在~/App_Code/BLL文件夹里创建一个名为EmployeesBLLWithSprocs.cs的类文件.该类文件与现有的EmployeesBLL class类文件差不多,只是方法要少一些,且使用的是NorthwindWithSprocs DataSet数据集(而不是Northwind DataSet数据集)。在EmployeesBLLWithSprocs类里添加如下的代码:
using System;
using System.Data;
using System.Configuration;
using System.Web;
using System.Web.Security;
using System.Web.UI;
using System.Web.UI.WebControls;
using System.Web.UI.WebControls.WebParts;
using System.Web.UI.HtmlControls;
using NorthwindWithSprocsTableAdapters;

[System.ComponentModel.DataObject]
public class EmployeesBLLWithSprocs
{
 private EmployeesTableAdapter _employeesAdapter = null;
 protected EmployeesTableAdapter Adapter
 {
 get
 {
  if (_employeesAdapter == null)
  _employeesAdapter = new EmployeesTableAdapter();

  return _employeesAdapter;
 }
 }

 [System.ComponentModel.DataObjectMethodAttribute
 (System.ComponentModel.DataObjectMethodType.Select, true)]
 public NorthwindWithSprocs.EmployeesDataTable GetEmployees()
 {
 return Adapter.GetEmployees();
 }

 [System.ComponentModel.DataObjectMethodAttribute
 (System.ComponentModel.DataObjectMethodType.Delete, true)]
 public bool DeleteEmployee(int employeeID)
 {
 int rowsAffected = Adapter.Delete(employeeID);

 // Return true if precisely one row was deleted, otherwise false
 return rowsAffected == 1;
 }
}
该EmployeesBLLWithSprocs class类的Adapter属性返回NorthwindWithSprocs DataSet数据集的EmployeesTableAdapter的一个实例,类里面的GetEmployees 和DeleteEmployee方法将要用到该属性.其中,GetEmployees方法调用EmployeesTableAdapter对应的GetEmploye方法,其又再调用Employees_Select存储过程并将结果传递给一个EmployeeDataTable;而DeleteEmployee方法仅仅调用EmployeesTableAdapter的Delete方法,该Delete方法调用Employees_Delete存储过程.
第5步:在表现层处理数据
添加完EmployeesBLLWithSprocs class类后,我们将在一个ASP.NET页面里处理 employee数据。打开AdvancedDAL文件夹里的JOINs.aspx页面,从工具箱里拖一个GridView控件到页面,设其ID值为Employees.接下来,从其智能标签里绑定到一个名为EmployeesDataSource的新的ObjectDataSource控件.设置该ObjectDataSource控件使用EmployeesBLLWithSprocs class类,在SELECT 和 DELETE标签里分别选择GetEmployees 和 DeleteEmployee方法. 点Finish完成设置.
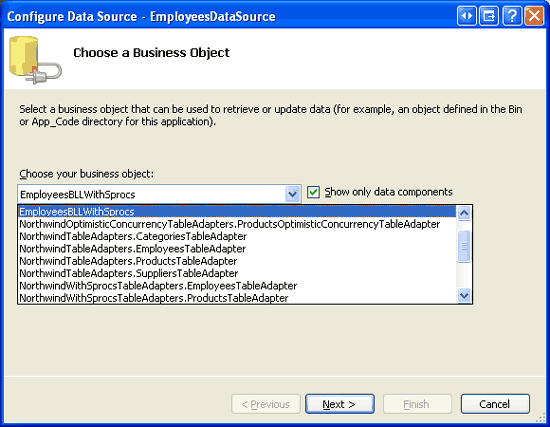
图12:设置该ObjectDataSource使用EmployeesBLLWithSprocs Class类
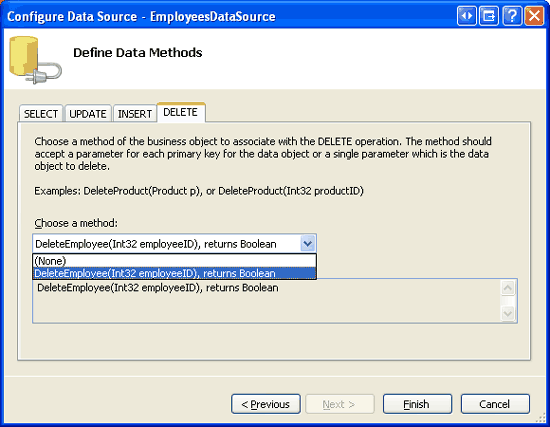
图13:设置该ObjectDataSource调用GetEmployees 和 DeleteEmployee方法
Visual Studio会为EmployeesDataTable里的每列添加一个BoundField。将Title, LastName, FirstName, ManagerFirstName,和ManagerLastName之外的列全部删除。并分别将这几个列的HeaderText属性重命名为“Last Name”, “First Name”, “Manager's First Name”, “Manager's Last Name” .
为了让用户可以在页面删除employees,我们要做2件事情.首先启用GridView的删除功能,然后将ObjectDataSource控件的OldValuesParameterFormatString属性设置为默认值{0}。完成这些后,GridView 和 ObjectDataSource控件的声明代码看起来应该和下面的差不多:
<asp:GridView ID="Employees" runat="server" AutoGenerateColumns="False"
 DataKeyNames="EmployeeID" DataSourceID="EmployeesDataSource">
 <Columns>
 <asp:CommandField ShowDeleteButton="True" />
 <asp:BoundField DataField="Title"
  HeaderText="Title"
  SortExpression="Title" />
 <asp:BoundField DataField="LastName"
  HeaderText="Last Name"
  SortExpression="LastName" />
 <asp:BoundField DataField="FirstName"
  HeaderText="First Name"
  SortExpression="FirstName" />
 <asp:BoundField DataField="ManagerFirstName"
  HeaderText="Manager's First Name"
  SortExpression="ManagerFirstName" />
 <asp:BoundField DataField="ManagerLastName"
  HeaderText="Manager's Last Name"
  SortExpression="ManagerLastName" />
 </Columns>
</asp:GridView>

<asp:ObjectDataSource ID="EmployeesDataSource" runat="server"
 DeleteMethod="DeleteEmployee" OldValuesParameterFormatString="{0}"
 SelectMethod="GetEmployees" TypeName="EmployeesBLLWithSprocs">
 <DeleteParameters>
 <asp:Parameter Name="employeeID" Type="Int32" />
 </DeleteParameters>
</asp:ObjectDataSource>
在浏览器里测试该页面,如图14所示,该页面列出了每一个employee以及他们的经理的名字.
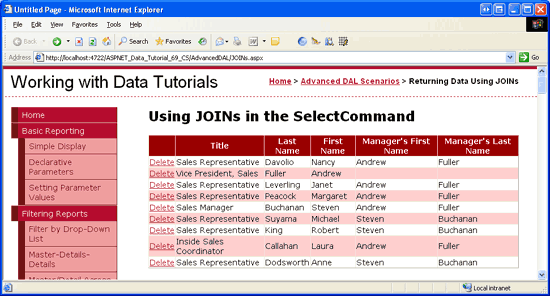
图14:Employees_Select存储过程使用JOIN返回经理的名字
点击Delete按钮将触发deleting流程,直到执行Employees_Delete存储过程才结束,但是存储过程里的DELETE statement执行失败,原因是有外键约束(如图15所示)。因为每个employee在Orders表里都有一条到多条记录,才导致删除操作失败.
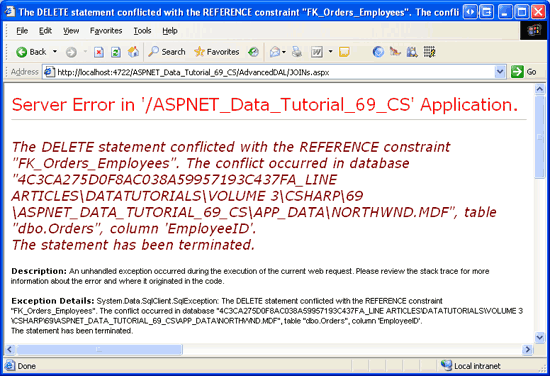
图15:删除操作违背外键约束
如果要删除操作执行成功,你要:
.更新外键约束
.对你要删除的employee(s),在Orders表里删除对应的记录
.更新Employees_Delete存储过程,使其在删除Employees记录之前,先删除Orders表里对应的记录
感谢各位的阅读!关于“ASP.NET 2.0之如何在TableAdapters中使用JOINs”这篇文章就分享到这里了,希望以上内容可以对大家有一定的帮助,让大家可以学到更多知识,如果觉得文章不错,可以把它分享出去让更多的人看到吧!
免责声明:本站发布的内容(图片、视频和文字)以原创、转载和分享为主,文章观点不代表本网站立场,如果涉及侵权请联系站长邮箱:is@yisu.com进行举报,并提供相关证据,一经查实,将立刻删除涉嫌侵权内容。