жӮЁеҘҪпјҢзҷ»еҪ•еҗҺжүҚиғҪдёӢи®ўеҚ•е“ҰпјҒ
еҜҶз Ғзҷ»еҪ•
зҷ»еҪ•жіЁеҶҢ
зӮ№еҮ» зҷ»еҪ•жіЁеҶҢ еҚіиЎЁзӨәеҗҢж„ҸгҖҠдәҝйҖҹдә‘з”ЁжҲ·жңҚеҠЎжқЎж¬ҫгҖӢ
жң¬зҜҮеҶ…е®№д»Ӣз»ҚдәҶвҖңеҰӮдҪ•зј–еҶҷASP.NET MVC5зҪ‘з«ҷејҖеҸ‘з”ЁжҲ·зҷ»еҪ•гҖҒжіЁй”ҖвҖқзҡ„жңүе…ізҹҘиҜҶпјҢеңЁе®һйҷ…жЎҲдҫӢзҡ„ж“ҚдҪңиҝҮзЁӢдёӯпјҢдёҚе°‘дәәйғҪдјҡйҒҮеҲ°иҝҷж ·зҡ„еӣ°еўғпјҢжҺҘдёӢжқҘе°ұи®©е°Ҹзј–еёҰйўҶеӨ§е®¶еӯҰд№ дёҖдёӢеҰӮдҪ•еӨ„зҗҶиҝҷдәӣжғ…еҶөеҗ§пјҒеёҢжңӣеӨ§е®¶д»”з»Ҷйҳ…иҜ»пјҢиғҪеӨҹеӯҰжңүжүҖжҲҗпјҒ
дёҖгҖҒеҲӣе»әClaimsIdentity
ClaimsIdentityпјҲ委жүҳеҹәдәҺеЈ°жҳҺзҡ„ж ҮиҜҶпјүжҳҜеңЁASP.NET Identityиә«д»Ҫи®ӨиҜҒзі»з»ҹзҡ„зҷ»еҪ•ж—¶иҰҒз”ЁеҲ°пјҢжҲ‘们еңЁUserServiceдёӯжқҘз”ҹжҲҗе®ғгҖӮ
1гҖҒжү“ејҖIBLLйЎ№зӣ®InterfaceUserServiceжҺҘеҸЈпјҢж·»еҠ жҺҘеҸЈж–№жі•ClaimsIdentity CreateIdentity(User user, string authenticationType);
2гҖҒжү“ејҖBLLйЎ№зӣ®зҡ„UserServiceзұ»пјҢж·»еҠ CreateIdentityж–№жі•зҡ„е®һзҺ°д»Јз Ғ
public ClaimsIdentity CreateIdentity(User user, string authenticationType)
 {
 ClaimsIdentity _identity = new ClaimsIdentity(DefaultAuthenticationTypes.ApplicationCookie);
 _identity.AddClaim(new Claim(ClaimTypes.Name, user.UserName));
 _identity.AddClaim(new Claim(ClaimTypes.NameIdentifier, user.UserID.ToString()));
 _identity.AddClaim(new Claim("http://schemas.microsoft.com/accesscontrolservice/2010/07/claims/identityprovider", "ASP.NET Identity"));
 _identity.AddClaim(new Claim("DisplayName", user.DisplayName));
 return _identity;
}дәҢгҖҒиҺ·еҸ–AuthenticationManagerпјҲи®ӨиҜҒз®ЎзҗҶеҷЁпјү
жү“ејҖNinesky.WebйЎ№зӣ® MemberеҢәеҹҹзҡ„UserControllerпјҢж·»еҠ AuthenticationManagerеұһжҖ§пјҢеңЁHttpContext.GetOwinContext()дёӯиҺ·еҸ–иҝҷдёӘеұһжҖ§гҖӮ
#region еұһжҖ§
private IAuthenticationManager AuthenticationManager { get { return HttpContext.GetOwinContext().Authentication; } }
#endregionдёүгҖҒеҲӣе»әзҷ»еҪ•и§ҶеӣҫжЁЎеһӢ
MemberеҢәеҹҹзҡ„жЁЎеһӢж–Ү件еӨ№ж·»еҠ и§ҶеӣҫжЁЎеһӢ
using System.ComponentModel.DataAnnotations;
namespace Ninesky.Web.Areas.Member.Models
{
/// <summary>
/// зҷ»еҪ•жЁЎеһӢ
/// <remarks>
/// еҲӣе»әпјҡ2014.02.16
/// </remarks>
/// </summary>
public class LoginViewModel
{
/// <summary>
/// з”ЁжҲ·еҗҚ
/// </summary>
[Required(ErrorMessage = "еҝ…еЎ«")]
[StringLength(20, MinimumLength = 4, ErrorMessage = "{2}еҲ°{1}дёӘеӯ—з¬Ұ")]
[Display(Name = "з”ЁжҲ·еҗҚ")]
public string UserName { get; set; }
/// <summary>
/// еҜҶз Ғ
/// </summary>
[Required(ErrorMessage = "еҝ…еЎ«")]
[Display(Name = "еҜҶз Ғ")]
[StringLength(20, MinimumLength = 6, ErrorMessage = "{2}еҲ°{1}дёӘеӯ—з¬Ұ")]
[DataType(DataType.Password)]
public string Password { get; set; }
/// <summary>
/// и®°дҪҸжҲ‘
/// </summary>
[Display(Name = "и®°дҪҸжҲ‘")]
public bool RememberMe { get; set; }
}
}еӣӣгҖҒеҲӣе»әзҷ»еҪ•йЎөйқў
еңЁUserCcontrollerдёӯж·»еҠ (string returnUrl) action
/// <summary>
/// з”ЁжҲ·зҷ»еҪ•
/// </summary>
/// <param name="returnUrl">иҝ”еӣһUrl</param>
/// <returns></returns>
public ActionResult Login(string returnUrl)
{
return View();
}еҸій”®ж·»еҠ ејәзұ»еһӢи§ҶеӣҫпјҢжЁЎеһӢдёәLoginViewModel
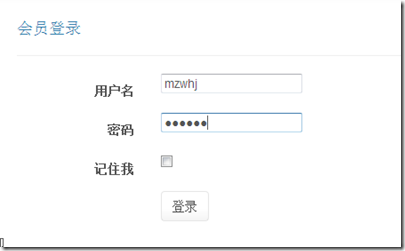
@model Ninesky.Web.Areas.Member.Models.LoginViewModel
@{
ViewBag.Title = "дјҡе‘ҳзҷ»еҪ•";
}
@using (Html.BeginForm())
{
@Html.AntiForgeryToken()
<div class="form-horizontal">
<h5>дјҡе‘ҳзҷ»еҪ•</h5>
<hr />
@Html.ValidationSummary(true)
<div class="form-group">
@Html.LabelFor(model => model.UserName, new { @class = "control-label col-md-2" })
<div class="col-md-10">
@Html.EditorFor(model => model.UserName)
@Html.ValidationMessageFor(model => model.UserName)
</div>
</div>
<div class="form-group">
@Html.LabelFor(model => model.Password, new { @class = "control-label col-md-2" })
<div class="col-md-10">
@Html.EditorFor(model => model.Password)
@Html.ValidationMessageFor(model => model.Password)
</div>
</div>
<div class="form-group">
@Html.LabelFor(model => model.RememberMe, new { @class = "control-label col-md-2" })
<div class="col-md-10">
@Html.EditorFor(model => model.RememberMe)
@Html.ValidationMessageFor(model => model.RememberMe)
</div>
</div>
<div class="form-group">
<div class="col-md-offset-2 col-md-10">
<input type="submit" value="зҷ»еҪ•" class="btn btn-default" />
</div>
</div>
</div>
}
@section Scripts {
@Scripts.Render("~/bundles/jqueryval")
}ж•Ҳжһң
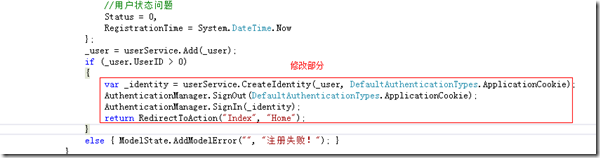
дә”гҖҒеҲӣе»әз”ЁжҲ·зҷ»еҪ•еӨ„зҗҶaction
еңЁUserCcontrollerдёӯж·»еҠ httppostзұ»еһӢзҡ„ Login actionдёӯе…Ҳз”ЁModelState.IsValidзңӢжЁЎеһӢйӘҢиҜҒжҳҜеҗҰйҖҡиҝҮпјҢжІЎйҖҡиҝҮзӣҙжҺҘиҝ”еӣһпјҢйҖҡиҝҮеҲҷжЈҖжҹҘз”ЁжҲ·еҜҶз ҒжҳҜеҗҰжӯЈзЎ®гҖӮз”ЁжҲ·еҗҚеҜҶз ҒжӯЈзЎ®з”ЁCreateIdentityж–№жі•еҲӣе»әж ҮиҜҶпјҢ然еҗҺз”ЁSignOutж–№жі•жё…з©әCookiesпјҢ然еҗҺз”ЁSignInзҷ»еҪ•гҖӮ
[ValidateAntiForgeryToken]
[HttpPost]
public ActionResult Login(LoginViewModel loginViewModel)
{
if(ModelState.IsValid)
{
var _user = userService.Find(loginViewModel.UserName);
if (_user == null) ModelState.AddModelError("UserName", "з”ЁжҲ·еҗҚдёҚеӯҳеңЁ");
else if (_user.Password == Common.Security.Sha256(loginViewModel.Password))
{
var _identity = userService.CreateIdentity(_user, DefaultAuthenticationTypes.ApplicationCookie);
AuthenticationManager.SignOut(DefaultAuthenticationTypes.ApplicationCookie);
AuthenticationManager.SignIn(new AuthenticationProperties() { IsPersistent = loginViewModel.RememberMe }, _identity);
return RedirectToAction("Index", "Home");
}
else ModelState.AddModelError("Password", "еҜҶз Ғй”ҷиҜҜ");
}
return View();
}е…ӯгҖҒдҝ®ж”№з”ЁжҲ·жіЁеҶҢд»Јз Ғ
и®©з”ЁжҲ·жіЁеҶҢжҲҗеҠҹеҗҺзӣҙжҺҘзҷ»еҪ•
дёғгҖҒжіЁй”Җ
еңЁUserCcontrollerдёӯж·»еҠ еңЁLogout action
/// <summary>
/// зҷ»еҮә
/// </summary>
/// <returns></returns>
public ActionResult Logout()
{
AuthenticationManager.SignOut(DefaultAuthenticationTypes.ApplicationCookie);
return Redirect(Url.Content("~/"));
}вҖңеҰӮдҪ•зј–еҶҷASP.NET MVC5зҪ‘з«ҷејҖеҸ‘з”ЁжҲ·зҷ»еҪ•гҖҒжіЁй”ҖвҖқзҡ„еҶ…е®№е°ұд»Ӣз»ҚеҲ°иҝҷйҮҢдәҶпјҢж„ҹи°ўеӨ§е®¶зҡ„йҳ…иҜ»гҖӮеҰӮжһңжғідәҶи§ЈжӣҙеӨҡиЎҢдёҡзӣёе…ізҡ„зҹҘиҜҶеҸҜд»Ҙе…іжіЁдәҝйҖҹдә‘зҪ‘з«ҷпјҢе°Ҹзј–е°ҶдёәеӨ§е®¶иҫ“еҮәжӣҙеӨҡй«ҳиҙЁйҮҸзҡ„е®һз”Ёж–Үз« пјҒ
е…ҚиҙЈеЈ°жҳҺпјҡжң¬з«ҷеҸ‘еёғзҡ„еҶ…е®№пјҲеӣҫзүҮгҖҒи§Ҷйў‘е’Ңж–Үеӯ—пјүд»ҘеҺҹеҲӣгҖҒиҪ¬иҪҪе’ҢеҲҶдә«дёәдё»пјҢж–Үз« и§ӮзӮ№дёҚд»ЈиЎЁжң¬зҪ‘з«ҷз«ӢеңәпјҢеҰӮжһңж¶үеҸҠдҫөжқғиҜ·иҒ”зі»з«ҷй•ҝйӮ®з®ұпјҡis@yisu.comиҝӣиЎҢдёҫжҠҘпјҢ并жҸҗдҫӣзӣёе…іиҜҒжҚ®пјҢдёҖз»ҸжҹҘе®һпјҢе°Ҷз«ӢеҲ»еҲ йҷӨж¶үе«ҢдҫөжқғеҶ…е®№гҖӮ
жӮЁеҘҪпјҢзҷ»еҪ•еҗҺжүҚиғҪдёӢи®ўеҚ•е“ҰпјҒ