您好,登录后才能下订单哦!
密码登录
登录注册
点击 登录注册 即表示同意《亿速云用户服务条款》
使用PHP怎么绘制3D扇形统计图?很多新手对此不是很清楚,为了帮助大家解决这个难题,下面小编将为大家详细讲解,有这方面需求的人可以来学习下,希望你能有所收获。
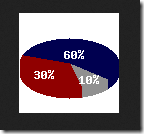
1、利用php gd库的函数绘制3D扇形统计图
  <?php
  header("content-type","text/html;charset=utf-8");
  /*扇形统计图*/
  $image = imagecreatetruecolor(100, 100);  /*创建画布*/

  /*设置画布需要的颜色*/
  $white = imagecolorallocate($image,0xff,0xff,0xff);
  $gray = imagecolorallocate($image, 0xc0, 0xc0, 0xc0);
  $darkgray = imagecolorallocate($image, 0x90, 0x90, 0x90);
  $navy = imagecolorallocate($image, 0x00, 0x00, 0x80);
  $darknavy = imagecolorallocate($image, 0x00, 0x00, 0x50);
  $red = imagecolorallocate($image, 0xff, 0x00, 0x00);
  $darkred = imagecolorallocate($image, 0x90, 0x00, 0x00);

  /*填充背景色*/
  imagefill($image, 0, 0, $white);

  /*3D制作*/
  for($i = 60; $i > 50; $i--)
  {
    imagefilledarc($image, 50, $i, 100, 50, -160, 40, $darknavy, IMG_ARC_PIE);
    imagefilledarc($image, 50, $i, 100, 50, 40, 75, $darkgray, IMG_ARC_PIE);
    imagefilledarc($image, 50, $i, 100, 50, 75, 200, $darkred, IMG_ARC_PIE);
  }
  /*画椭圆弧并填充*/
  imagefilledarc($image, 50, 50, 100, 50, -160, 40, $darknavy, IMG_ARC_PIE);
  imagefilledarc($image, 50, 50, 100, 50, 40, 75, $darkgray, IMG_ARC_PIE);
  imagefilledarc($image, 50, 50, 100, 50, 75, 200, $darkred, IMG_ARC_PIE);

  /*画字符串*/
  imagestring($image, 3, 15, 55, "30%", $white);
  imagestring($image, 3, 45, 35, "60%", $white);
  imagestring($image, 3, 60, 60, "10%", $white);

  /*输出图像*/
  header("content-type:image/png");
  imagepng($image);

  /*释放资源*/
  imagedestroy($image);
  ?>
效果:
2、对图片进行缩放
  <div>
    <h5>原图大小</h5>
    <img src="1.png" >
  </div>
  <?php
  header("content-type","text/html;charset=utf-8");

  /*
  *图片缩放
  *@param string $filename  图片的url
  *@param int  $width   设置图片缩放的最大宽度
  *@param int  $height   设置图片缩放的最大高度
  */
  function thumb($filename,$width=130,$height=130)
  {
    /*获取原图的大小*/
    list($width_orig,$height_orig) = getimagesize($filename);

    /*根据参数$width和$height,换算出等比例的高度和宽度*/
    if($width && ($width_orig < $height_orig))
    {
      $width = ($height / $height_orig) * $width_orig;
    }
    else
    {
      $height = ($width / $width_orig) * $height_orig;
    }

    /*以新的大小创建画布*/
    $image_p = imagecreatetruecolor($width, $height);

    /*获取图像资源*/
    $image = imagecreatefrompng($filename);

    /*使用imagecopyresampled缩放*/
    imagecopyresampled($image_p, $image, 0, 0, 0, 0, $width, $height, $width_orig, $height_orig);

    /*保存缩放后的图片和命名*/
    imagepng($image_p,'test.png');

    /*释放资源*/
    imagedestroy($image_p);
    imagedestroy($image);
  }
  /*调用函数*/
  thumb('1.png');
  ?>
  <div>
    <h5>缩放后的大小</h5>
    <img src="test.png" >
  </div>
看完上述内容是否对您有帮助呢?如果还想对相关知识有进一步的了解或阅读更多相关文章,请关注亿速云行业资讯频道,感谢您对亿速云的支持。
免责声明:本站发布的内容(图片、视频和文字)以原创、转载和分享为主,文章观点不代表本网站立场,如果涉及侵权请联系站长邮箱:is@yisu.com进行举报,并提供相关证据,一经查实,将立刻删除涉嫌侵权内容。