жӮЁеҘҪпјҢзҷ»еҪ•еҗҺжүҚиғҪдёӢи®ўеҚ•е“ҰпјҒ
еҜҶз Ғзҷ»еҪ•
зҷ»еҪ•жіЁеҶҢ
зӮ№еҮ» зҷ»еҪ•жіЁеҶҢ еҚіиЎЁзӨәеҗҢж„ҸгҖҠдәҝйҖҹдә‘з”ЁжҲ·жңҚеҠЎжқЎж¬ҫгҖӢ
д»ҠеӨ©е°Ҹзј–з»ҷеӨ§е®¶еҲҶдә«дёҖдёӢAndroidејҖеҸ‘жҖҺд№Ҳе®һзҺ°и®Ўз®—еҷЁеҠҹиғҪзҡ„зӣёе…ізҹҘиҜҶзӮ№пјҢеҶ…е®№иҜҰз»ҶпјҢйҖ»иҫ‘жё…жҷ°пјҢзӣёдҝЎеӨ§йғЁеҲҶдәәйғҪиҝҳеӨӘдәҶи§Јиҝҷж–№йқўзҡ„зҹҘиҜҶпјҢжүҖд»ҘеҲҶдә«иҝҷзҜҮж–Үз« з»ҷеӨ§е®¶еҸӮиҖғдёҖдёӢпјҢеёҢжңӣеӨ§е®¶йҳ…иҜ»е®ҢиҝҷзҜҮж–Үз« еҗҺжңүжүҖ收иҺ·пјҢдёӢйқўжҲ‘们дёҖиө·жқҘдәҶи§ЈдёҖдёӢеҗ§гҖӮ
е…ҲдёҠеӣҫзңӢж•Ҳжһң
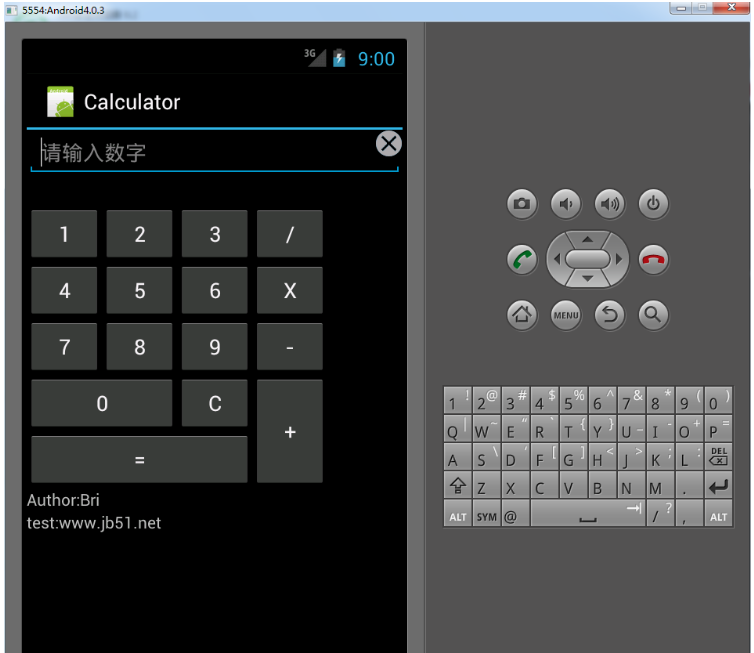
жҜ”иҫғз®ҖеҚ•пјҢжүҖд»ҘжҲ‘е°ұжІЎжҖҺд№ҲеҶҷжіЁйҮҠпјҢеә”иҜҘдёҖзңӢе°ұиғҪжҳҺзҷҪзҡ„
жңүдёҚжҳҺзҷҪзҡ„еҸҜд»ҘеҸ‘дҝЎй—®жҲ‘
е…ҲиҙҙMainActivity.javaд»Јз Ғ
package com.example.calculator;
import android.app.Activity;
import android.os.Bundle;
import android.view.Menu;
import android.view.MenuItem;
import android.view.View;
import android.view.View.OnClickListener;
import android.widget.Button;
import android.widget.EditText;
import android.widget.ImageView;
import android.widget.TextView;
import android.widget.Toast;
public class MainActivity extends Activity implements OnClickListener {
Button b1, b2, b3, b4, b5, b6, b7, b8, b9, b0, bp, bs, bm, bd, bc, be;
ImageView delete;
TextView tv;
EditText show;
String showString = "", option = "";
int showfirst = 0;
String exception = "";
@Override
protected void onCreate(Bundle savedInstanceState) {
super.onCreate(savedInstanceState);
setContentView(R.layout.activity_main);
b0 = (Button) findViewById(R.id.bt_0);
b1 = (Button) findViewById(R.id.bt_1);
b2 = (Button) findViewById(R.id.bt_2);
b3 = (Button) findViewById(R.id.bt_3);
b4 = (Button) findViewById(R.id.bt_4);
b5 = (Button) findViewById(R.id.bt_5);
b6 = (Button) findViewById(R.id.bt_6);
b7 = (Button) findViewById(R.id.bt_7);
b8 = (Button) findViewById(R.id.bt_8);
b9 = (Button) findViewById(R.id.bt_9);
bp = (Button) findViewById(R.id.bt_plus);
bs = (Button) findViewById(R.id.bt_sub);
bm = (Button) findViewById(R.id.bt_mutilate);
bd = (Button) findViewById(R.id.bt_div);
bc = (Button) findViewById(R.id.bt_c);
be = (Button) findViewById(R.id.bt_equ);
b1.setOnClickListener(this);
b2.setOnClickListener(this);
b3.setOnClickListener(this);
b4.setOnClickListener(this);
b5.setOnClickListener(this);
b6.setOnClickListener(this);
b7.setOnClickListener(this);
b8.setOnClickListener(this);
b9.setOnClickListener(this);
b0.setOnClickListener(this);
bp.setOnClickListener(this);
bs.setOnClickListener(this);
bm.setOnClickListener(this);
bd.setOnClickListener(this);
bc.setOnClickListener(this);
be.setOnClickListener(this);
show = (EditText) findViewById(R.id.et_show);
delete = (ImageView) findViewById(R.id.iv_delete);
delete.setOnClickListener(this);
tv=(TextView) findViewById(R.id.author);
tv.setOnClickListener(this);
}
@Override
public boolean onCreateOptionsMenu(Menu menu) {
// Inflate the menu; this adds items to the action bar if it is present.
getMenuInflater().inflate(R.menu.main, menu);
return true;
}
@Override
public boolean onOptionsItemSelected(MenuItem item) {
// Handle action bar item clicks here. The action bar will
// automatically handle clicks on the Home/Up button, so long
// as you specify a parent activity in AndroidManifest.xml.
int id = item.getItemId();
if (id == R.id.action_settings) {
return true;
}
return super.onOptionsItemSelected(item);
}
@Override
public void onClick(View v) {
switch (v.getId()) {
case R.id.bt_0:
showString += "0";
break;
case R.id.bt_1:
showString += "1";
break;
case R.id.bt_2:
showString += "2";
break;
case R.id.bt_3:
showString += "3";
break;
case R.id.bt_4:
showString += "4";
break;
case R.id.bt_5:
showString += "5";
break;
case R.id.bt_6:
showString += "6";
break;
case R.id.bt_7:
showString += "7";
break;
case R.id.bt_8:
showString += "8";
break;
case R.id.bt_9:
showString += "9";
break;
case R.id.bt_plus:
if (showString.equals(""))
exception = "е…Ҳиҫ“е…Ҙж•°еҖје“Ұ";
else {
showfirst = Integer.parseInt(showString);
showString = "";
option = "+";
}
break;
case R.id.bt_sub:
if (showString.equals(""))
exception = "е…Ҳиҫ“е…Ҙж•°еҖје“Ұ";
else {
showfirst = Integer.parseInt(showString);
showString = "";
option = "-";
}
break;
case R.id.bt_mutilate:
if (showString.equals(""))
exception = "е…Ҳиҫ“е…Ҙж•°еҖје“Ұ";
else {
showfirst = Integer.parseInt(showString);
showString = "";
option = "*";
}
break;
case R.id.bt_div:
if (showString.equals(""))
exception = "е…Ҳиҫ“е…Ҙж•°еҖје“Ұ";
else {
showfirst = Integer.parseInt(showString);
showString = "";
option = "/";
}
break;
case R.id.bt_equ:
if (option.equals("+"))
showString = showfirst + Integer.parseInt(showString) + "";
else if (option.equals("-")) {
showString = showfirst - Integer.parseInt(showString) + "";
} else if (option.equals("*")) {
showString = showfirst * Integer.parseInt(showString) + "";
} else if (option.equals("/")) {
if (showString.equals("0")) {
exception = "йҷӨж•°дёҚиғҪдёә0пјҒ";
} else
showString = showfirst / Integer.parseInt(showString) + "";
}
break;
case R.id.bt_c:
showString = "";
break;
case R.id.iv_delete:
Toast.makeText(MainActivity.this, showString + "е·Іиў«жё…з©ә",
Toast.LENGTH_SHORT).show();
showString = "";
break;
case R.id.author:
Toast.makeText(MainActivity.this, "йғ‘жҳҺдә®\nиҪҜ件е·ҘзЁӢ\nQQпјҡ1072307340",
Toast.LENGTH_SHORT).show();
break;
default:
break;
}
if (exception.equals(""))
show.setText(showString);
else {
show.setText(exception);
exception = "";
}
// и®ҫзҪ®ж–Үжң¬жЎҶйўңиүІпјӣ
if (!show.getText().toString().equals("")) {
delete.setBackgroundColor(R.drawable.delete_gray);
}
else {
delete.setBackgroundResource(R.drawable.delete);
}
}
}еҶҚиҙҙеёғеұҖactivity_main.xmlпјҡ
<LinearLayout xmlns:android="http://schemas.android.com/apk/res/android" xmlns:tools="http://schemas.android.com/tools" android:layout_width="match_parent" android:layout_height="match_parent" android:orientation="vertical" tools:context="com.example.calculator.MainActivity" > <RelativeLayout android:layout_width="match_parent" android:layout_height="wrap_content" > <EditText android:id="@+id/et_show" android:layout_width="fill_parent" android:layout_height="wrap_content" android:hint="иҜ·иҫ“е…Ҙж•°еӯ—" /> <ImageView android:id="@+id/iv_delete" android:layout_width="wrap_content" android:layout_height="wrap_content" android:layout_alignRight="@id/et_show" android:src="@drawable/delete_and_deletegray" > </ImageView> </RelativeLayout> <GridLayout android:layout_width="fill_parent" android:layout_height="wrap_content" android:layout_below="@+id/et_show" android:focusable="false" android:gravity="center" android:layout_marginTop="25dp" android:columnCount="4" android:horizontalSpacing="0dp" android:orientation="horizontal" android:stretchMode="none" > <Button android:id="@+id/bt_1" android:layout_height="wrap_content" android:text="1" /> <Button android:id="@+id/bt_2" android:text="2" /> <Button android:id="@+id/bt_3" android:text="3" /> <Button android:id="@+id/bt_div" android:text="/" /> <Button android:id="@+id/bt_4" android:text="4" /> <Button android:id="@+id/bt_5" android:text="5" /> <Button android:id="@+id/bt_6" android:text="6" /> <Button android:id="@+id/bt_mutilate" android:text="X" /> <Button android:id="@+id/bt_7" android:text="7" /> <Button android:id="@+id/bt_8" android:text="8" /> <Button android:id="@+id/bt_9" android:text="9" /> <Button android:id="@+id/bt_sub" android:text="-" /> <Button android:id="@+id/bt_0" android:layout_columnSpan="2" android:layout_gravity="fill_horizontal" android:text="0" android:width="2dp" /> <Button android:id="@+id/bt_c" android:layout_width="wrap_content" android:layout_height="wrap_content" android:text="C" /> <Button android:id="@+id/bt_plus" android:layout_gravity="fill_vertical" android:layout_rowSpan="2" android:text="+" /> <Button android:id="@+id/bt_equ" android:layout_columnSpan="3" android:layout_gravity="fill_horizontal" android:text="=" /> </GridLayout> <TextView android:id="@+id/author" android:layout_width="wrap_content" android:layout_height="wrap_content" android:text="Author:Bri" /> <TextView android:id="@+id/test" android:layout_width="wrap_content" android:layout_height="wrap_content" android:text="test:www.jb51.net" /> </LinearLayout>
жҲ‘иҝҳеҶҷдәҶдёҖдёӘdrawableзҡ„xmlпјҢиҮӘе·ұзңӢеҗ§
delete_and_deletegray.xmlпјҡ
<?xml version="1.0" encoding="utf-8"?>
<selector xmlns:android="http://schemas.android.com/apk/res/android">
  <item android:drawable="@drawable/delete_gray" android:state_focused="false" android:state_pressed="false"></item>
  <item android:drawable="@drawable/delete" android:state_focused="false" android:state_pressed="false" android:state_selected="true"/>
  <item android:drawable="@drawable/delete" android:state_pressed="true" android:state_selected="false"/>
  <item android:drawable="@drawable/delete" android:state_focused="true" android:state_pressed="true"/>
</selector>
д»ҘдёҠе°ұжҳҜвҖңAndroidејҖеҸ‘жҖҺд№Ҳе®һзҺ°и®Ўз®—еҷЁеҠҹиғҪвҖқиҝҷзҜҮж–Үз« зҡ„жүҖжңүеҶ…е®№пјҢж„ҹи°ўеҗ„дҪҚзҡ„йҳ…иҜ»пјҒзӣёдҝЎеӨ§е®¶йҳ…иҜ»е®ҢиҝҷзҜҮж–Үз« йғҪжңүеҫҲеӨ§зҡ„收иҺ·пјҢе°Ҹзј–жҜҸеӨ©йғҪдјҡдёәеӨ§е®¶жӣҙж–°дёҚеҗҢзҡ„зҹҘиҜҶпјҢеҰӮжһңиҝҳжғіеӯҰд№ жӣҙеӨҡзҡ„зҹҘиҜҶпјҢиҜ·е…іжіЁдәҝйҖҹдә‘иЎҢдёҡиө„и®Ҝйў‘йҒ“гҖӮ
е…ҚиҙЈеЈ°жҳҺпјҡжң¬з«ҷеҸ‘еёғзҡ„еҶ…е®№пјҲеӣҫзүҮгҖҒи§Ҷйў‘е’Ңж–Үеӯ—пјүд»ҘеҺҹеҲӣгҖҒиҪ¬иҪҪе’ҢеҲҶдә«дёәдё»пјҢж–Үз« и§ӮзӮ№дёҚд»ЈиЎЁжң¬зҪ‘з«ҷз«ӢеңәпјҢеҰӮжһңж¶үеҸҠдҫөжқғиҜ·иҒ”зі»з«ҷй•ҝйӮ®з®ұпјҡis@yisu.comиҝӣиЎҢдёҫжҠҘпјҢ并жҸҗдҫӣзӣёе…іиҜҒжҚ®пјҢдёҖз»ҸжҹҘе®һпјҢе°Ҷз«ӢеҲ»еҲ йҷӨж¶үе«ҢдҫөжқғеҶ…е®№гҖӮ
жӮЁеҘҪпјҢзҷ»еҪ•еҗҺжүҚиғҪдёӢи®ўеҚ•е“ҰпјҒ