您好,登录后才能下订单哦!
密码登录
登录注册
点击 登录注册 即表示同意《亿速云用户服务条款》
RAC搭建手册... 1
一.环境介绍... 1
二.配置hostname和hosts文件两台都需要设置... 1
三.关闭防火墙,NTP服务,关闭selinux. 2
四.创建必要的用户、组和目录,并授权... 2
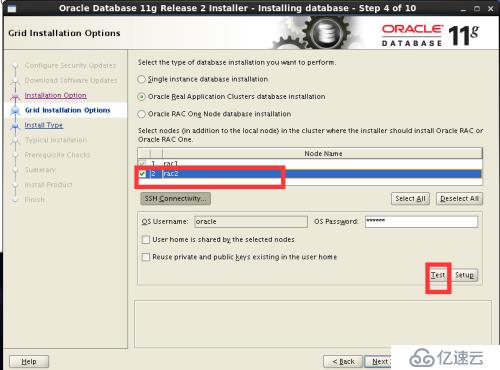
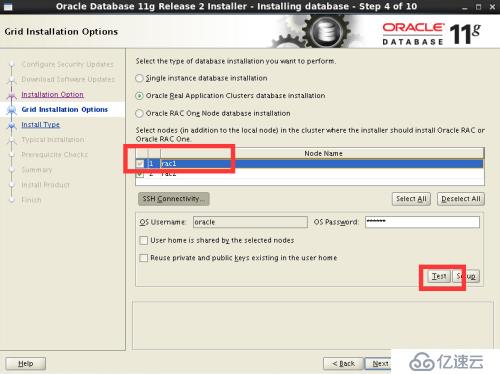
五. 节点配置检查... 3
六.参数文件修改... 3
七.安装所需的依赖包... 4
八.添加软连接... 4
九.配置grid和oracle用户环境变量... 5
十.配置grid用户互信... 5
十一.配置裸盘... 7
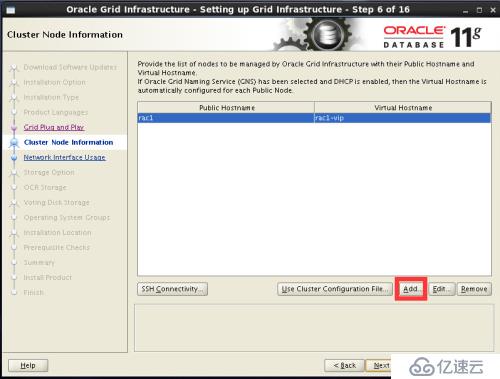
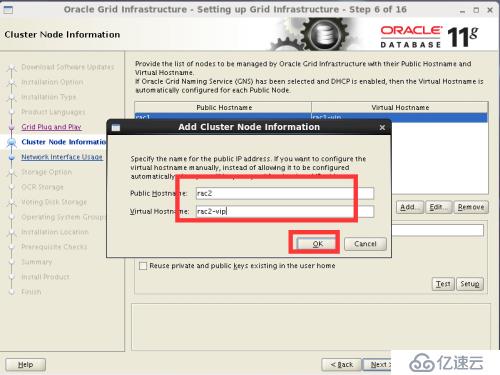
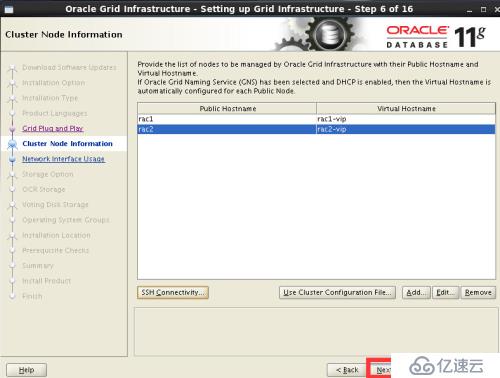
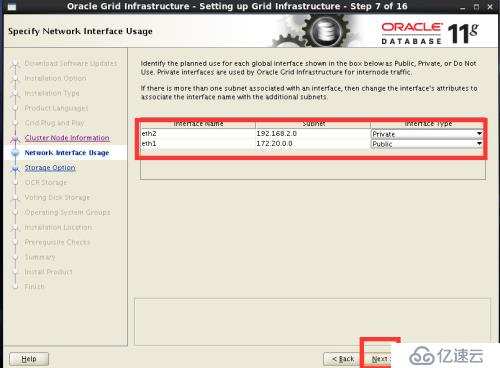
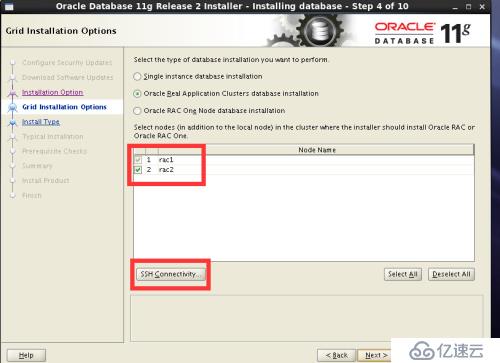
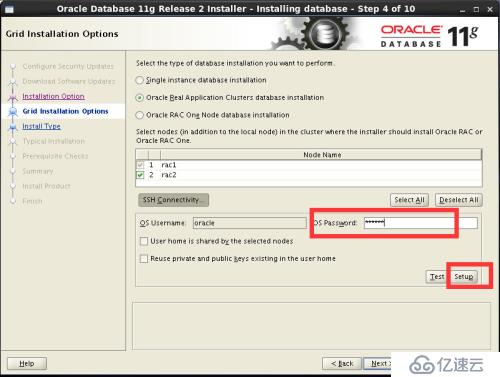
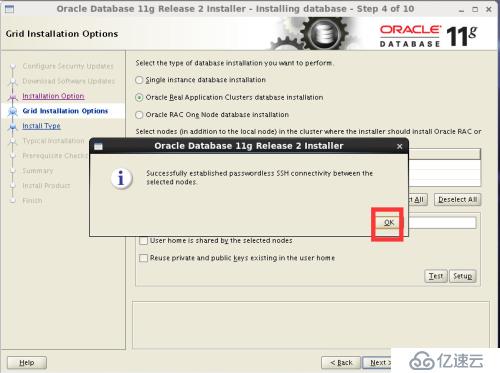
十二.grid安装... 8
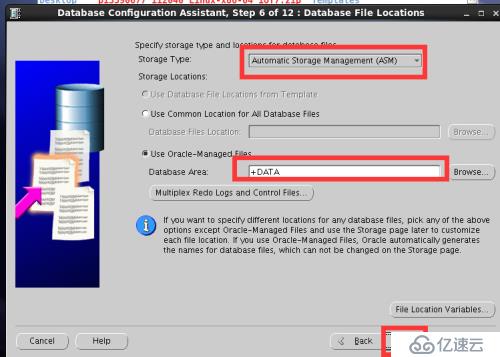
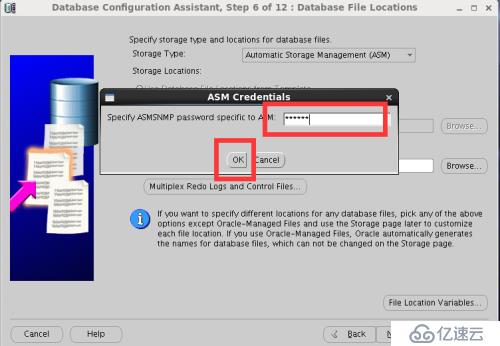
十三.asm磁盘组创建... 27
十四.安装oracle software. 32
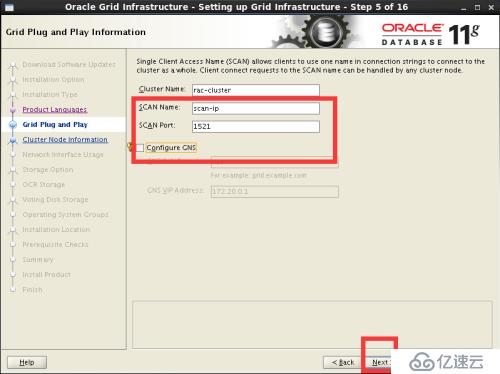
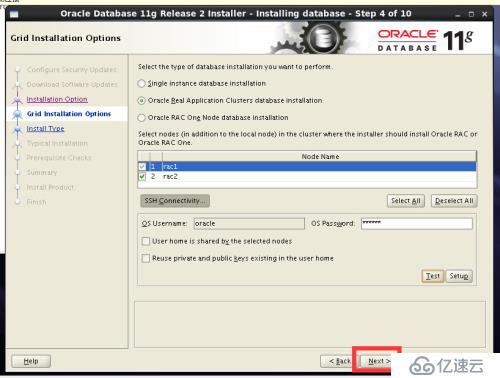
scan-ip | 172.20.0.174 |
rac1-public ip | 172.20.0.25 |
rac2-public ip | 172.20.0.26 |
rac1-vip | 172.20.0.186 |
rac2-vip | 172.20.0.189 |
rac1-private ip | 192.168.2.112 |
rac2-private ip | 192.168.2.107 |
172.20.0.25 rac1:
[root@localhost ~]# vi /etc/sysconfig/network NETWORKING=yes HOSTNAME=rac1 |
172.20.0.26 rac2
[root@localhost ~]# vi /etc/sysconfig/network NETWORKING=yes HOSTNAME=rac2 |
[root@localhost ~]# vi /etc/hosts 172.20.0.25 rac1 172.20.0.186 rac1-vip 192.168.2.112 rac1-priv 172.20.0.26 rac2 172.20.0.189 rac2-vip 192.168.2.107 rac2-priv 172.20.0.174 scan-ip |
rac1和rac2都需要关闭
[root@rac1 ~]# vi /etc/sysconfig/selinux SELINUX=disabled 这里需要重启生效 [root@rac1 ~]# getenforce disabled [root@rac1 ~]#/etc/init.d/iptables stop [root@rac1 ~]# chkconfig iptables off [root@rac1 ~]# chkconfig ntpd off |
两个节点rac1和rac2都需要创建,这里只演示rac1上面的操作。
[root@rac1 ~]# /usr/sbin/groupadd -g 1000 oinstall [root@rac1 ~]# /usr/sbin/groupadd -g 1020 asmadmin [root@rac1 ~]# /usr/sbin/groupadd -g 1021 asmdba [root@rac1 ~]# /usr/sbin/groupadd -g 1022 asmoper [root@rac1 ~]# /usr/sbin/groupadd -g 1031 dba [root@rac1 ~]# /usr/sbin/groupadd -g 1032 oper [root@rac1 ~]# useradd -d /opt/grid -u 1100 -g oinstall -G asmadmin,asmdba,asmoper,oper,dba grid [root@rac1 ~]# useradd -d /opt/oracle -u 1101 -g oinstall -G dba,asmdba,oper oracle [root@rac1 ~]# passwd oracle Changing password for user oracle. New password: BAD PASSWORD: it is based on a dictionary word BAD PASSWORD: is too simple Retype new password: passwd: all authentication tokens updated successfully. [root@rac1 ~]# passwd grid Changing password for user grid. New password: BAD PASSWORD: it is too short BAD PASSWORD: is too simple Retype new password: passwd: all authentication tokens updated successfully. [root@rac1 ~]# mkdir -p /u01/app/11.2.0/grid [root@rac1 ~]# mkdir -p /u01/app/grid [root@rac1 ~]# mkdir /u01/app/oracle [root@rac1 ~]# chown -R grid:oinstall /u01 [root@rac1 ~]# chown oracle:oinstall /u01/app/oracle [root@rac1 ~]# chmod -R 775 /u01/ [root@rac1 ~]# |
查看内存和swap大小,内存大小:至少2.5GB
root@rac1 ~]# grep MemTotal /proc/meminfo MemTotal: 8061904 kB [root@rac1 ~]# grep SwapTotal /proc/meminfo SwapTotal: 3145720 kB [root@rac1 ~]# |
(1)内核参数设置:
[root@rac1 ~]# vi /etc/sysctl.conf # Controls the maximum shared segment size, in bytes kernel.shmmax = 68719476736(已有)物理内存的1/2(M)*1024*1024
# Controls the maximum number of shared memory segments, in pages kernel.shmall = 4294967296(已有) #oracle setting fs.aio-max-nr = 1048576 fs.file-max = 6815744 kernel.shmmni = 4096 kernel.sem = 250 32000 100 128 net.ipv4.ip_local_port_range = 9000 65500 net.core.rmem_default = 262144 net.core.rmem_max = 4194304 net.core.wmem_default = 262144 net.core.wmem_max = 1048576 |
#/sbin/sysctl -p 执行该命令,使修改生效
[root@rac1 ~]# /sbin/sysctl -p |
(2)配置oracle、grid用户的shell限制
[root@rac1 ~]# vi /etc/security/limits.conf oracle hard nproc 16384 oracle soft nofile 1024 oracle hard nofile 65536 oracle soft stack 10240 grid soft nproc 2047 grid hard nproc 16384 grid soft nofile 1024 grid hard nofile 65536 |
(3)配置login
[root@rac1 ~]# vi /etc/pam.d/login |
yum -y install binutils compat-libstdc++-33 elfutils-libelf elfutils-libelf-devel gcc gcc-c++ yum -y install glibc glibc-common glibc-devel glibc-headers ksh libaio libaio-devel yum -y install libgcc libstdc++ libstdc++-devel make numactl-devel sysstat unixODBC unixODBC-devel yum install libcap |
[root@rac1 ~]# cd /lib64 ln -s libcap.so.2 libcap.so.1 |
Oracle_sid需要根据节点不同进行修改
[root@rac1 ~]# su - grid export TMP=/tmp export TMPDIR=$TMP export ORACLE_SID=+ASM1 # RAC1 export ORACLE_SID=+ASM2 # RAC2 export ORACLE_BASE=/u01/app/grid export ORACLE_HOME=/u01/app/11.2.0/grid export PATH=/usr/sbin:$PATH export PATH=$ORACLE_HOME/bin:$PATH export LD_LIBRARY_PATH=$ORACLE_HOME/lib:/lib:/usr/lib export CLASSPATH=$ORACLE_HOME/JRE:$ORACLE_HOME/jlib:$ORACLE_HOME/rdbms/jlib umask 022 |
需要注意的是ORACLE_UNQNAME是数据库名,创建数据库时指定多个节点是会创建多个实例,ORACLE_SID指的是数据库实例名
[root@rac1 ~]# su - oracle export TMP=/tmp export TMPDIR=$TMP export ORACLE_SID=orcl1 # RAC1 export ORACLE_SID=orcl2 # RAC2 export ORACLE_UNQNAME=orcl export ORACLE_BASE=/u01/app/oracle export ORACLE_HOME=$ORACLE_BASE/product/11.2.0/db_1 export TNS_ADMIN=$ORACLE_HOME/network/admin export PATH=/usr/sbin:$PATH export PATH=$ORACLE_HOME/bin:$PATH export LD_LIBRARY_PATH=$ORACLE_HOME/lib:/lib:/usr/lib |
$ source .bash_profile使配置文件生效
配置过程如下: 各节点生成Keys: 配置过程如下: 各节点生成Keys: [root@rac1 ~]# su - grid [grid@rac1 ~]$ mkdir ~/.ssh [grid@rac1 ~]$ chmod 700 ~/.ssh [grid@rac1 ~]$ ssh-keygen -t rsa [grid@rac1 ~]$ ssh-keygen -t dsa [root@rac2 ~]# su - grid [grid@rac2 ~]$ mkdir ~/.ssh [grid@rac2 ~]$ chmod 700 ~/.ssh [grid@rac2 ~]$ ssh-keygen -t rsa [grid@rac2 ~]$ ssh-keygen -t dsa
在节点1上进行互信配置: [grid@rac1 ~]$ touch ~/.ssh/authorized_keys [grid@rac1 ~]$ cd ~/.ssh [grid@rac1 .ssh]$ ssh rac1 cat ~/.ssh/id_rsa.pub >> authorized_keys [grid@rac1 .ssh]$ ssh rac2 cat ~/.ssh/id_rsa.pub >> authorized_keys [grid@rac1 .ssh]$ ssh rac1 cat ~/.ssh/id_dsa.pub >> authorized_keys [grid@rac1 .ssh]$ ssh rac2 cat ~/.ssh/id_dsa.pub >> authorized_keys
在rac1把存储公钥信息的验证文件传送到rac2上 [grid@rac1 .ssh]$ pwd /home/grid/.ssh [grid@rac1 .ssh]$ scp authorized_keys rac2:'pwd' grid@rac2's password: authorized_keys 100% 1644 1.6KB/s 00:00
设置验证文件的权限 在每一个节点执行: $ chmod 600 ~/.ssh/authorized_keys
启用用户一致性 在你要运行OUI的节点以grid用户运行(这里选择rac1): [grid@rac1 .ssh]$ exec /usr/bin/ssh-agent $SHELL [grid@rac1 .ssh]$ ssh-add Identity added: /home/grid/.ssh/id_rsa (/home/grid/.ssh/id_rsa) Identity added: /home/grid/.ssh/id_dsa (/home/grid/.ssh/id_dsa)
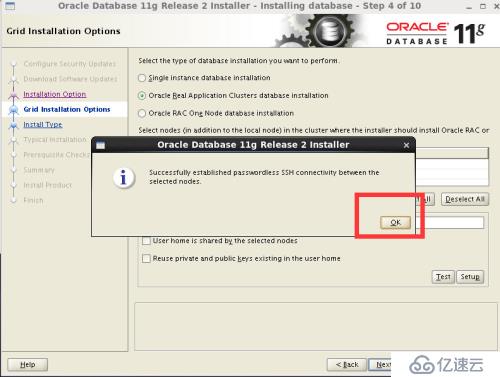
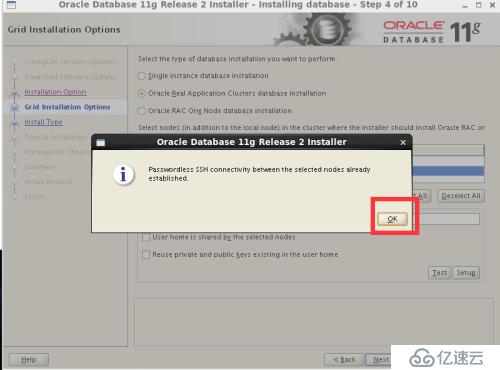
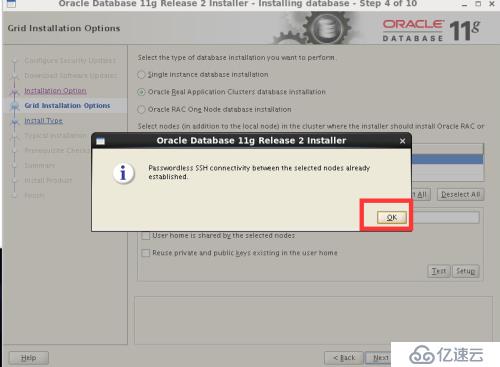
验证ssh配置是否正确 以grid用户在所有节点分别执行: ssh rac1 date ssh rac2 date ssh rac1-priv date ssh rac2-priv date
如果不需要输入密码就可以输出时间,说明ssh验证配置成功。必须把以上命令在两个节点都运行,每一个命令在第一次执行的时候需要输入yes。 如果不运行这些命令,即使ssh验证已经配好,安装clusterware的时候也会出现错误: The specified nodes are not clusterable 因为,配好ssh后,还需要在第一次访问时输入yes,才算是真正的无障碍访问其他服务器。 |
需要注意的是生成密钥时不设置密码,授权文件权限为600,同时需要两个节点互相ssh通过一次。
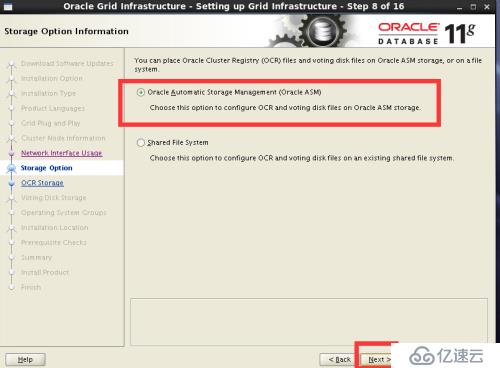
使用asm管理存储需要裸盘,前面配置了共享硬盘到两台主机上。配置裸盘的方式有两种(1)oracleasm添加
(2)/etc/udev/rules.d/60-raw.rules配置文件添加(字符方式帮绑定udev)
采用第二种
fdisk /dev/sdb Command (m forhelp): n Command action e extended p primary partition (1-4) p Partition number (1-4): 1 ……. 这里我分了三个区:OCR(投票盘),DATA(数据文件)),FAR(快速恢复区) 最后 w 命令保存更改 partx -a /dev/sdb |
分别在两个节点创建裸设备映射(两个节点都要编辑)(两个节点都要编辑)
[root@rac1 rules.d]# vi /etc/udev/rules.d/60-raw.rules # Enter raw device bindings here. # # An example would be: # ACTION=="add", KERNEL=="sda", RUN+="/bin/raw /dev/raw/raw1 %N" # to bind /dev/raw/raw1 to /dev/sda, or # ACTION=="add", ENV{MAJOR}=="8", ENV{MINOR}=="1", RUN+="/bin/raw /dev/raw/raw2 %M %m" # to bind /dev/raw/raw2 to the device with major 8, minor 1. ACTION=="add", KERNEL=="sdb1", RUN+="/bin/raw /dev/raw/raw1 %N" ACTION=="add", KERNEL=="sdb2", RUN+="/bin/raw /dev/raw/raw2 %N" ACTION=="add", KERNEL=="sdb3", RUN+="/bin/raw /dev/raw/raw3 %N" KERNEL=="raw[1-3]",OWNER="grid",GROUP="asmadmin" MODE="660" |
启动并查看裸盘
[root@rac1 ~]# start_udev Starting udev: [ OK ] [root@rac1 ~]# ll /dev/raw/ total 0 crw-rw---- 1 grid asmadmin 162, 1 Apr 13 13:51 raw1 crw-rw---- 1 grid asmadmin 162, 2 Apr 13 13:51 raw2 crw-rw---- 1 grid asmadmin 162, 3 Apr 13 13:51 raw3 crw-rw---- 1 root disk 162, 0 Apr 13 13:51 rawctl |
[root@rac1 rules.d]# raw -qa /dev/raw/raw1: bound to major 8, minor 17 /dev/raw/raw2: bound to major 8, minor 18 /dev/raw/raw3: bound to major 8, minor 19 查看裸设备的主从设备号 [root@rac1 rules.d]# ls -l /dev/raw/ total 0 crw-rw---- 1 grid asmadmin 162, 1 Aug 5 12:44 raw1 crw-rw---- 1 grid asmadmin 162, 2 Aug 5 12:44 raw2 crw-rw---- 1 grid asmadmin 162, 3 Aug 5 12:44 raw3 |
节点2强制刷新
[root@rac2 rules.d]# partprobe [root@rac2 ~]# start_udev Starting udev: [ OK ] [root@rac1 rules.d]# raw -qa /dev/raw/raw1: bound to major 8, minor 17 /dev/raw/raw2: bound to major 8, minor 18 /dev/raw/raw3: bound to major 8, minor 19 查看裸设备的主从设备号 [root@rac1 rules.d]# ls -l /dev/raw/ total 0 crw-rw---- 1 grid asmadmin 162, 1 Aug 5 12:44 raw1 crw-rw---- 1 grid asmadmin 162, 2 Aug 5 12:44 raw2 crw-rw---- 1 grid asmadmin 162, 3 Aug 5 12:44 raw3 |
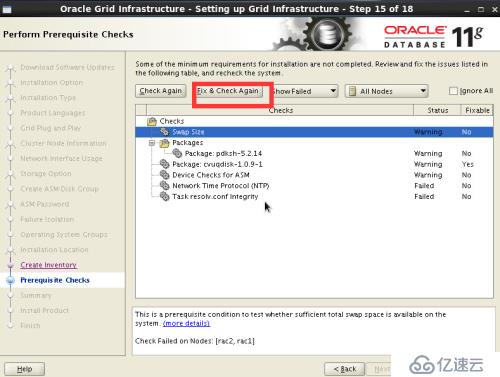
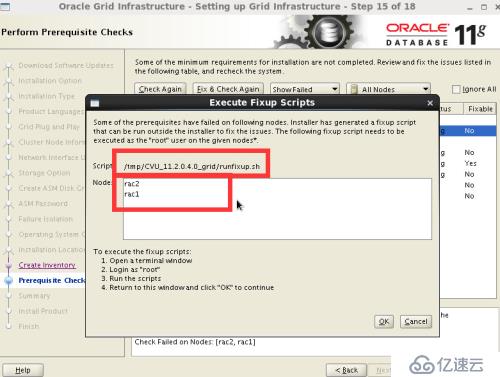
rac1到grid软件目录下执行runcluvfy.sh命令开始预安装检查:
在grid下解压grid,执行预安装检查。
[grid@rac1 ~]$ cd grid/ [grid@rac1 grid]$ ls install readme.html response rpm runcluvfy.sh runInstaller sshsetup stage welcome.html [grid@rac1 grid]$ pwd /opt/grid/grid [grid@rac1 grid]$ ./runcluvfy.sh stage -pre crsinst -n rac1,rac2 -fixup -verbose |
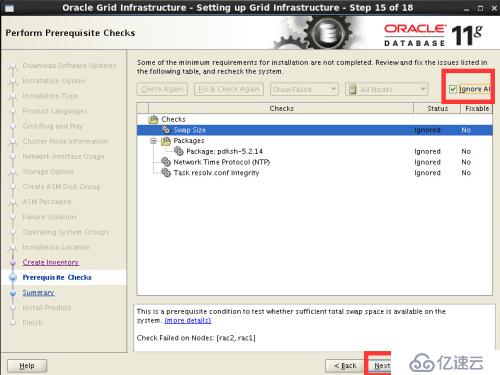
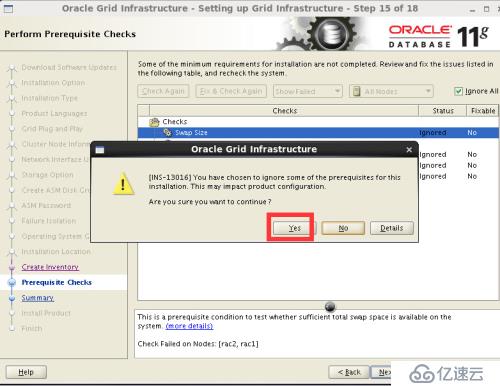
查看cvu报告,修正错误, 各项都检查通过即可开始安装grid
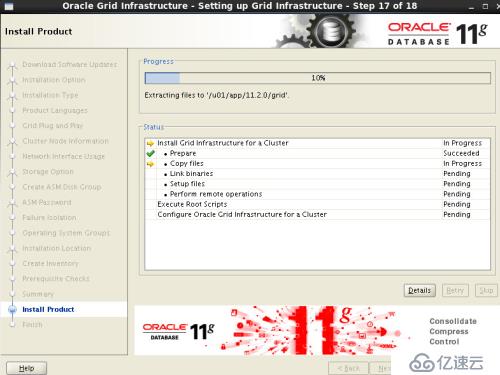
登陆到图形化界面
[root@rac1 ~]#xhost + [root@rac1 ~]#su – grid [grid@rac1 ~]$cd grid [grid@rac1 grid]$./runInstaller |

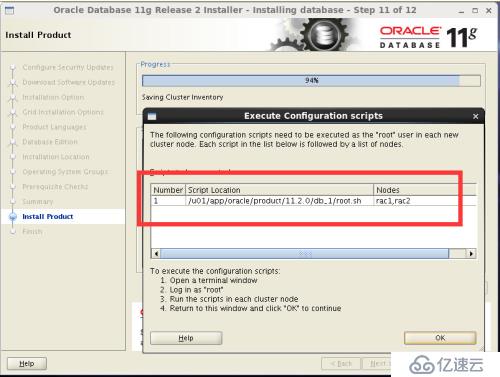
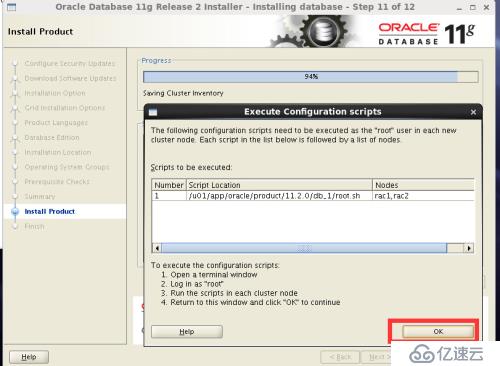
已经手动做过互信,这里可以跳过,直接下一步

在两个节点上分别执行这两个脚本
执行脚本时注意顺序,一定是先执行rac1,然后去rac2上执行


执行完之后点击ok
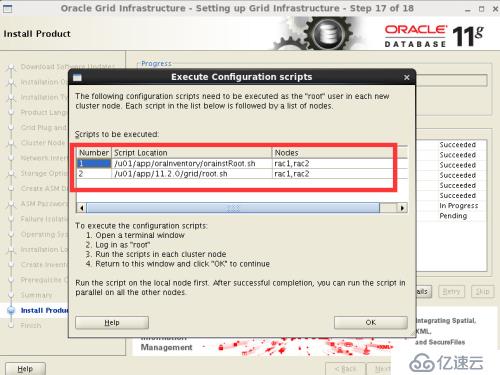
rac1:
[root@rac1 ~]# cd /u01/app/oraInventory/ [root@rac1 oraInventory]# ./orainstRoot.sh Changing permissions of /u01/app/oraInventory. Adding read,write permissions for group. Removing read,write,execute permissions for world.
Changing groupname of /u01/app/oraInventory to oinstall. The execution of the script is complete. [root@rac1 oraInventory]# clear [root@rac1 oraInventory]# cd /u01/app/11.2.0/grid/ [root@rac1 grid]# ./root.sh Performing root user operation for Oracle 11g
The following environment variables are set as: ORACLE_OWNER= grid ORACLE_HOME= /u01/app/11.2.0/grid
Enter the full pathname of the local bin directory: [/usr/local/bin]: Copying dbhome to /usr/local/bin ... Copying oraenv to /usr/local/bin ... Copying coraenv to /usr/local/bin ...
Creating /etc/oratab file... Entries will be added to the /etc/oratab file as needed by Database Configuration Assistant when a database is created Finished running generic part of root script. Now product-specific root actions will be performed.
Using configuration parameter file: /u01/app/11.2.0/grid/crs/install/crsconfig_params Creating trace directory User ignored Prerequisites during installation Installing Trace File Analyzer OLR initialization - successful root wallet root wallet cert root cert export peer wallet profile reader wallet pa wallet peer wallet keys pa wallet keys peer cert request pa cert request peer cert pa cert peer root cert TP profile reader root cert TP pa root cert TP peer pa cert TP pa peer cert TP profile reader pa cert TP profile reader peer cert TP peer user cert pa user cert Adding Clusterware entries to upstart CRS-2672: Attempting to start 'ora.mdnsd' on 'rac1' CRS-2676: Start of 'ora.mdnsd' on 'rac1' succeeded CRS-2672: Attempting to start 'ora.gpnpd' on 'rac1' CRS-2676: Start of 'ora.gpnpd' on 'rac1' succeeded CRS-2672: Attempting to start 'ora.cssdmonitor' on 'rac1' CRS-2672: Attempting to start 'ora.gipcd' on 'rac1' CRS-2676: Start of 'ora.cssdmonitor' on 'rac1' succeeded CRS-2676: Start of 'ora.gipcd' on 'rac1' succeeded CRS-2672: Attempting to start 'ora.cssd' on 'rac1' CRS-2672: Attempting to start 'ora.diskmon' on 'rac1' CRS-2676: Start of 'ora.diskmon' on 'rac1' succeeded CRS-2676: Start of 'ora.cssd' on 'rac1' succeeded
ASM created and started successfully.
Disk Group OCR created successfully.
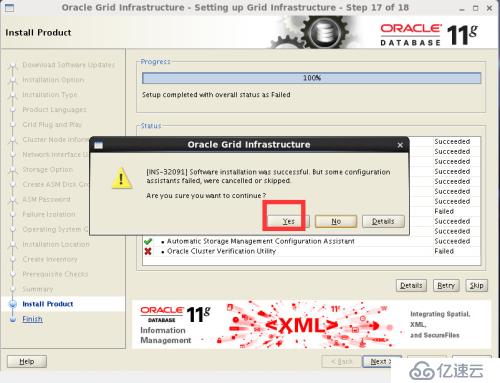
clscfg: -install mode specified Successfully accumulated necessary OCR keys. Creating OCR keys for user 'root', privgrp 'root'.. Operation successful. CRS-4256: Updating the profile Successful addition of voting disk 9ee58ddd21094f61bf43065b4875e9a4. Successfully replaced voting disk group with +OCR. CRS-4256: Updating the profile CRS-4266: Voting file(s) successfully replaced ## STATE File Universal Id File Name Disk group -- ----- ----------------- --------- --------- 1. ONLINE 9ee58ddd21094f61bf43065b4875e9a4 (/dev/raw/raw1) [OCR] Located 1 voting disk(s). CRS-2672: Attempting to start 'ora.asm' on 'rac1' CRS-2676: Start of 'ora.asm' on 'rac1' succeeded CRS-2672: Attempting to start 'ora.OCR.dg' on 'rac1' CRS-2676: Start of 'ora.OCR.dg' on 'rac1' succeeded Configure Oracle Grid Infrastructure for a Cluster ... succeeded |
rac2
[root@rac2 CVU_11.2.0.4.0_grid]# cd /u01/app/oraInventory/ ContentsXML/ logs/ oraInst.loc orainstRoot.sh [root@rac2 CVU_11.2.0.4.0_grid]# cd /u01/app/oraInventory/ [root@rac2 oraInventory]# ./orainstRoot.sh Changing permissions of /u01/app/oraInventory. Adding read,write permissions for group. Removing read,write,execute permissions for world.
Changing groupname of /u01/app/oraInventory to oinstall. The execution of the script is complete. [root@rac2 oraInventory]# cd ../11.2.0/grid/ [root@rac2 grid]# ./r racg/ rdbms/ relnotes/ root.sh rootupgrade.sh [root@rac2 grid]# ./root.sh Performing root user operation for Oracle 11g
The following environment variables are set as: ORACLE_OWNER= grid ORACLE_HOME= /u01/app/11.2.0/grid
Enter the full pathname of the local bin directory: [/usr/local/bin]: Copying dbhome to /usr/local/bin ... Copying oraenv to /usr/local/bin ... Copying coraenv to /usr/local/bin ...
Creating /etc/oratab file... Entries will be added to the /etc/oratab file as needed by Database Configuration Assistant when a database is created Finished running generic part of root script. Now product-specific root actions will be performed. Using configuration parameter file: /u01/app/11.2.0/grid/crs/install/crsconfig_params Creating trace directory User ignored Prerequisites during installation Installing Trace File Analyzer
OLR initialization - successful Adding Clusterware entries to upstart CRS-4402: The CSS daemon was started in exclusive mode but found an active CSS daemon on node rac1, number 1, and is terminating An active cluster was found during exclusive startup, restarting to join the cluster Configure Oracle Grid Infrastructure for a Cluster ... succeeded |
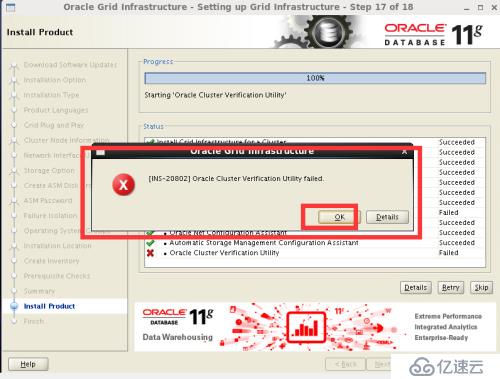
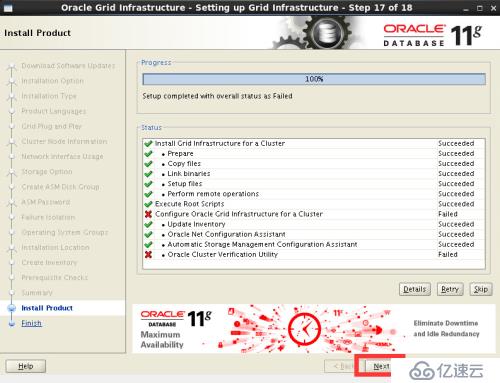
点击ok继续安装
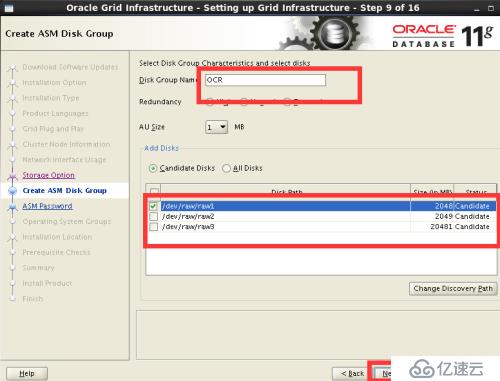
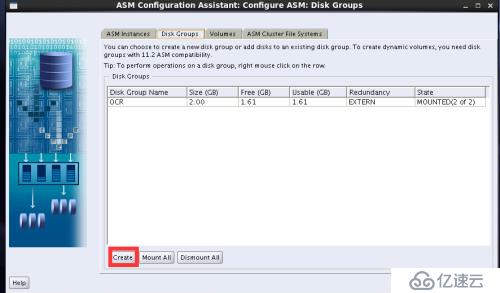
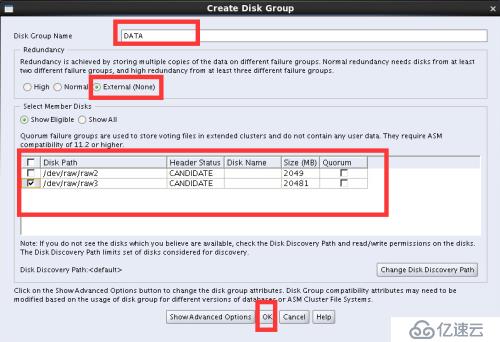
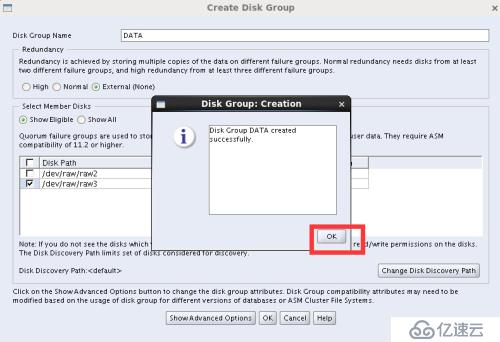
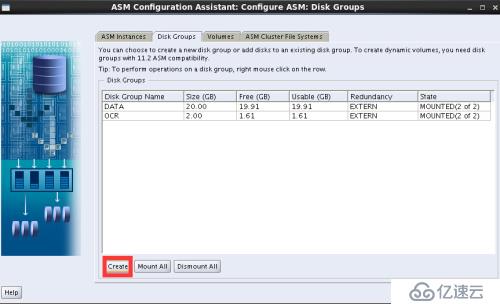
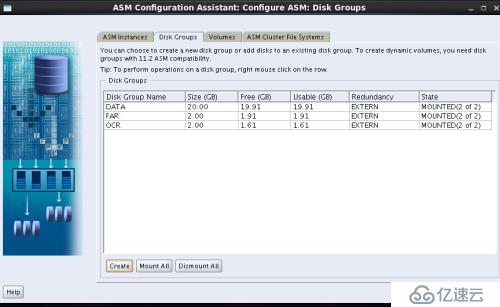
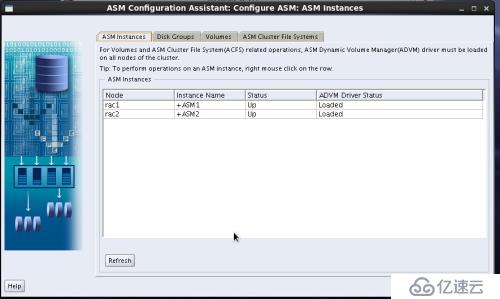
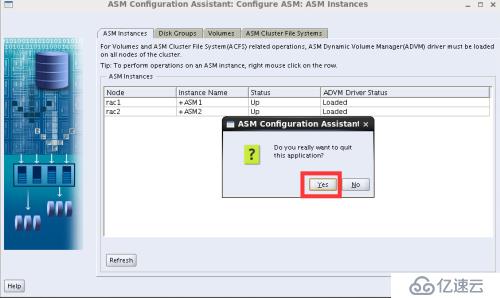
十三.asm磁盘组创建
[root@rac1 ~]#su – grid [grid@rac1 ~]$asmca
|


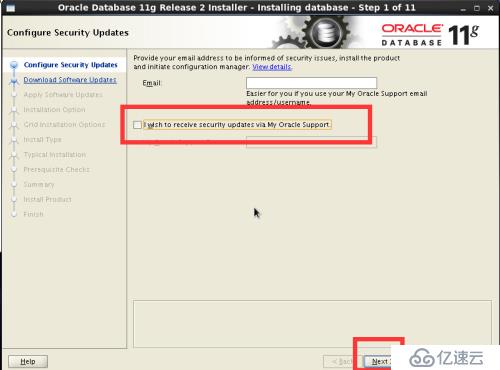
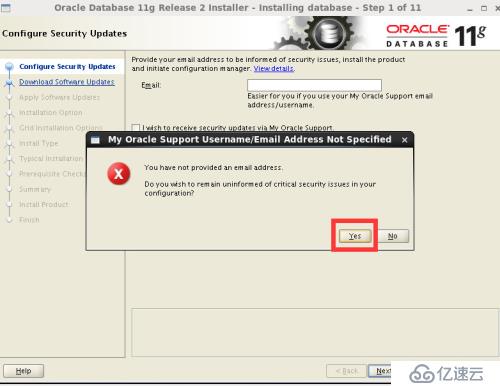
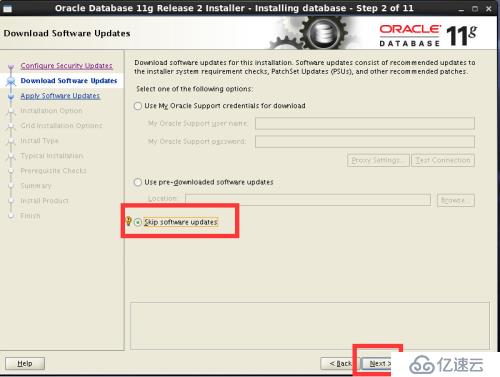
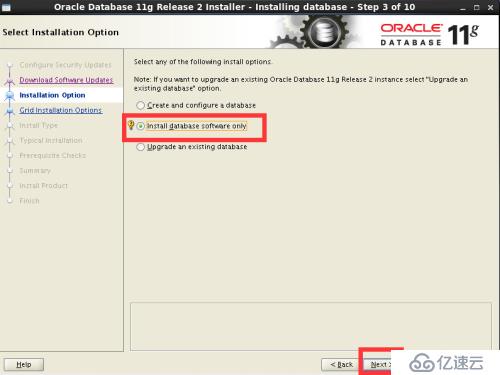
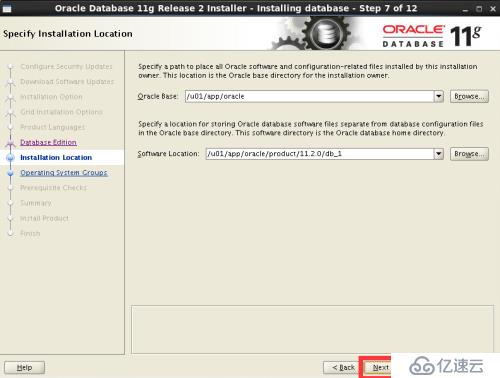
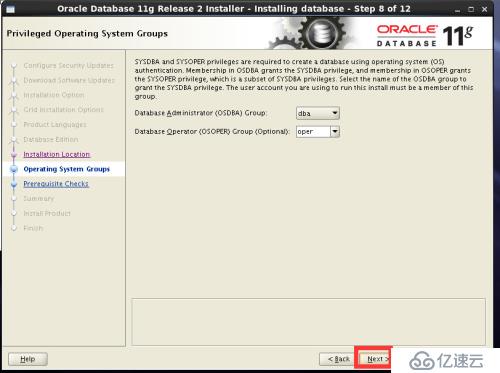
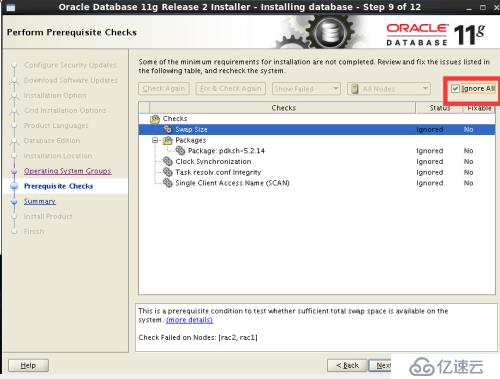
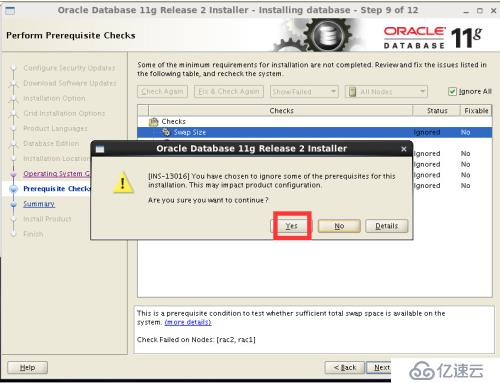
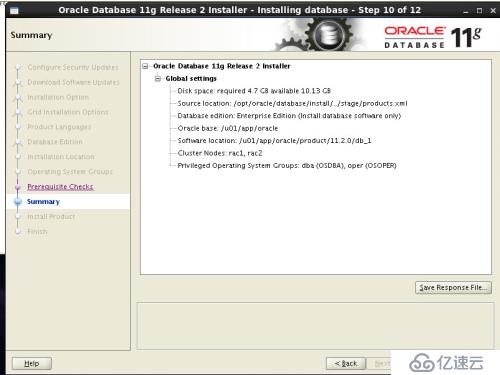
十四.安装oracle software
[rooot@rac1 ~]#xhost + [root@rac1 ~]#su – oracle [oracle@rac1 ~]$cd database [oracle@rac1 ~]$./runInstaller |

rac1
[root@rac1 ~]# cd /u01/app/oracle/product/11.2.0/db_1/ [root@rac1 db_1]# ./root.sh Performing root user operation for Oracle 11g
The following environment variables are set as: ORACLE_OWNER= oracle ORACLE_HOME= /u01/app/oracle/product/11.2.0/db_1
Enter the full pathname of the local bin directory: [/usr/local/bin]: The contents of "dbhome" have not changed. No need to overwrite. The contents of "oraenv" have not changed. No need to overwrite. The contents of "coraenv" have not changed. No need to overwrite.
Entries will be added to the /etc/oratab file as needed by Database Configuration Assistant when a database is created Finished running generic part of root script. Now product-specific root actions will be performed. Finished product-specific root actions. [root@rac1 db_1]# |
rac2
[root@rac2 grid]# cd /u01/app/oracle/product/11.2.0/db_1/ [root@rac2 db_1]# ./root.sh Performing root user operation for Oracle 11g
The following environment variables are set as: ORACLE_OWNER= oracle ORACLE_HOME= /u01/app/oracle/product/11.2.0/db_1
Enter the full pathname of the local bin directory: [/usr/local/bin]: The contents of "dbhome" have not changed. No need to overwrite. The contents of "oraenv" have not changed. No need to overwrite. The contents of "coraenv" have not changed. No need to overwrite.
Entries will be added to the /etc/oratab file as needed by Database Configuration Assistant when a database is created Finished running generic part of root script. Now product-specific root actions will be performed. Finished product-specific root actions. [root@rac2 db_1]# |

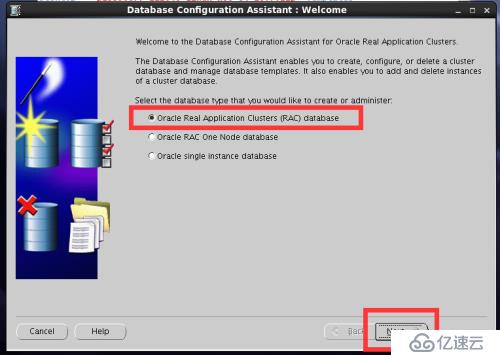
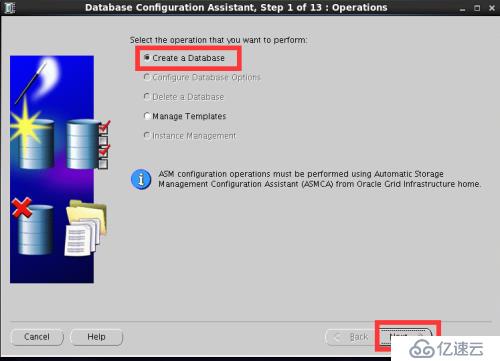
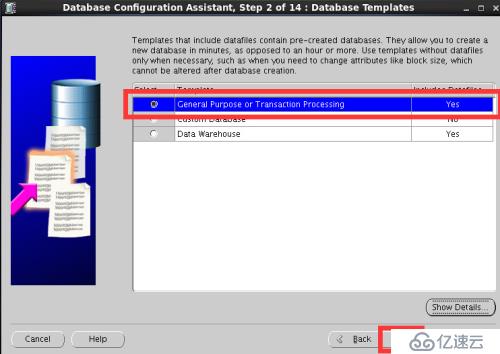
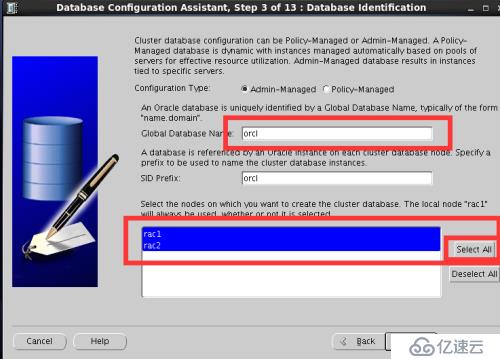
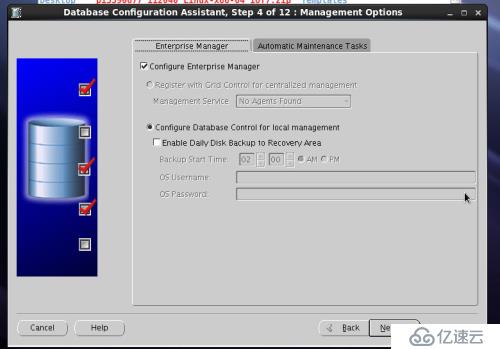
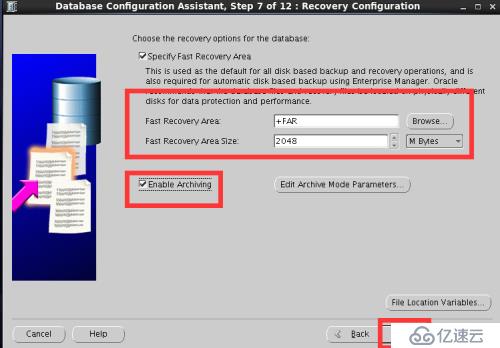
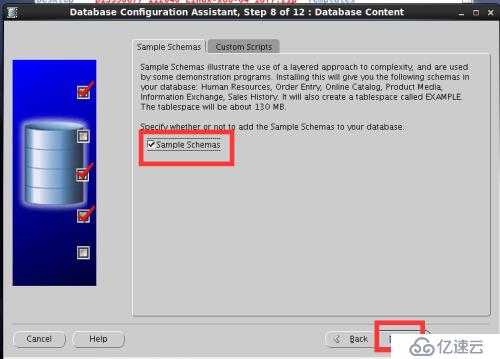
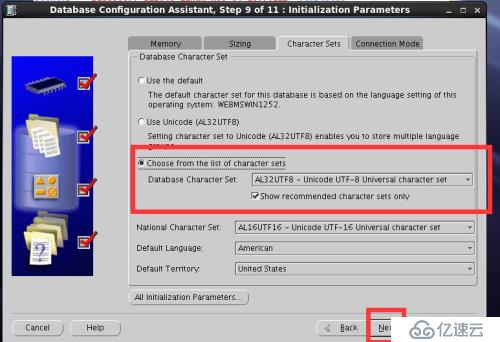
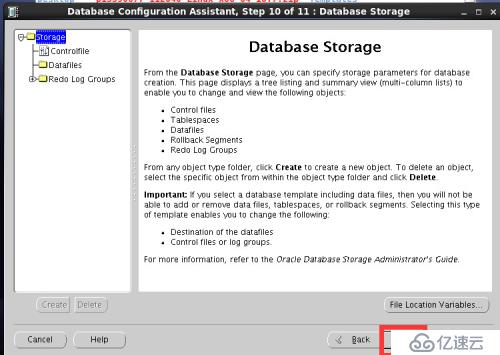
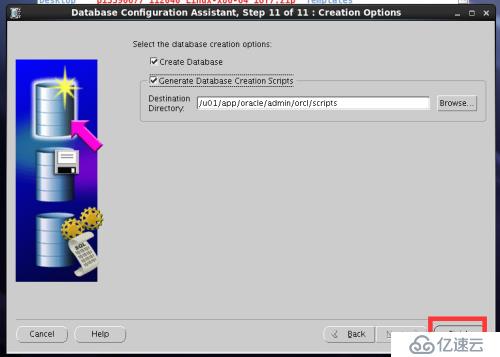
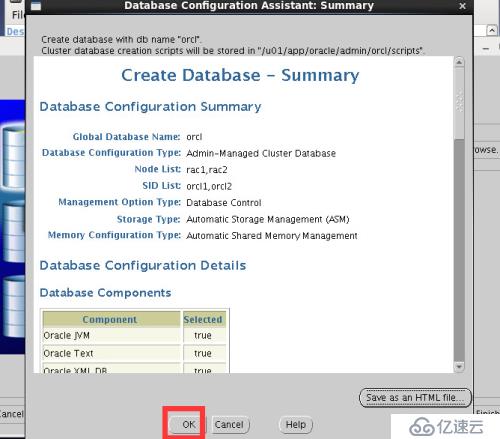
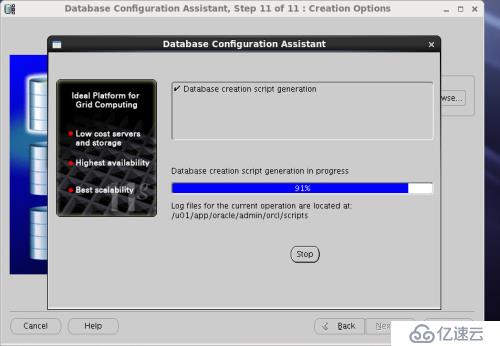
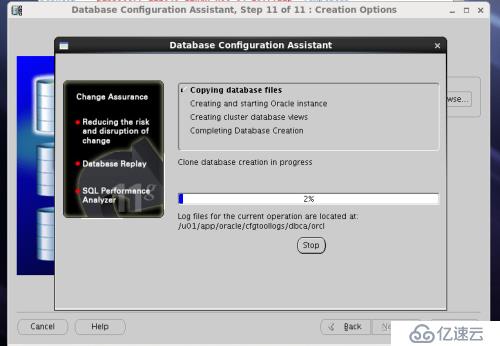
十五.DBCA创建实例
在oracle下解压安装包
登陆到图形化界面
[root@rac1 ~]#xhost + [root@rac1 ~]#su – oracle [oracle@rac1 ~]$ dbca |
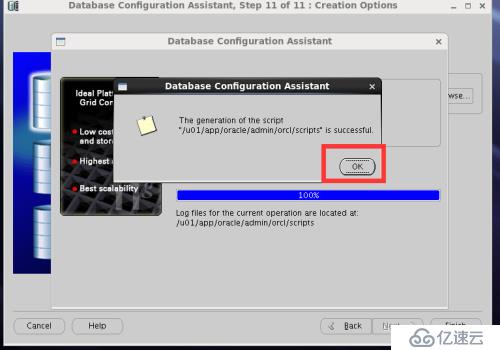
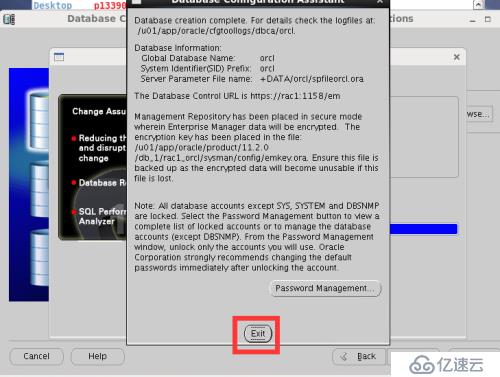
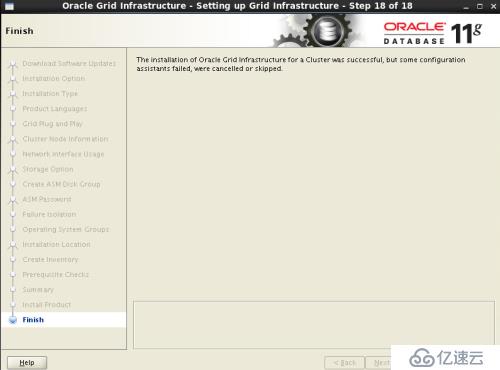
安装完成。
免责声明:本站发布的内容(图片、视频和文字)以原创、转载和分享为主,文章观点不代表本网站立场,如果涉及侵权请联系站长邮箱:is@yisu.com进行举报,并提供相关证据,一经查实,将立刻删除涉嫌侵权内容。