您好,登录后才能下订单哦!
这期内容当中小编将会给大家带来有关R语言中怎么实现PCA分析与可视化,文章内容丰富且以专业的角度为大家分析和叙述,阅读完这篇文章希望大家可以有所收获。
(1)标准化(Scale)
如果不对数据进行scale处理,本身数值大的基因对主成分的贡献会大。如果关注的是变量的相对大小对样品分类的贡献,则应SCALE,以防数值高的变量导入的大方差引入的偏见。但是定标(scale)可能会有一些负面效果,因为定标后变量之间的权重就是变得相同。如果我们的变量中有噪音的话,我们就在无形中把噪音和信息的权重变得相同,但PCA本身无法区分信号和噪音。在这样的情形下,我们就不必做定标。
(2)特征值 (eigen value)
特征值与特征向量均为矩阵分解的结果。特征值表示标量部分,一般为某个主成分的方差,其相对比例可理解为方差解释度或贡献度 ;特征值从第一主成分会逐渐减小。
(3)特征向量(eigen vector)
特征向量为对应主成分的线性转换向量(线性回归系数),特征向量与原始矩阵的矩阵积为主成分得分。特征向量是单位向量,其平方和为1。特征向量主要起转换作用,其数值不能说明什么问题,解释力更强的是载荷loadings,但很多R输出中经常混用,engen vector与loadings。
(4)载荷(loading)
因子载荷矩阵并不是主成分的特征向量,即不是主成分的系数。主成分系数的求法:各自因子载荷向量除以各自因子特征值的算数平方根。
特征向量是单位向量,特征向量乘以特征值的平方根构造了载荷loading。
列上看,不同变量对某一PC的loadings的平方和等于其征值,因此每个变量的loadings值可表征其对PC的贡献。
行上看,同一变量对不同PCs的loadings行平方和为1,表征不同PCs对某一变量方差的解释度。
(5)得分(score)
指主成分得分,矩阵与特征向量的积。·
#特征分解
dat_eigen<-scale(iris[,-5],scale=T)%>%cor()%>%eigen()
#特征值提取
dat_eigen$values
#特征向量提取
dat_eigen$vectors
#求loadings=eigen vector*sqrt(eigen value),与princomp不同
#主成分载荷表示各个主成分与原始变量的相关系数。
sweep(dat_eigen$vectors,2,sqrt(dat_eigen$values),"*")
#将中心化的变量矩阵得到每个观测值的得分
scale(iris[,-5],scale=T)%*%dat_eigen$vectors%>%head()
prcomp函数使用较为简单,但是不同于常规的求取特征值和特征向量的方法,prcomp函数是对变量矩阵(相关矩阵)采用SVD方法计算其奇异值(原理上是特征值的平方根),函数帮助中描述为函数结果中的sdev。
prcomp函数输入参数为变量矩阵(x),中心化(center,默认为true),标准化(scale,默认为false,建议改为true),主成份个数(rank)。
prcomp函数输出有sdev(各主成份的奇异值),rotation(特征向量,回归系数),x(score得分矩阵)。
iris.pca<-prcomp(iris[,-5],scale=T,rank=4,retx=T) #相关矩阵分解
	#retx表四返回score,scale表示要标准化
	summary(iris.pca) #方差解释度
	iris.pca$sdev #特征值的开方
	iris.pca$rotation #特征向量,回归系数
	iris.pca$x #样本得分score
princomp以计算相关矩阵或者协方差矩阵的特征值为主要手段。
princomp函数输出有主成份的sd,loading,score,center,scale.
prcomp函数使用较为简单,但是不同于常规的求取特征值和特征向量的方法,prcomp函数是对变量矩阵(相关矩阵)采用SVD方法计算其奇异值(原理上是特征值的平方根),函数帮助中描述为函数结果中的sdev。
prcomp函数输入参数为变量矩阵(x),中心化(center,默认为true),标准化(scale,默认为false,建议改为true),主成份个数(rank)。
prcomp函数输出有sdev(各主成份的奇异值及其方差累积),rotation(载荷矩阵),x(得分矩阵),center(变量的均值),scale(变量的标准偏差)
data(wine) #三种葡萄酿造的红酒品质分析数据集
wine.pca<-princomp(wine,cor=T,scores=T)
#默认方差矩阵(cor=F),改为cor=T则结果与prcomp相同
summary(wine.pca) #各主成份的SVD值以及相对方差
wine.pca$loading #特征向量,回归系数
wine.pca$score
screenplot(wine.pca) #方差分布图
biplot(wine.pca,scale=F) #碎石图,直接把x与rotation绘图,而不标准化
实际上该principal主要用于因子分析。
model_pca<-psych::principal(iris[,-5],nfactors=4,rotate="none")
model_pca$values # 特征值=sdev^2
# 此处loadings与手动计算相同=prcomp的rotation*sdev
model_pca%>%.$loadings #载荷,不是特征向量
#此处score=prcomp的score/sdev
model_pca$scores[1:5,] #此处为因子得分,不是主成分得分
model_pca$weights #此处为上面loadings/特征值,也称成份得分系数或者因子系数
下文引用chentong的内容
prcomp函数会返回主成分的标准差、特征向量和主成分构成的新矩阵。
不同主成分对数据差异的贡献和主成分与原始变量的关系。
1. 主成分的平方为为特征值,其含义为每个主成分可以解释的数据差异,计算方式为 eigenvalues = (pca$sdev)^2
2. 每个主成分可以解释的数据差异的比例为 percent_var = eigenvalues*100/sum(eigenvalues)
3. 可以使用summary(pca)获取以上两条信息。

这两个信息可以判断主成分分析的质量:
 成功的降维需要保证在前几个为数不多的主成分对数据差异的解释可以达到80-90%。

指导选择主成分的数目:
 1. 选择的主成分足以解释的总方差大于80% (方差比例碎石图)
 2. 从前面的协方差矩阵可以看到,自动定标(scale)的变量的方差为1 (协方差矩阵对角线的值)。待选择的主成分应该是那些方差大于1的主成分,即其解释的方差大于原始变量(特征值碎石图,方差大于1,特征值也会大于1,反之亦然)。

鉴定核心变量和变量间的隐性关系:
 原始变量与主成分的相关性 Variable correlation with PCs (var.cor) = loadings * sdev
 原始数据对主成分的贡献度 var.cor^2 / (total var.cor^2)
devtools::install_github("vqv/ggbiplot")
library(ggbiplot)
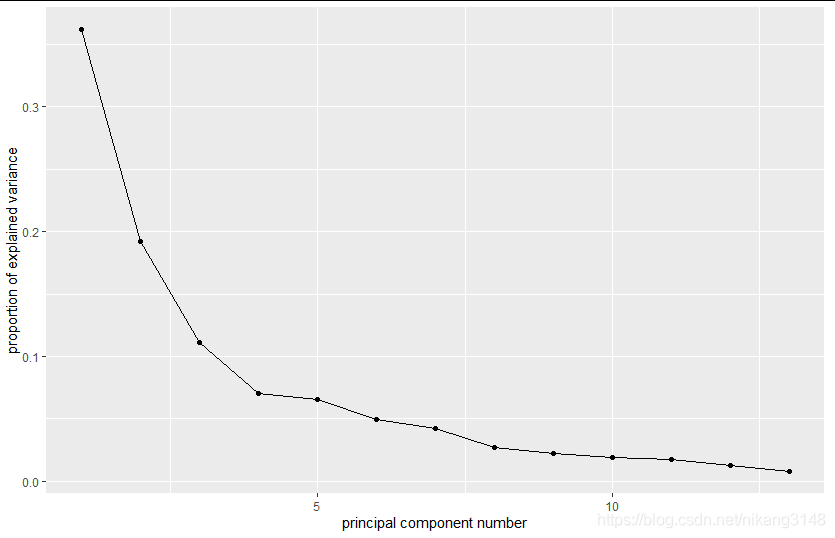
ggscreeplot(wine.pca) #碎石图
碎石图
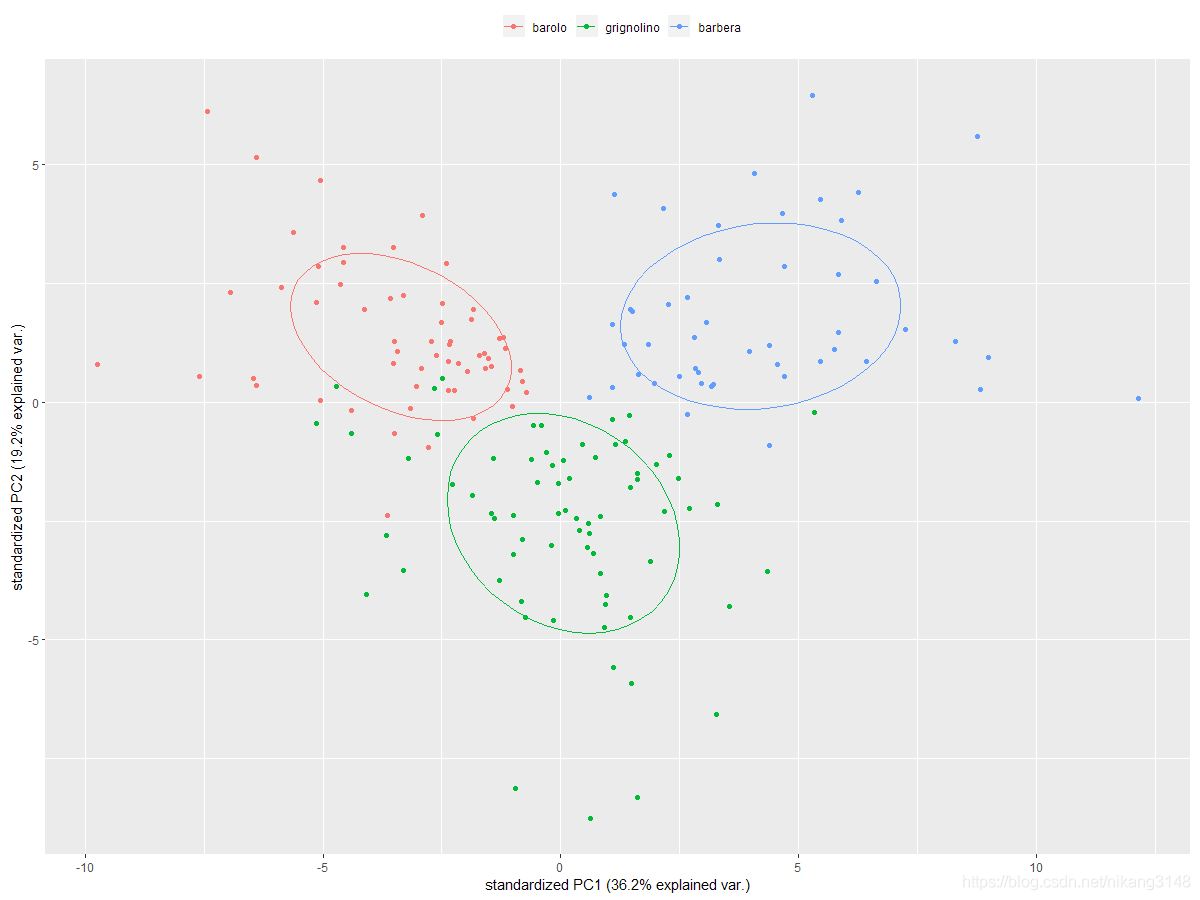
biplot
ggbiplot(wine.pca, obs.scale = 1, var.scale = 1,
   groups = wine.class, ellipse = TRUE, circle = TRUE) +
 scale_color_discrete(name = '') +
 theme(legend.direction = 'horizontal', legend.position = 'top')
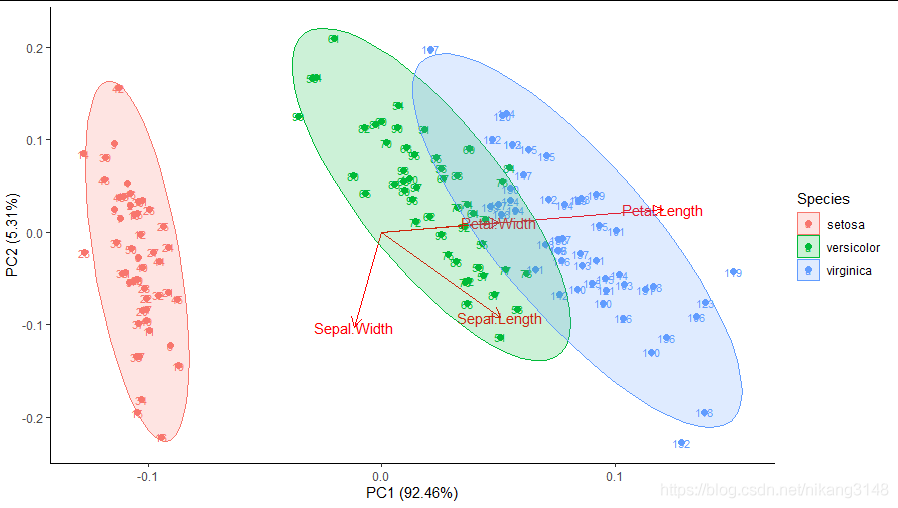
ggfortify包中autoplot函数可自动绘制。
library(ggfortify)
pca1<-iris%>%select(-5)%>%prcomp()
autoplot(pca1,data = iris,col= 'Species',size=2,
   loadings =T,loadings.label = TRUE,
   frame = TRUE,frame.type='norm',
   label = TRUE, label.size = 3
)+ theme_classic()
FactoMineR与factoextra分别进行PCA分析与可视化,当然factoextra包中函数也可对prcomp、princomp函数结果进行可视化。
library(factoextra)
library(FactoMineR)
# 利用FactoMineR包中PCA函数进行PCA分析
> wine.pca2 <- PCA(wine,scale.unit = T,ncp=5,graph = T) #
wine.pca2中内容
> print(wine.pca2)
**Results for the Principal Component Analysis (PCA)**
The analysis was performed on 178 individuals, described by 13 variables
*The results are available in the following objects:

 name    description
1 "$eig"    "eigenvalues"
2 "$var"    "results for the variables"
3 "$var$coord"  "coord. for the variables"
4 "$var$cor"   "correlations variables - dimensions"
5 "$var$cos2"  "cos2 for the variables"
6 "$var$contrib"  "contributions of the variables"
7 "$ind"    "results for the individuals"
8 "$ind$coord"  "coord. for the individuals"
9 "$ind$cos2"  "cos2 for the individuals"
10 "$ind$contrib"  "contributions of the individuals"
11 "$call"   "summary statistics"
12 "$call$centre"  "mean of the variables"
13 "$call$ecart.type" "standard error of the variables"
14 "$call$row.w"  "weights for the individuals"
15 "$call$col.w"  "weights for the variables"
摘要信息
> summary(wine.pca2)

Call:
PCA(X = wine, scale.unit = T, ncp = 5, graph = T)


Eigenvalues
      Dim.1 Dim.2 Dim.3 Dim.4 Dim.5 Dim.6 Dim.7 Dim.8 Dim.9 Dim.10
Variance    4.706 2.497 1.446 0.919 0.853 0.642 0.551 0.348 0.289 0.251
% of var.    36.199 19.207 11.124 7.069 6.563 4.936 4.239 2.681 2.222 1.930
Cumulative % of var. 36.199 55.406 66.530 73.599 80.162 85.098 89.337 92.018 94.240 96.170
      Dim.11 Dim.12 Dim.13
Variance    0.226 0.169 0.103
% of var.    1.737 1.298 0.795
Cumulative % of var. 97.907 99.205 100.000

...省略...
还输出了简易的图
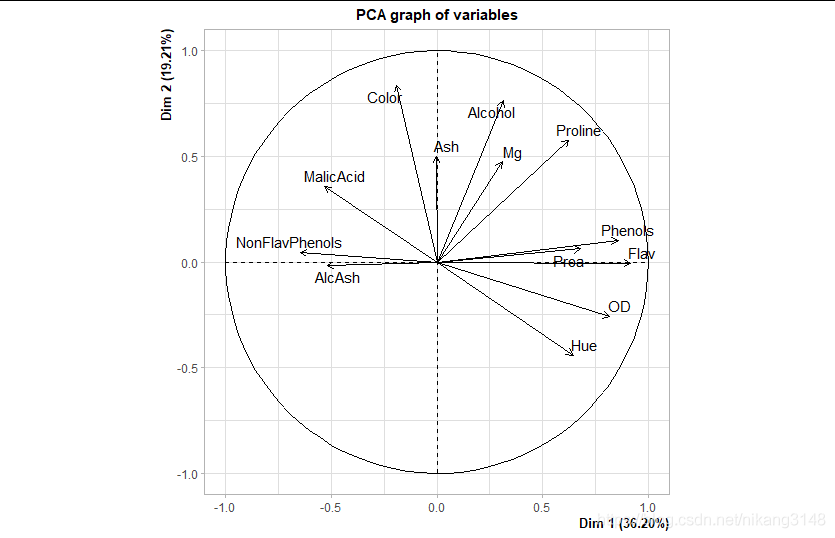
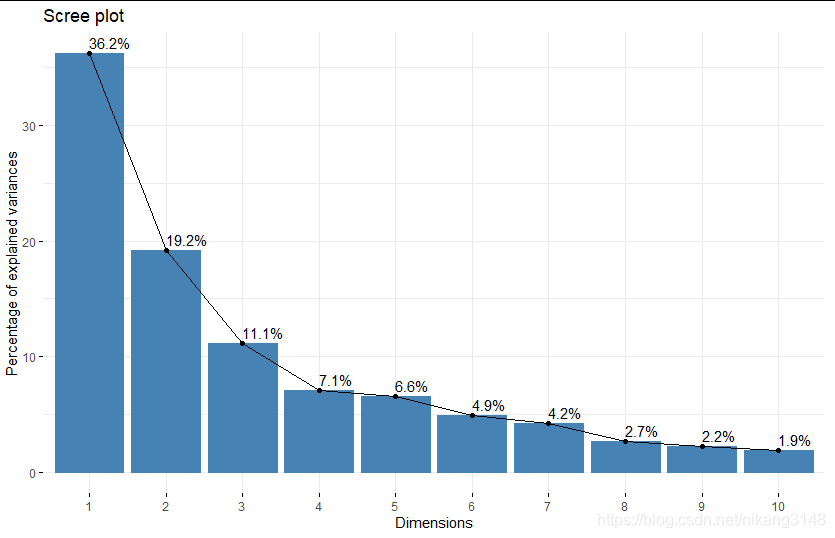
4.3.1 特征值可视化 提取特征值
> get_eigenvalue(wine.pca2) #标准化数据中特征值>1的变量解释能力较强
  eigenvalue variance.percent cumulative.variance.percent
Dim.1 4.7058503  36.1988481     36.19885
Dim.2 2.4969737  19.2074903     55.40634
Dim.3 1.4460720  11.1236305     66.52997
...省略部分
碎石图
fviz_eig(wine.pca2,addlabels = TRUE) #碎石图,展示方差解释度
4.3.2 变量信息可视化
变量提取主要有get_pca_var()函数,输出变量在主成分投影上的坐标,变量与主成分PC的相关系数,相关系数的平方,变量对某一PC的相关贡献
#get_pca_var()等同于get_pca(element="var")
> get_pca_var(wine.pca2)#coord cor cos2 contribution
Principal Component Analysis Results for variables
 ===================================================
 Name  Description
1 "$coord" "Coordinates for the variables"
2 "$cor"  "Correlations between variables and dimensions"
3 "$cos2" "Cos2 for the variables"
4 "$contrib" "contributions of the variables"
> wine.pca2$var #输出上述数据
> get_pca_var(wine.pca2)$coord
> get_pca_var(wine.pca2)$cos2
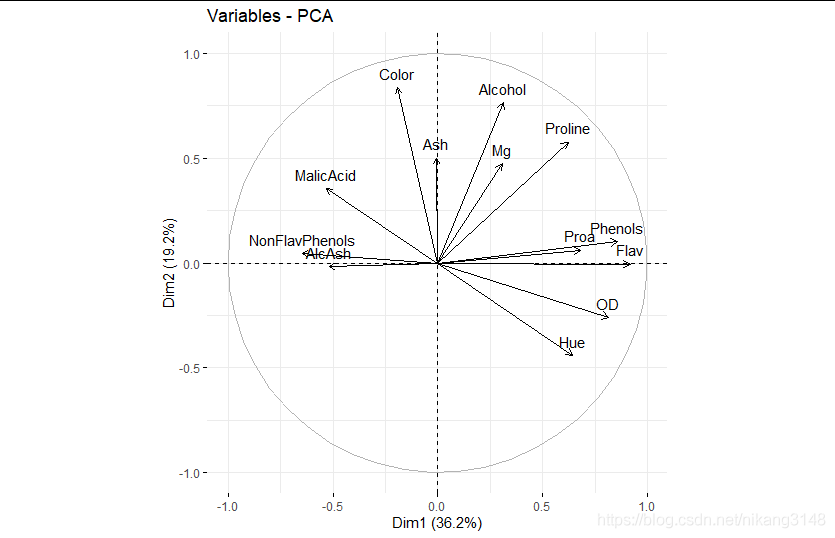
变量坐标(coord)与相关性(cor)可视化
coord是坐标(实际的loading),与cor数值相同
coord=eigen vector * stdev
相关图中,靠近的变量表示正相关;对向的是负相关。
箭头越远离远原点、越靠经圆圈表明PC对其的代表性高(相关性强)
fviz_pca_var(wine.pca2) #变量相关性可视化图
cos2可视化
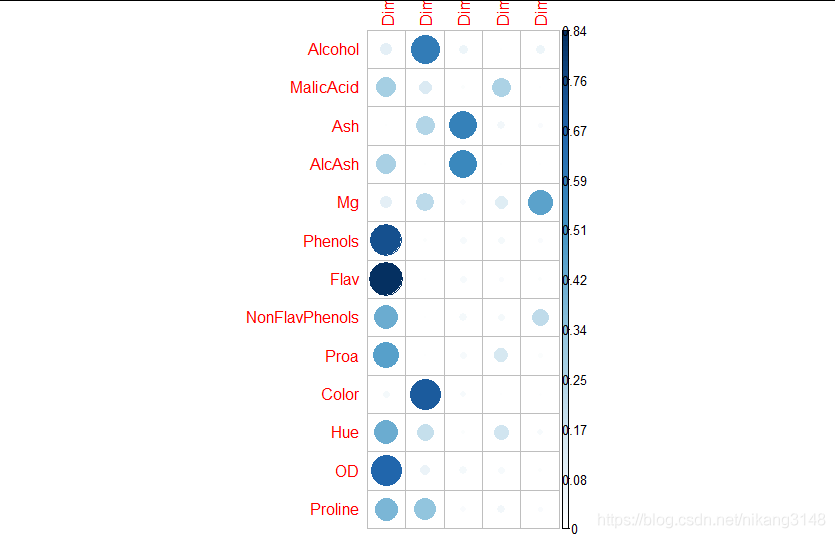
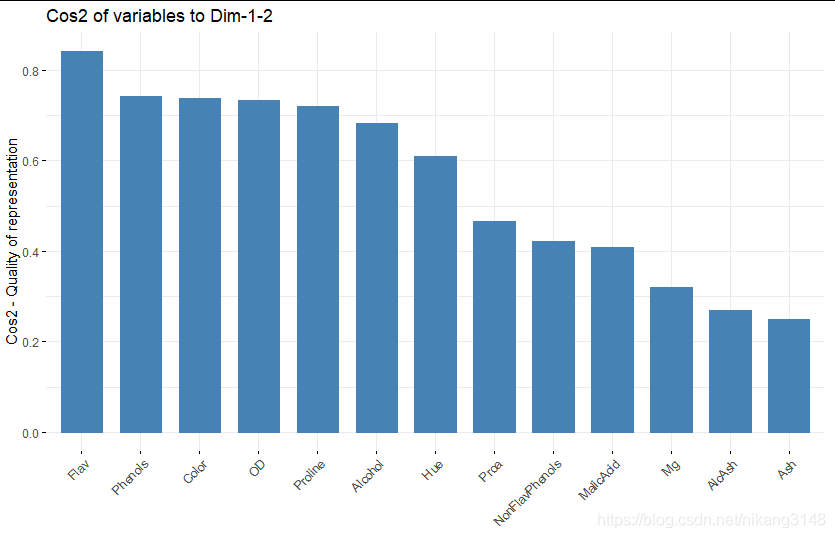
cos2代表不同主成分对变量的代表性强弱,对特定变量,所有组成份上的cos2之和为1,因为cos2为cor的平方,所以也认为是相关性越强,其结果与cor类似。
#cos2是coord的平方,表征特定变量在所有PC上的代表性,某个变量的所有cos2总和为1
library("corrplot")
corrplot(get_pca_var(wine.pca2)$cos2, is.corr=FALSE)
下图中PC1对Phenols变量的代表性最好
fviz_cos2(wine.pca2, choice = "var", axes = 1:2)
# cos2在主成分上的加和,并排序
#不同按照cos2大小设定颜色梯度,也可以设置alpha梯度
fviz_pca_var(wine.pca2,axes=c(1,2),
 col.var = "cos2",
gradient.cols = c("#00AFBB", "#E7B800", "#FC4E07"),
    repel = TRUE) # Avoid text overlapping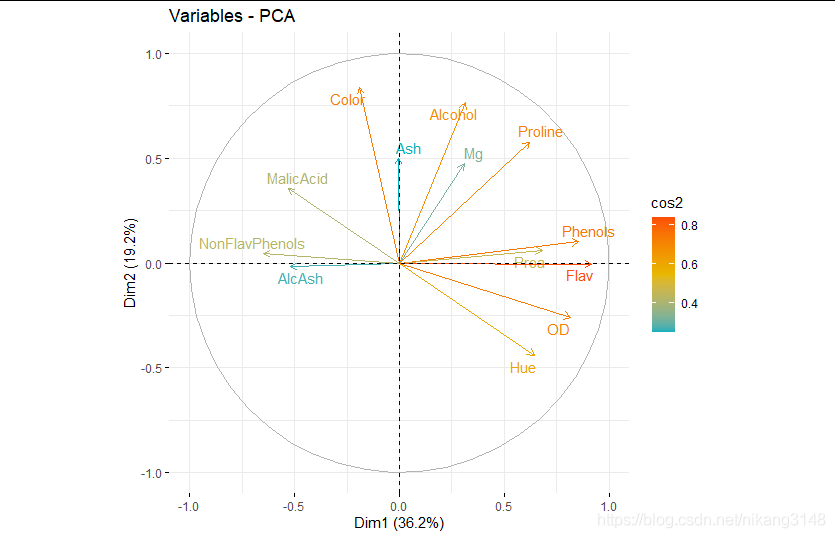
contrib可视化
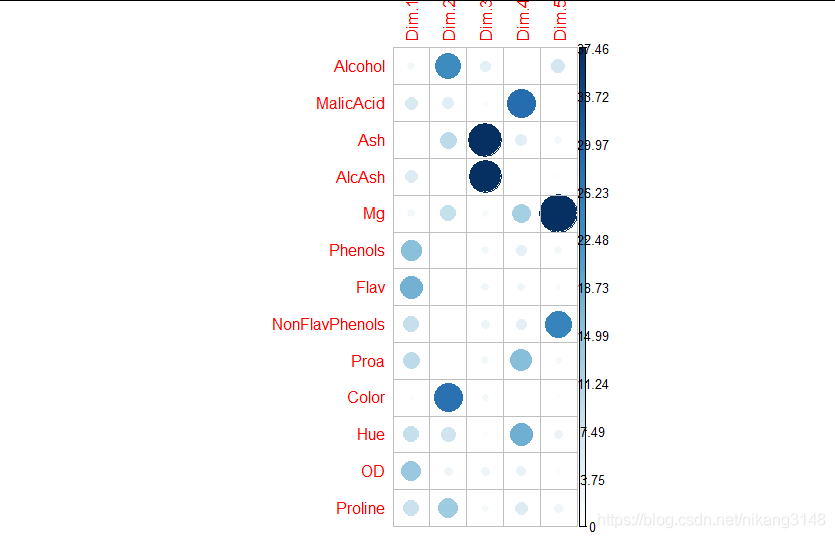
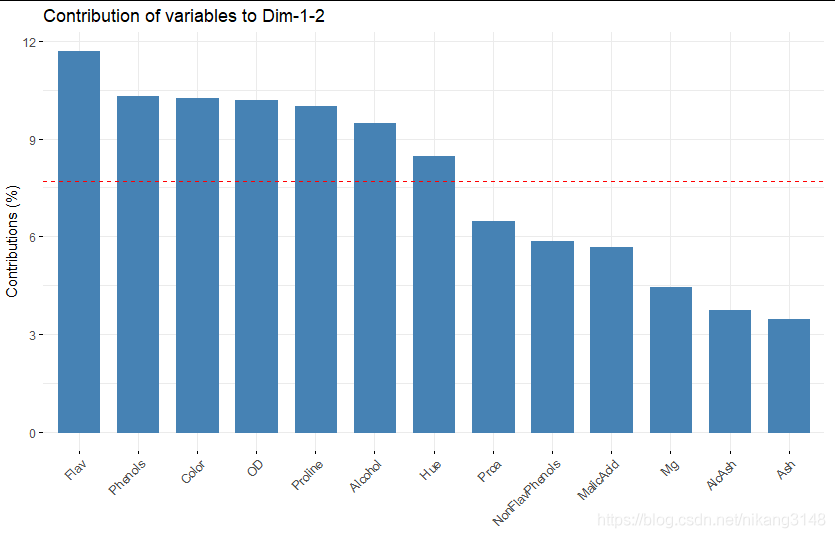
contrib是每个变量对某一特定PC的贡献
contrib=(var.cos2 * 100) / (total cos2 of the PC component)
多个变量的contrib = [(Contrb1 * Eig1) + (Contrib2 * Eig2)]/(Eig1 + Eig2)
> get_pca_var(wine.pca2)$contrib
      Dim.1  Dim.2  Dim.3  Dim.4  Dim.5
Alcohol  2.083097e+00 23.391881971 4.3007553 0.03188475 7.0577176
MalicAcid  6.011695e+00 5.059392535 0.7923294 28.82511766 0.1240000
Ash   4.206853e-04 9.989949520 39.2156374 4.58711714 2.0456286
AlcAsh   5.727426e+00 0.011215874 37.4642355 0.37038683 0.4369599
Mg    2.016174e+00 8.978053590 1.7097376 12.37608338 52.8599543
Phenols  1.557572e+01 0.423013810 2.1368289 3.92310704 2.2295987
Flav   1.788734e+01 0.001128834 2.2705035 2.31937045 1.1886633
NonFlavPhenols 8.912201e+00 0.082825894 2.9025311 4.13313047 25.0703477
Proa   9.823804e+00 0.154462537 2.2336591 15.92461164 1.8730611
Color   7.852920e-01 28.089541241 1.8852996 0.43461955 0.5842581
Hue   8.803953e+00 7.797226784 0.7262776 18.29883787 3.0142002
OD    1.415019e+01 2.705899746 2.7557523 3.39004479 1.0233546
Proline  8.222684e+00 13.315407665 1.6064528 5.38568842 2.4922558
fviz_contrib(wine.pca2, choice = "var", axes = 1:2)
corrplot(get_pca_var(wine.pca2)$contrib, is.corr=FALSE)
fviz_contrib(wine.pca2, choice = "var", axes = 1:2)
根据contribution将变量颜色分类
fviz_pca_var(wine.pca2,col.var = "contrib",
gradient.cols = c("#00AFBB", "#E7B800", "#FC4E07"))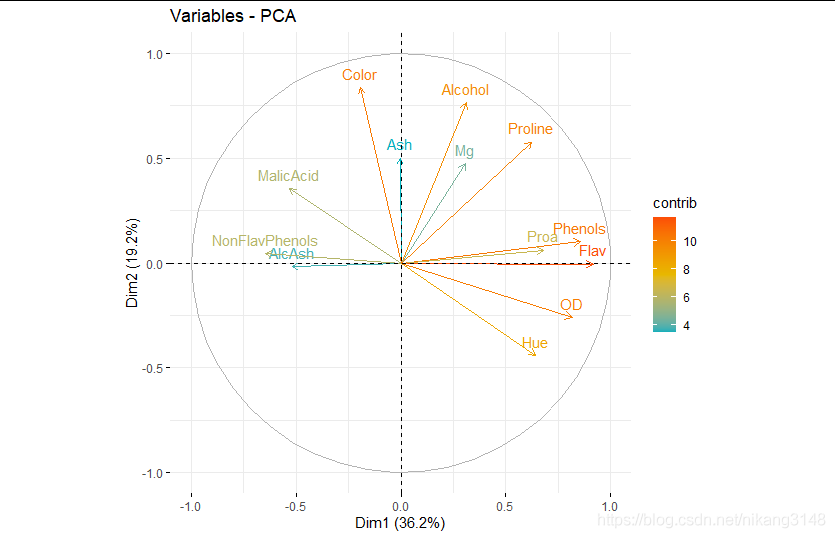
变量分组
#人为分组
bb<-as.factor(c(rep(c("soil","micro","plant"),4),"soil"))
names(bb)<-row.names(wine.pca2$var$contrib)
fviz_pca_var(wine.pca2, col.var = bb, palette = c("#0073C2FF", "#EFC000FF", "#868686FF"),
    legend.title = "Cluster")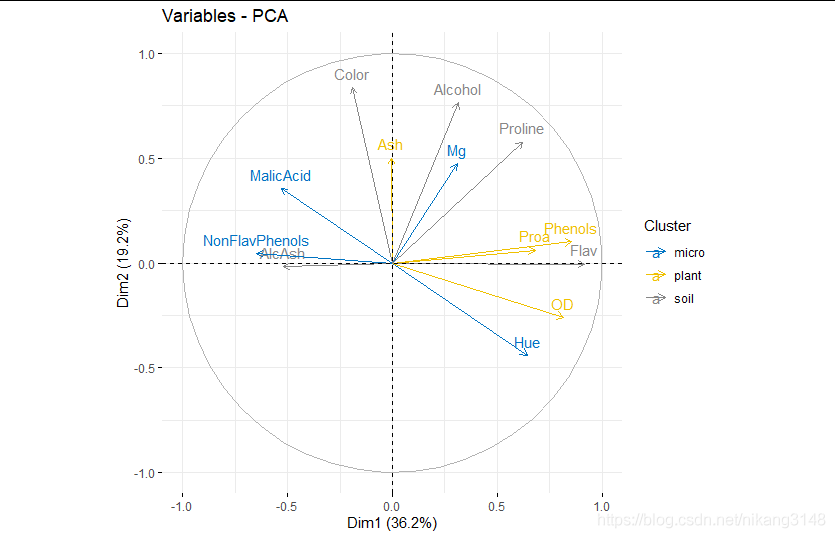
4.3.3 样本可视化scores 样本坐标可视化
get_pca_ind(wine.pca2) #coord cor cos2 contribution
get_pca(element="ind)
get_pca_ind(wine.pca2) #coord cor cos2 contribution
wine.pca2$ind #coord cos2 contrib dist
fviz_pca_ind(wine.pca2)#score 可视化coord
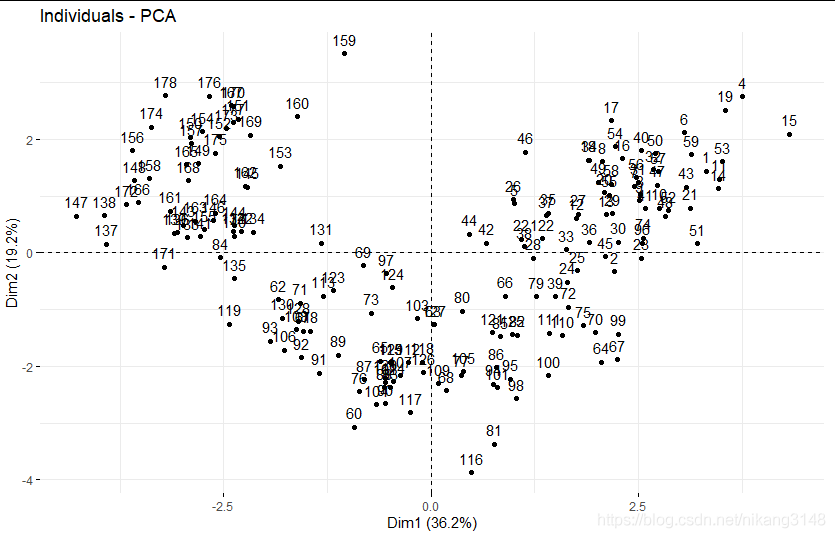
fviz_pca_ind(wine.pca2, geom=c("point","text"),
   addEllipses = T,
   pointshape=21,col.ind="black",pointsize="cos2",
   fill.ind = wine.class,palette = "npg",
   #col.ind="cos2", gradient.cols = c("#00AFBB", "#E7B800", "#FC4E07"),
   #col.ind="contrib", gradient.cols = c("#00AFBB", "#E7B800", "#FC4E07"),
   # label=wine.class,
   repel = TRUE)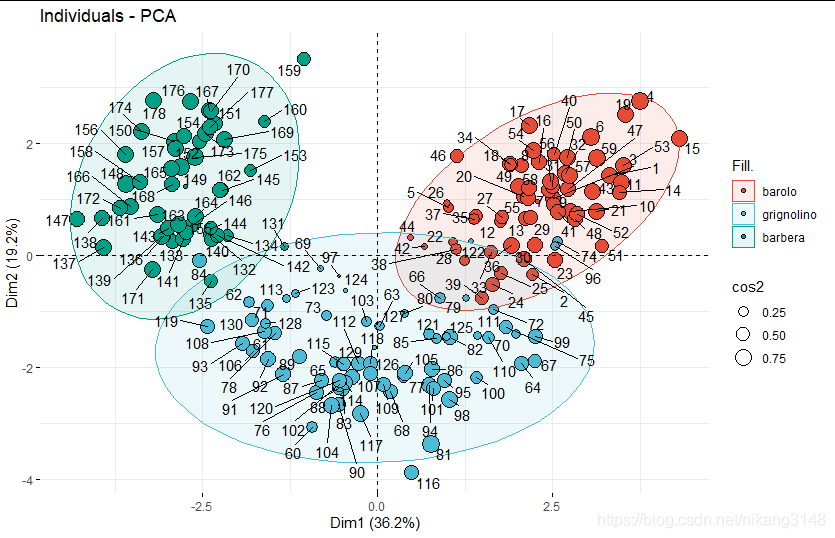
fviz_pca_ind(wine.pca2, axes = c(1, 2),label="none", #habillage只能是分类变量
    addEllipses = TRUE, ellipse.type="norm",ellipse.level=0.9,
    # one of "confidence","t","norm","euclid","convex"
    habillage = wine.class,palette = "jco",
    mean.point=F
    )

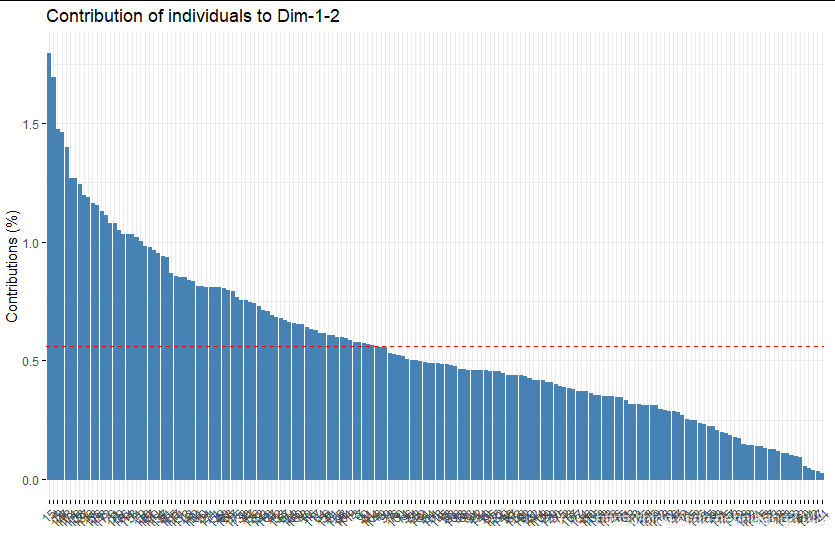
样本的cos2与contrib图
fviz_cos2(wine.pca2, choice = "ind",axes=1:2)
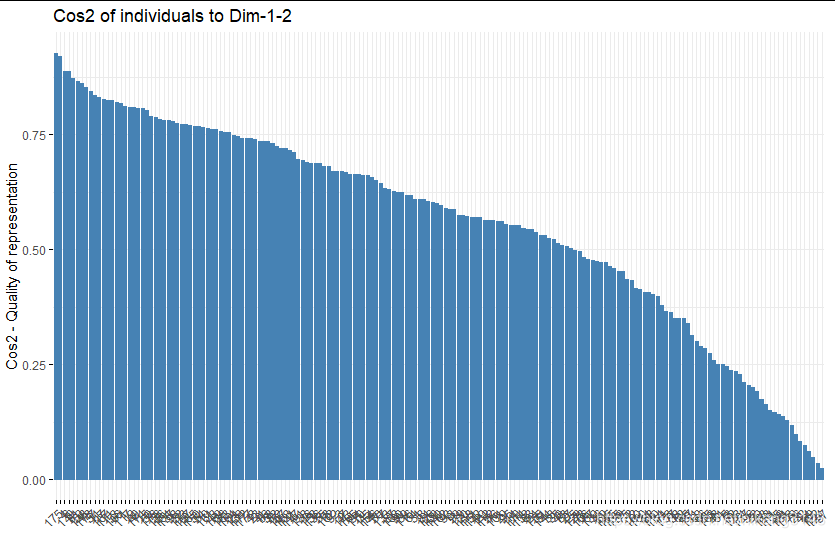
fviz_contrib(wine.pca2, choice = "ind", axes = 1:2)
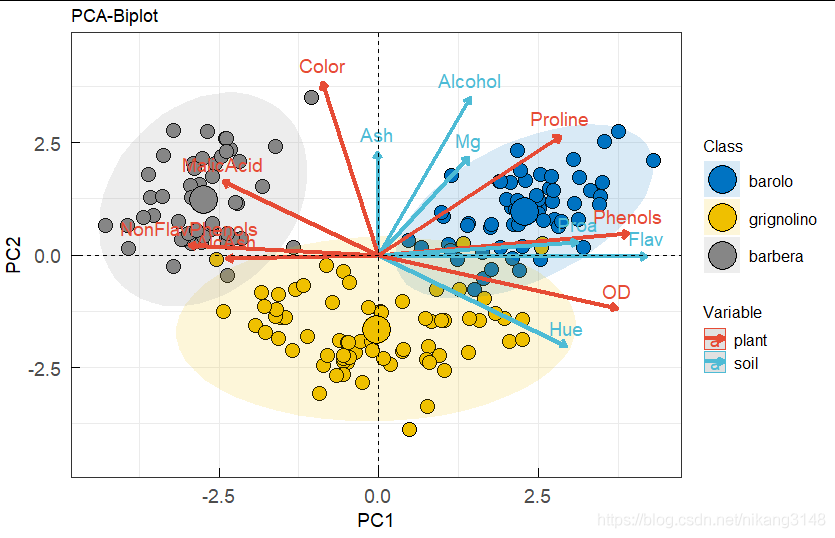
4.3.4 biplot
biplot不需要关注具体数值,只需要关注方向与位置
样本在变量同侧是具有高数值,反之则值低
fviz_pca_biplot(wine.pca2, axes = c(1,2),repel = F,
    addEllipses = T,ellipse.alpha=0.15,
    geom=c("point"),geom.var=c("arrow","text"),
    arrowsize=1.5,labelsize=5, #arrow与text大小
    pointshape=21,pointsize=5,fill.ind = wine.class,col.ind="black", #point
    col.var=factor(c(rep(c("soil","plant"),6),"plant"))

)%>%ggpar(xlab="PC1",ylab="PC2",title="PCA-Biplot",
   font.x=14,font.y=14,font.tickslab = 14,ggtheme=theme_bw(),ylim=c(-4.5,4.5),
   legend.title = list(color="Variable",fill="Class"),font.legend = 12,
   )+
  ggpubr::fill_palette("jco")+ggpubr::color_palette("npg")+
 theme(axis.ticks.length= unit(-0.25, 'cm'), #设置y轴的刻度长度为负数,即向内
  axis.text.y.left = element_text(margin = unit(c(0.5, 0.5, 0.5, 0.05), 'cm')),
  axis.text.x.bottom = element_text(margin = unit(c(0.5, 0.5, 0.05, 0.5), 'cm'))
  )
上述就是小编为大家分享的R语言中怎么实现PCA分析与可视化了,如果刚好有类似的疑惑,不妨参照上述分析进行理解。如果想知道更多相关知识,欢迎关注亿速云行业资讯频道。
免责声明:本站发布的内容(图片、视频和文字)以原创、转载和分享为主,文章观点不代表本网站立场,如果涉及侵权请联系站长邮箱:is@yisu.com进行举报,并提供相关证据,一经查实,将立刻删除涉嫌侵权内容。