您好,登录后才能下订单哦!
密码登录
登录注册
点击 登录注册 即表示同意《亿速云用户服务条款》
本人初学php,刚刚看到设计验证码的部分,自己实践了一下,自己看代码看懂,但是自己设计的时候,遇到了一些问题。
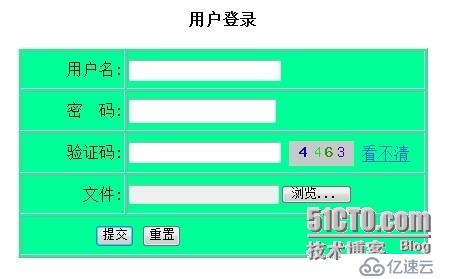
本次设计一个简单的登录页面,前台登录界面包括:用户名、密码、验证码以及各个输入域的简单验证(login.php),后台生成验证码(verifycode.php)+验证码的验证(verifycodecheck.php)。
1、登录页面及代码:
登录界面如图:

<form id="form1" name="form1" method="post" action="verifycodecheck.php" enctype="multipart/form-data">
<p align="center"><b>用户登录</b></p>
<table width="410" border="1" align="center" bgcolor="#00FF99">
<tr>
<td width="100" height="34" align="right">用户名:<span ></span></td>
<td width="150"><label><input name="username" type="text" id="username" /></label>
</td>
</tr>
<tr>
<td height="36" align="right">密 码:</td>
<td><label><input name="password" type="password" id="password" /></label>
</td>
</tr>
<tr>
<td height="36" align="right">验证码:</td>
<td><label>
<input name="passwordconfirm" type="text" id="passwordconfirm" />
</label>
<label><img src="verifycode.php" name="verifycode" height="25" align="top" <label><a href="javascript:recode()">看不清</a></label>
<input type="hidden" name="defverifycode" />
</td>
</tr>
<tr>
<td height="35" align="right">文件:</td>
<td height="35"><input type="file" name="file" id="file" height="36"/></td>
</tr>
<tr>
<td height="35" colspan="2"><label>
<input type="submit" name="submit" value="提交" NotNullCheck()" /></label>
<label><input type="reset" name="reset" value="重置"/></label></td>
</tr>
</table>
</form>输入域的验证代码如下:
function NotNullCheck()   //检测用户输入是否为空
    {
        var uname=document.getElementById("username").value;
        var upassword=document.getElementById("password").value;
        var upasswordconfirm=document.getElementById("passwordconfirm").value;
        //var uname=document.getElementById("username");
        if(uname=="")
        {
            alert("用户名不能为空!");
            return false;
        }
            if(upassword=="")
        {
            alert("密码不能为空!");
            return false;
        }
            if(upasswordconfirm=="")
        {
            alert("验证码不能为空!");
            return false;
        }
    }
点击图片或“看不清”链接时javascript代码如下:
function recode()
    {
        var num1=Math.round(Math.random()*10000000);
        var num=num1.toString().substr(0,4);
        //alert(num);
        form1.verifycode.src="verifycode.php?code="+num;  //此处是为在verifycode.php中请求到不同的数据
    }
2、生成验证码(verifycode.php)
<?php
    header("Content-type:p_w_picpath/png");
//用GD2库函数生成图片验证码
    $im=p_w_picpathcreate(65,25);
    p_w_picpathfill($im,0,0,p_w_picpathcolorallocate($im,200,200,200));
//  $verify=$_GET['code'];
    $verify="";
    $data=array(1,2,3,4,5,6,7,8,9,0);
    for($i=0;$i<4;$i++)   //产生4为随机数
    {
        $verify.=rand(0,9);
    }
    //
    p_w_picpathstring($im,rand(3,5),10,3,substr($verify,0,1),p_w_picpathcolorallocate($im,rand(1,255),0,rand(1,255)));
    p_w_picpathstring($im,rand(3,5),25,3,substr($verify,1,1),p_w_picpathcolorallocate($im,0,rand(1,255),rand(1,255)));
    p_w_picpathstring($im,rand(3,5),36,3,substr($verify,2,1),p_w_picpathcolorallocate($im,rand(1,255),rand(1,255),0));
    p_w_picpathstring($im,rand(3,5),48,3,substr($verify,3,1),p_w_picpathcolorallocate($im,rand(1,255),0,rand(1,255)));
    p_w_picpathpng($im);
    p_w_picpathdestroy();
    session_start();
    $_SESSION['code']=$verify;   //将生产的验证码保存到session['code']中
//  echo $_SESSION['code'];
?>
3、验证码的验证(verifycodecheck.php)
<?php
    session_start();
    $verifycode=strtolower($_POST['passwordconfirm']);  //转换为小写
    if($verifycode!=strtolower($_SESSION['code']))      //输入的验证码和图片验证码不一样
    {
        echo "<script>alert('verifycode error!');</script>";
        echo "<script language='javascript' type='text/javascript'>";
        echo "window.location.href='http://localhost:8000/phptest1/02/304/login.php'";
        echo "</script>";
    }
    else
    {
        echo "<script>alert('WELCOME!');</script>";
        echo "<script language='javascript' type='text/javascript'>";
        echo "window.location.href='http://localhost:8000/phptest1/02/304/login.php'";
        echo "</script>";
    }
?>
整个设计过程及实现可能还存在问题,希望自己再接再厉...
免责声明:本站发布的内容(图片、视频和文字)以原创、转载和分享为主,文章观点不代表本网站立场,如果涉及侵权请联系站长邮箱:is@yisu.com进行举报,并提供相关证据,一经查实,将立刻删除涉嫌侵权内容。