您好,登录后才能下订单哦!
密码登录
登录注册
点击 登录注册 即表示同意《亿速云用户服务条款》
使用CocosCreator怎么进行音效处理?很多新手对此不是很清楚,为了帮助大家解决这个难题,下面小编将为大家详细讲解,有这方面需求的人可以来学习下,希望你能有所收获。

Cocos Creator 提供两种音频播放方式,AudioEngine 与 AudioSource 都能播放音频,它 们的区别在于 AudioSource 是组件,可以添加到场景中,由编辑器设置。而 AudioEngine 是 引擎提供的纯 API,只能在脚本中进行调用。
共同点:本质都是处理 AudioClip 音频资源,需要在 Cocos Creator 编辑器中挂载组件。
个人建议使用这个来替换 AudioSource 组件播放声音,接口齐全,测试有效,可以自己 封装一个类似 AudioSource 组件的脚本来使用。
方式一:使用 AudioSource 组件播放
创建一个空节点,在这个空节点上,添加一个 其他组件 -> AudioSource
在脚本上预设好 AudioSource,并且根据实际需求,完善脚本的对外接口,如下
cc.Class({

	properties: {

		audioSource: {

			type: cc.AudioSource,
			default: null

		},
	},
	play() {

		this.audioSource.play();

	},
	pause() {

		this.audioSource.pause();

	},
});
方式二:使用 AudioEngine 播放
在脚本内定义一个 audioClip 资源对象,如下示例中 properties 对象内。
直接使用 cc.audioEngine.play(audio, loop, volume); 播放。如下示例中 onLoad 中。
cc.Class({

	properties: {

		audio: {

			default: null,
			type: cc.AudioClip

		}

	},
	onLoad() {

		this.current = cc.audioEngine.play(this.audio, false, 1);

	},
	onDestroy() {

		cc.audioEngine.stop(this.current);

	}

});
AudioEngine 播放的时候,需要注意这里的传入的是一个完整的 AudioClip 对象(而不 是 url)。所以我们不建议在 play 接口内直接填写音频的 url 地址,而是希望大家先定义 一个 AudioClip,然后在编辑器内将音频拖拽过来。
【1】组件 AudioSource
play ( ) 播放音频剪辑。
stop ( ) 停止当前音频剪辑。
pause ( ) 暂停当前音频剪辑。
resume ( ) 恢复播放。
【2】声音系统 cc.audioEngine
// 背景音乐,循环
cc.audioEngine.playMusic(source);
cc.audioEngine.stopMusic(source);
// 短音效
cc.audioEngine.playEffect(source);
cc.audioEngine.stopEffect(source);
上面的第一种方法原生平台有很多 Bug,所以我们的游戏都用的第二种方法播放声音。
const {
	ccclass,
	property
} = cc._decorator;

@ccclass

exportdefaultclassSoundMgr {

	sound_path: string = 'res/sounds/';

	// sound 中保存的是音乐的名称和音频对象的 key-value 键值对

	sounds: {
		[key: string]: any
	} = {};

	enabled: boolean = true;

	music: string = '';

	// 单例模式

	protectedstatic instance: SoundMgr;

	publicstatic getInstance(): SoundMgr {

		if (!this.instance) {

			this.instance = newSoundMgr();

		}

		returnthis.instance;

	}

	// 添加声音资源

	addSound(key: string, clip: cc.AudioClip) {

		this.sounds[key] = clip;

	}

	playFx(fxName: string) {

		if (!this.enabled) return;

		cc.audioEngine.playEffect(this.sounds[fxName], false);

	}

	playMusic(musicName: string) {

		this.music = musicName;

		if (!this.enabled) return;

		cc.audioEngine.playMusic(this.sounds[musicName], true);

	}

	stopMusic() {

		cc.audioEngine.stopMusic();

	}

	setEnabled(enabled: boolean) {

		this.enabled = enabled;

		if (this.enabled) {

			this.playMusic(this.music);

		} else {

			cc.audioEngine.stopAll();

		}

	}

	getEnable() {

		returnthis.enabled;

	}

}通过 Cocos Creator 可视化编辑工具,我们设置游戏场景和资源如下:
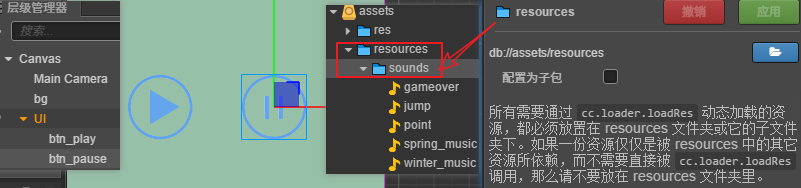
因为 sounds 我们是通过代码动态加载,故我们将保存所有声音文件的 sounds 文件夹放 到 resources 文件夹内(如上图)。
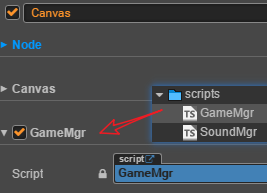
然后,新建 GameMgr.ts,挂载到 Canvas 节点上。
onst {
	ccclass,
	property
} = cc._decorator;

importSoundMgrfrom "SoundMgr";

@ccclass

exportdefaultclassGameMgrextends cc.Component {

	loadSounds() {

		// 注意通过代码动态加载的资源必须放到 resources 文件夹下

		cc.loader.loadResDir('sounds', cc.AudioClip, function(err, clips) {

			console.log("load clips:", clips);

			if (err) {

				console.log("err:", err);

			}

			for (let i = 0; i

				SoundMgr.getInstance().addSound(clips[i].name, clips[i]);

			}

		});

	}

	onLoad() {

		this.loadSounds();

		console.log("sounds:", SoundMgr.getInstance().sounds);

	}

	onPlayClick() {

		console.log("play");

		SoundMgr.getInstance().playMusic('spring_music');

	}

	onPauseClick() {

		console.log("pause");

		SoundMgr.getInstance().stopMusic();

	}

}
在 GameMgr 自定义组件的 onLoad 方法中,调用 loadSounds 加载游戏中所需要的所有 声音资源。同时在 GameMgr.ts 中提供播放和暂停接口方法 onPlayClick 和 onPauseClick 方法。
供播放和暂停按钮调用。
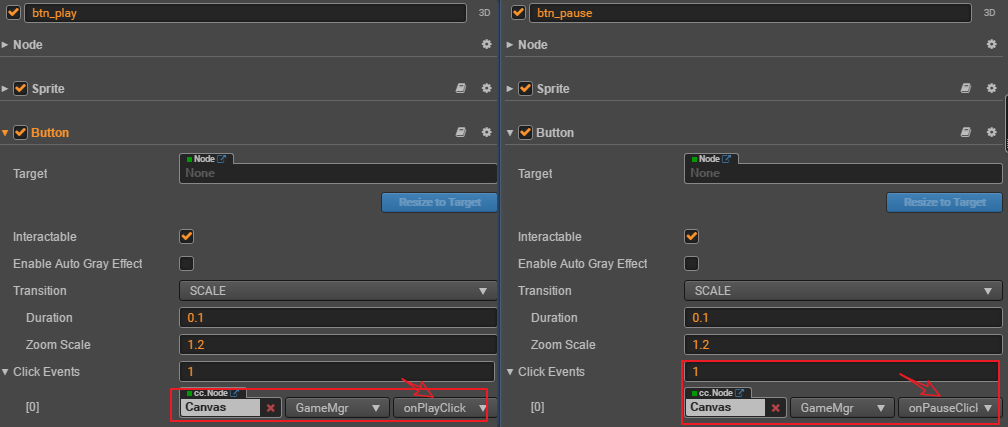

声音资源全部加载成功,并且点击播放和暂停按钮,都能测试通过。

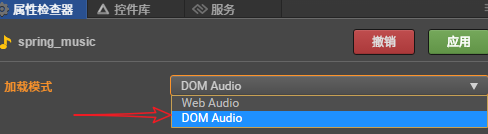
注意:如果音频播放相关的设置都完成后,在部分浏览器上预览或者运行时仍听不到声 音,那可能是由于浏览器兼容性导致的问题。例如:Chrome 禁用了 WebAudio 的自动播放,而音频默认是使用 Web Audio 的方式加载并播放的,此时用户就需要在 资源管理器中选中音频资源,然后在 属性检查器 中将音频的加载模式修改为 DOM Audio 才能在浏览器上正常播放。
看完上述内容是否对您有帮助呢?如果还想对相关知识有进一步的了解或阅读更多相关文章,请关注亿速云行业资讯频道,感谢您对亿速云的支持。
免责声明:本站发布的内容(图片、视频和文字)以原创、转载和分享为主,文章观点不代表本网站立场,如果涉及侵权请联系站长邮箱:is@yisu.com进行举报,并提供相关证据,一经查实,将立刻删除涉嫌侵权内容。