您好,登录后才能下订单哦!
密码登录
登录注册
点击 登录注册 即表示同意《亿速云用户服务条款》
这篇文章将为大家详细讲解有关python中selenium如何实现智联招聘数据爬取,小编觉得挺实用的,因此分享给大家做个参考,希望大家阅读完这篇文章后可以有所收获。
Python是一种编程语言,内置了许多有效的工具,Python几乎无所不能,该语言通俗易懂、容易入门、功能强大,在许多领域中都有广泛的应用,例如最热门的大数据分析,人工智能,Web开发等。
最近在玩Python网络爬虫,然后接触到了selenium这个模块,就捉摸着搞点有意思的,顺便记录一下自己的学习过程。
操作系统:windows10
浏览器:谷歌浏览器(Google Chrome)
浏览器驱动:chromedriver.exe (我的版本—>89.0.4389.128 )
程序中我使用的模块
import csv
import os
import re
import json
import time

import requests
from selenium.webdriver import Chrome
from selenium.webdriver.remote.webelement import WebElement
from selenium.webdriver.common.by import By
from selenium.webdriver.support import ui
from selenium.webdriver.support import expected_conditions
from lxml import etree

chrome = Chrome(executable_path='chromedriver')
用的的第三方包均可用 pip install 进行安装
上面代码中的最后一行表示创建一个浏览器对象
1.大致看了一下网站主页,需要先登录后才能进行信息的获取,所以只能先模拟登录。
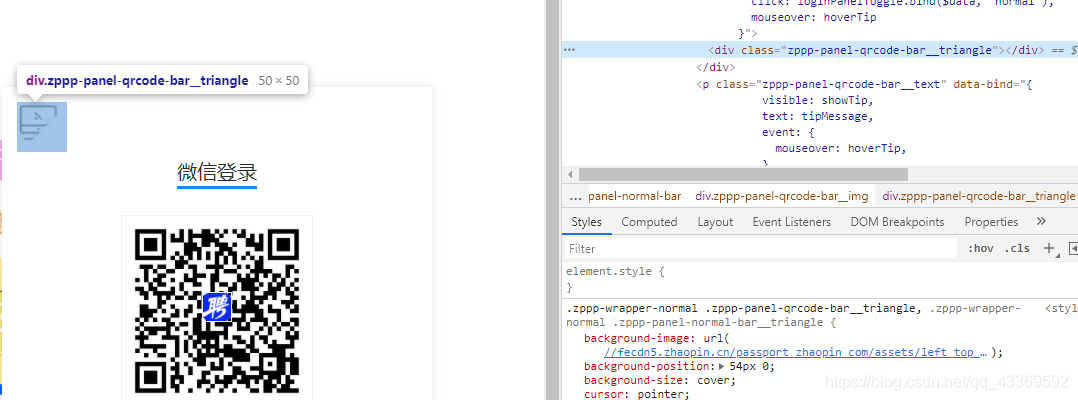
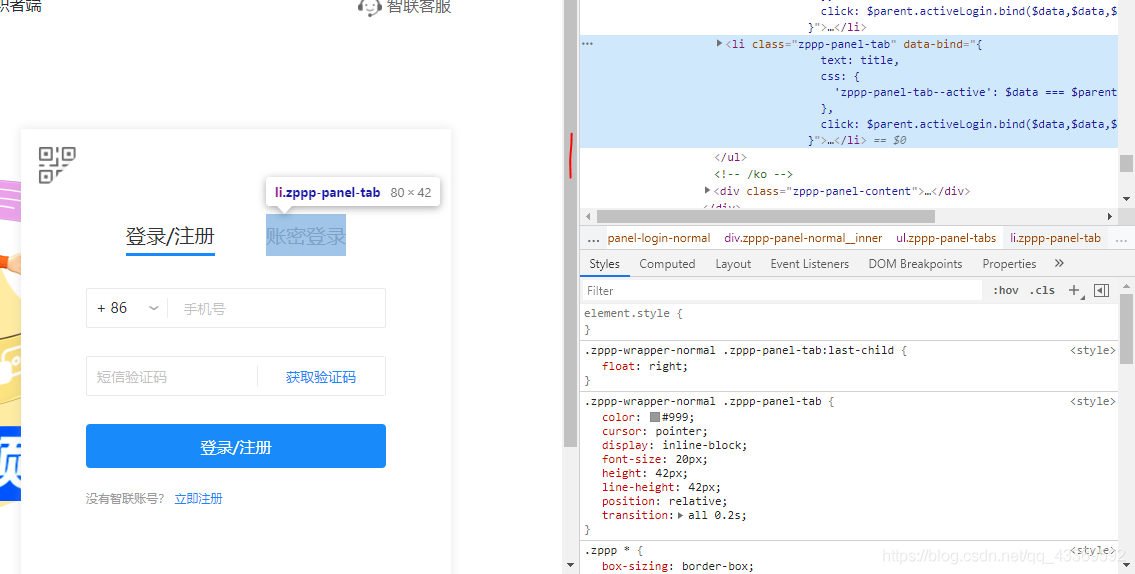
进入登录页面的时候是显示二维码登录,我们不用这个,因为确实不怎么方便,我们通过模拟点击页面上的按钮进入到账号、密码登录的页面输入进行登录。下面是如何驱动浏览器进行上述的一系列操作⬇⬇⬇⬇⬇⬇
# 获取登录页面
chrome.get(url)
# 找出账号密码登录的页面
chrome.find_element_by_class_name('zppp-panel-qrcode-bar__triangle').click()
chrome.find_element_by_xpath('//div[@class="zppp-panel-normal__inner"]/ul/li[2]').click()
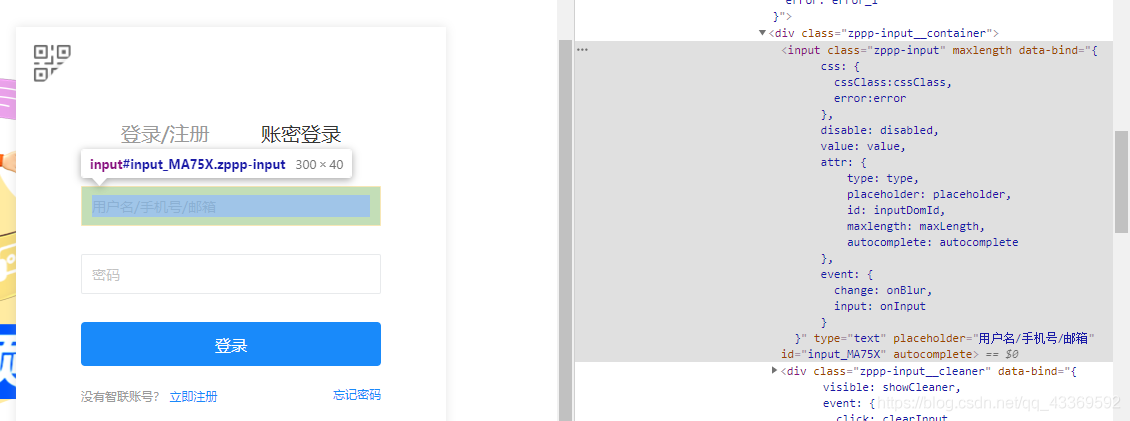
# 找到账户密码的交互接口并进行输入
user_name = chrome.find_elements_by_xpath('//div[@class="zppp-input__container"]/input')[0]
pass_word = chrome.find_elements_by_xpath('//div[@class="zppp-input__container"]/input')[1]
# 进行需要登录的账号密码输入
user_name.send_keys('**********')
pass_word.send_keys('***********')
# 输入完成后点击登录
chrome.find_element_by_class_name('zppp-submit').click()
# 此处手动实现滑块验证
# 动动你的小鼠标2.登陆后大致看了一下主页决定先从城市开始爬,在它的原文件中分析出它的位置,如图↓
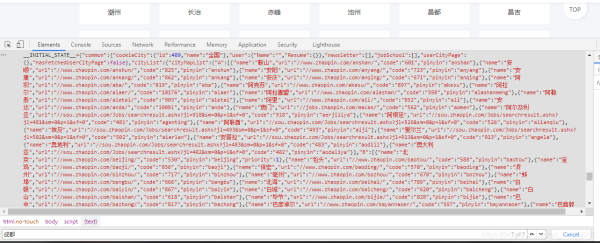
我用的是requests请求获取到网页原文件,再使用正则匹配到我们需要的内容(就是上图中那一坨红色的↑),之后再进行一系列的解析获取到每个城市与其对应的url ⬇⬇⬇⬇⬇⬇
resp = requests.get(url, headers=headers)
    if resp.status_code == 200:
        html = resp.text
        json_data = re.search(r'<script>__INITIAL_STATE__=(.*?)</script>', html).groups()[0]
        data = json.loads(json_data)
        cityMapList = data['cityList']['cityMapList']  # dict
        for letter, citys in cityMapList.items():
            # print(f'-----{letter}-------')
            for city in citys:  # citys 是个列表,里面嵌套的字典
                '''
                {
                    'name': '鞍山',
                    'url': '//www.zhaopin.com/anshan/',
                    'code': '601',
                    'pinyin': 'anshan'
               }
                '''
                city_name = city['name']
                city_url = 'https:' + city['url']
此处我们获取的是所有的城市和它url,如果都要进行爬取的话数据量略大,因此我们可以筛选出需要爬取的城市减轻工作量,反正爬取城市我们想怎么改就怎么改哈哈哈哈哈。
3.接下来我们就可以进行工作的查找了,既然我们用的是Python来爬取的,那就查询Python相关的工作吧。
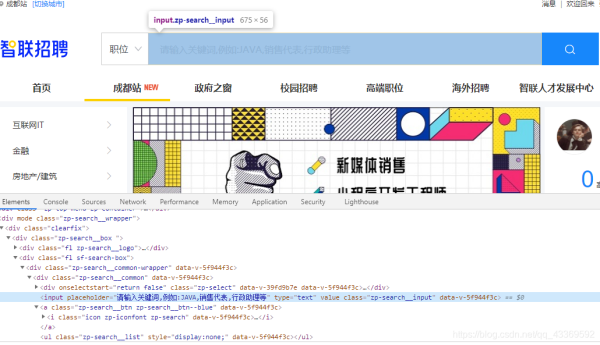
首先还是要找到输入搜索信息的框框并找出它的接口,然后进行输入(这里输入的是Python),输入完成后找到右边的搜索按钮(就是那个放大镜)进行点击操作,下面是模拟浏览器操作的代码实现⬇⬇⬇⬇⬇
# 根据class_name 查询WebElement找出输入的位置
input_seek: WebElement = chrome.find_element_by_class_name('zp-search__input')
input_seek.send_keys('Python')  # 输入Python
click: WebElement =
    # 找出搜索	按钮并点击
    chrome.find_element_by_xpath('//div[@class="zp-search__common"]//a')
click.click()

chrome.switch_to.window(chrome.window_handles[1])这里就有一个需要注意的地方了:在输入Python点击搜索按钮后会弹出一个新的窗口,而驱动浏览器的 程序还在第一个窗口,因此需要使用 swiitch_to_window(chrome.window_handles[n]) --<n表示目标窗口的 位置,最开始的第一个窗口是0> 方法进行窗口的切换。
4.数据的解析和提取
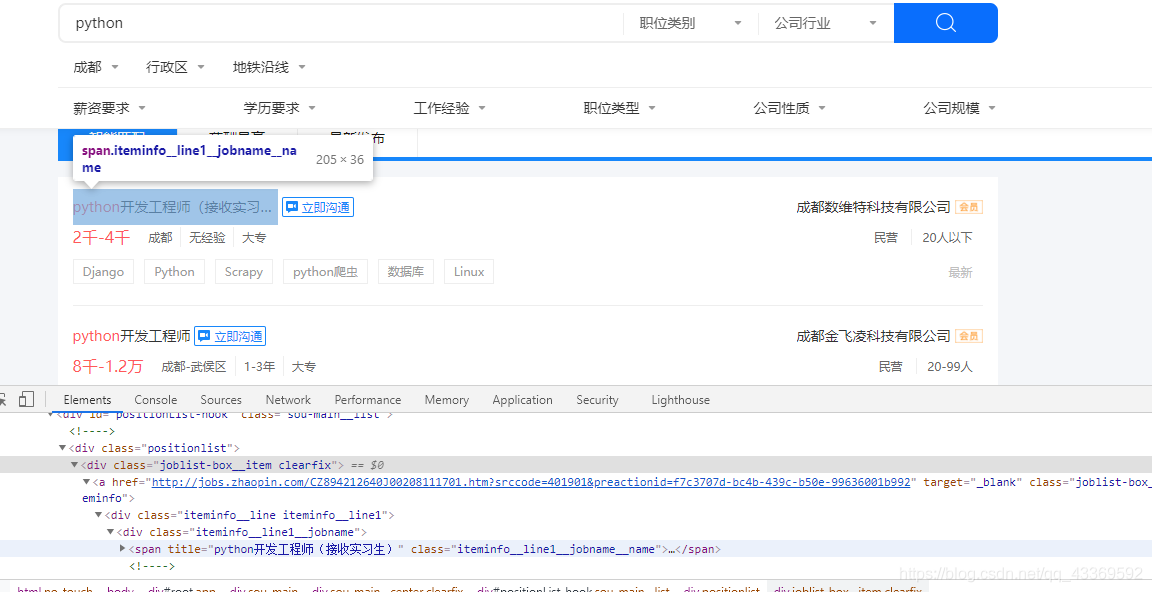
很明显可以看出需要的信息都在 class="positionlist "下,进一步分析可知数据都在 a标签下,接下来就可以使用Xpath进行数据的提取⬇⬇⬇⬇⬇
root = etree.HTML(html)
    divs = root.xpath('//div[@class="positionlist"]')  # element对象
    for div in divs:
        # 岗位     # 里面对应的是一个个列表
        position = div.xpath('.//a//div[@class="iteminfo__line1__jobname"]/span[1]')
         # 公司
        company = div.xpath('//a//div[@class="iteminfo__line1__compname"]/span/text()')
        # 薪资
        money = div.xpath('.//a//div[@class="iteminfo__line2__jobdesc"]/p/text()')
         # 位置
        city = div.xpath('//a//div[@class="iteminfo__line2__jobdesc"]/ul/li[1]/text()')
        # 经验
        experience = 				              div.xpath('.//a//div[@class="iteminfo__line2__jobdesc"]/ul/li[2]/text()')
        # 学历
        education =    div.xpath('.//a//div[@class="iteminfo__line2__jobdesc"]/ul/li[3]/text()')
         # 规模
        scale = div.xpath('.//a//div[@class="iteminfo__line2__compdesc"]/span[1]/text()')
         # 人数
        people = div.xpath('.//a//div[@class="iteminfo__line2__compdesc"]/span[2]/text()')
5.获取下一页
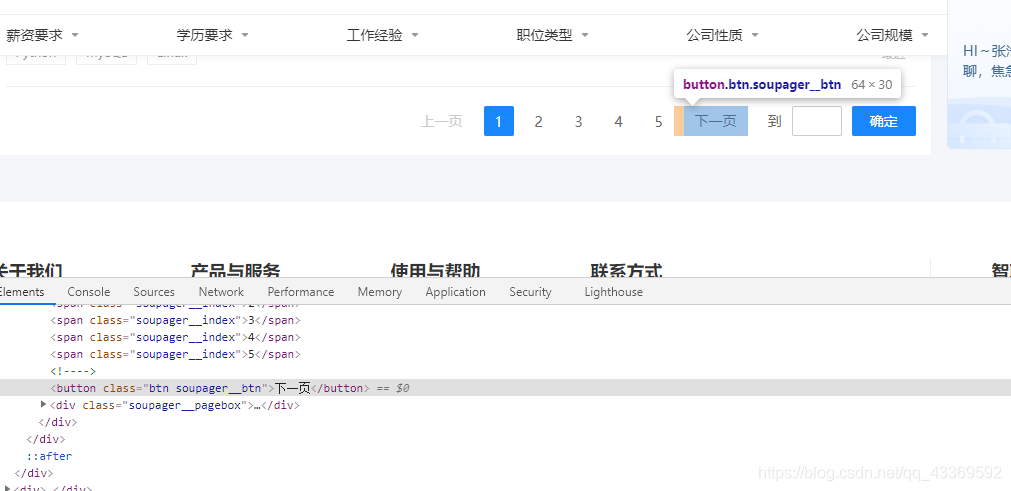
找到下一页按钮并模拟浏览器进行点击,获取到每一页所有的数据。
import csv
import os
import re
import json
import time

import requests
from selenium.webdriver import Chrome
from selenium.webdriver.remote.webelement import WebElement
from selenium.webdriver.common.by import By
from selenium.webdriver.support import ui
from selenium.webdriver.support import expected_conditions
from lxml import etree

chrome = Chrome(executable_path='chromedriver')


# 模拟登录
def login(url):
    # 获取登录页面
    chrome.get(url)
    # 找出账号密码登录的页面
    chrome.find_element_by_class_name('zppp-panel-qrcode-bar__triangle').click()
    chrome.find_element_by_xpath('//div[@class="zppp-panel-normal__inner"]/ul/li[2]').click()
    # 找到账户密码的交互接口并进行输入
    user_name = chrome.find_elements_by_xpath('//div[@class="zppp-input__container"]/input')[0]
    pass_word = chrome.find_elements_by_xpath('//div[@class="zppp-input__container"]/input')[1]
    # 此处输入登录智联招聘的账号密码
    user_name.send_keys('***********')
    pass_word.send_keys('**********')
    # 输入完成后点击登录
    chrome.find_element_by_class_name('zppp-submit').click()

    # 此处手动实现滑块验证
    # 动动手指滑一划完成登录
    time.sleep(10)

    get_allcity('https://www.zhaopin.com/citymap')
    # 在登录状态下进行所有城市信息的获取


def get_allcity(url):
    resp = requests.get(url, headers=headers)
    if resp.status_code == 200:
        html = resp.text
        json_data = re.search(r'<script>__INITIAL_STATE__=(.*?)</script>', html).groups()[0]
        data = json.loads(json_data)
        cityMapList = data['cityList']['cityMapList']  # dict
        for letter, citys in cityMapList.items():
            # print(f'-----{letter}-------')
            for city in citys:  # citys 是个列表,里面嵌套的字典
                '''
                {
                    'name': '鞍山',
                    'url': '//www.zhaopin.com/anshan/',
                    'code': '601',
                    'pinyin': 'anshan'
               }
                '''
                city_name = city['name']
                city_url = 'https:' + city['url']

                # 筛选城市
                query_citys = ('成都')
                if city_name in query_citys:
                    print(f'正在获取{city_name}的信息')
                    get_city_job(city_url)
                    time.sleep(3)
                else:
                    # print(f'{city_name} 不在搜索范围内!')
                    pass
    else:
        print('网页获取失败')


def get_city_job(url):
    chrome.get(url)  # 打开城市信息
    # 根据class_name 查询WebElement找出输入的位置
    input_seek: WebElement = chrome.find_element_by_class_name('zp-search__input')
    input_seek.send_keys('Python')  # 输入Python
    click: WebElement = chrome.find_element_by_xpath('//div[@class="zp-search__common"]//a')  # 找出搜索按钮并点击
    click.click()

    # 切换到第二个页面
    chrome.switch_to.window(chrome.window_handles[1])

    time.sleep(1)

    time.sleep(1)
    # 等待class_name为“sou-main__list” div元素出现
    ui.WebDriverWait(chrome, 30).until(
        expected_conditions.visibility_of_all_elements_located((By.CLASS_NAME, 'sou-main__list')),
        '查找的元素一直没有出现'
    )

    # 判断当前查询结果是否不存在
    no_content = chrome.find_elements_by_class_name('positionlist')
    if not no_content:
        print('当前城市未查找到Python岗位')
    else:
        # 提取查找结果
        parse(chrome.page_source)


def parse(html):
    root = etree.HTML(html)
    divs = root.xpath('//div[@class="positionlist"]')  # element对象
    items = {}
    for div in divs:
        # 岗位
        position = div.xpath('.//a//div[@class="iteminfo__line1__jobname"]/span[1]')
         # 公司
        company = div.xpath('//a//div[@class="iteminfo__line1__compname"]/span/text()')
        # 薪资
        money = div.xpath('.//a//div[@class="iteminfo__line2__jobdesc"]/p/text()')
        # 位置
        city = div.xpath('//a//div[@class="iteminfo__line2__jobdesc"]/ul/li[1]/text()')
        # 经验
        experience =  div.xpath('.//a//div[@class="iteminfo__line2__jobdesc"]/ul/li[2]/text()')
        # 学历
        education =  div.xpath('.//a//div[@class="iteminfo__line2__jobdesc"]/ul/li[3]/text()')
         # 规模
        scale = div.xpath('.//a//div[@class="iteminfo__line2__compdesc"]/span[1]/text()')
         # 人数
        people = div.xpath('.//a//div[@class="iteminfo__line2__compdesc"]/span[2]/text()')
        for position_, company_, money_, city_, experience_, education_, scale_, people_ in zip(position, company,
                                                                                                money, city, experience,
                                                                                                education, scale,
                                                                                                people):
            # title="python爬虫工程师" 获取它的title属性值
            string = position_.attrib.get('title')
            items['position'] = string
            items['company'] = company_
            items['money'] = money_.strip()
            items['city'] = city_
            items['experience'] = experience_
            items['education'] = education_
            items['scale'] = scale_
            items['people'] = people_
            itempipeline(items)

    # 获取下一页
    next_page()


def itempipeline(items):
    has_header = os.path.exists(save_csv)  # 文件头
    with open(save_csv, 'a', encoding='utf8') as file:
        writer = csv.DictWriter(file, fieldnames=items.keys())
        if not has_header:
            writer.writeheader()  # 写入文件头
        writer.writerow(items)

def next_page():
    # 找到下一页按钮
    time.sleep(0.5)
    button = chrome.find_elements_by_xpath('//div[@class="soupager"]/button[@class="btn soupager__btn"]')
    if not button:
        print(f'获取完毕,请在 {save_csv} 里查看!!')
        exit()
    else:
        button[0].click()  # 点击下一页
        time.sleep(1)
        parse(chrome.page_source)


if __name__ == '__main__':
    n = 0
    headers = {
        'User-Agent': 'Mozilla/5.0 (Windows NT 10.0; WOW64) AppleWebKit/537.36 (KHTML, like Gecko) Chrome/70.0.3538.25 Safari/537.36 Core/1.70.3823.400 QQBrowser/10.7.4307.400',
        'Cookie': 'aQQ_ajkguid=B4D4C2CC-2F46-D252-59D7-83356256A4DC; id58=e87rkGBclxRq9+GOJC4CAg==; _ga=GA1.2.2103255298.1616680725; 58tj_uuid=4b56b6bf-99a3-4dd5-83cf-4db8f2093fcd; wmda_uuid=0f89f6f294d0f974a4e7400c1095354c; wmda_new_uuid=1; wmda_visited_projects=%3B6289197098934; als=0; cmctid=102; ctid=15; sessid=E454865C-BA2D-040D-1158-5E1357DA84BA; twe=2; isp=true; _gid=GA1.2.1192525458.1617078804; new_uv=4; obtain_by=2; xxzl_cid=184e09dc30c74089a533faf230f39099; xzuid=7763438f-82bc-4565-9fe8-c7a4e036c3ee'
    }
    save_csv = 'chengdu-python.csv'
    login(
        'https://passport.zhaopin.com/login?bkUrl=%2F%2Fi.zhaopin.com%2Fblank%3Fhttps%3A%2F%2Fwww.zhaopin.com%2Fbeijing%2F')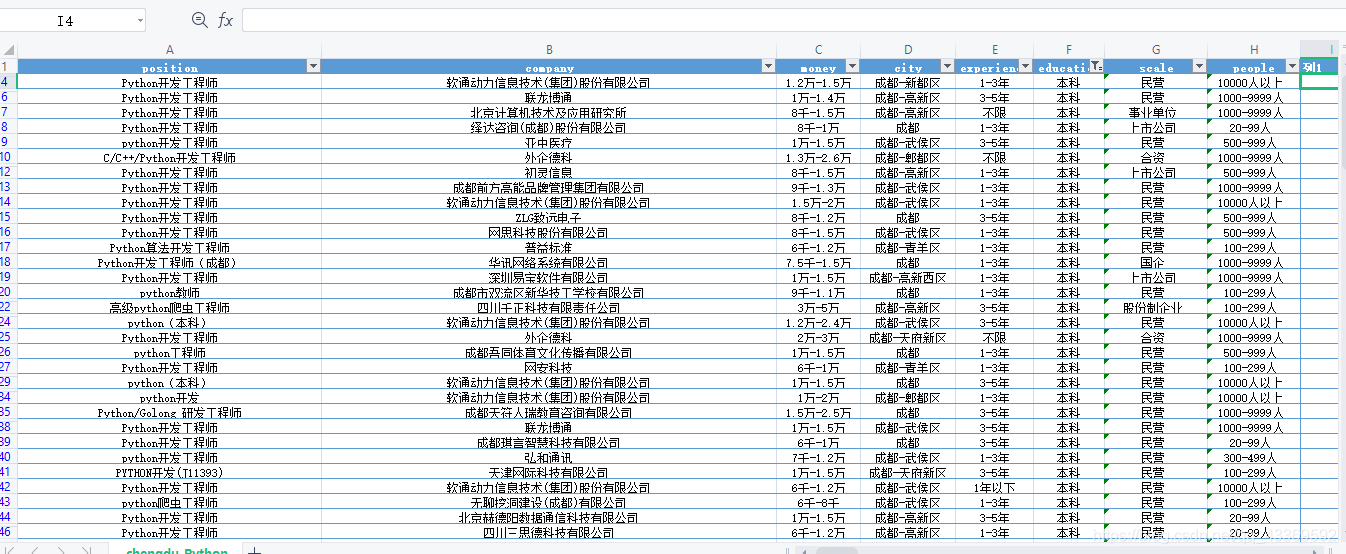
关于“python中selenium如何实现智联招聘数据爬取”这篇文章就分享到这里了,希望以上内容可以对大家有一定的帮助,使各位可以学到更多知识,如果觉得文章不错,请把它分享出去让更多的人看到。
免责声明:本站发布的内容(图片、视频和文字)以原创、转载和分享为主,文章观点不代表本网站立场,如果涉及侵权请联系站长邮箱:is@yisu.com进行举报,并提供相关证据,一经查实,将立刻删除涉嫌侵权内容。