жӮЁеҘҪпјҢзҷ»еҪ•еҗҺжүҚиғҪдёӢи®ўеҚ•е“ҰпјҒ
еҜҶз Ғзҷ»еҪ•
зҷ»еҪ•жіЁеҶҢ
зӮ№еҮ» зҷ»еҪ•жіЁеҶҢ еҚіиЎЁзӨәеҗҢж„ҸгҖҠдәҝйҖҹдә‘з”ЁжҲ·жңҚеҠЎжқЎж¬ҫгҖӢ
жң¬зҜҮж–Үз« дёәеӨ§е®¶еұ•зӨәдәҶжҖҺд№ҲеңЁPythonдёӯдҪҝз”ЁScrapyзҲ¬еҸ–иұҶз“ЈеӣҫзүҮпјҢеҶ…е®№з®ҖжҳҺжүјиҰҒ并且容жҳ“зҗҶи§ЈпјҢз»қеҜ№иғҪдҪҝдҪ зңјеүҚдёҖдә®пјҢйҖҡиҝҮиҝҷзҜҮж–Үз« зҡ„иҜҰз»Ҷд»Ӣз»ҚеёҢжңӣдҪ иғҪжңүжүҖ收иҺ·гҖӮ
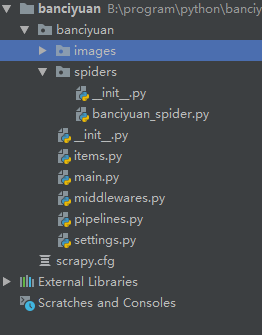
scrapy startproject banciyuan еҲӣе»әscrapyйЎ№зӣ®еҲӣе»әзҡ„йЎ№зӣ®з»“жһ„еҰӮдёӢ
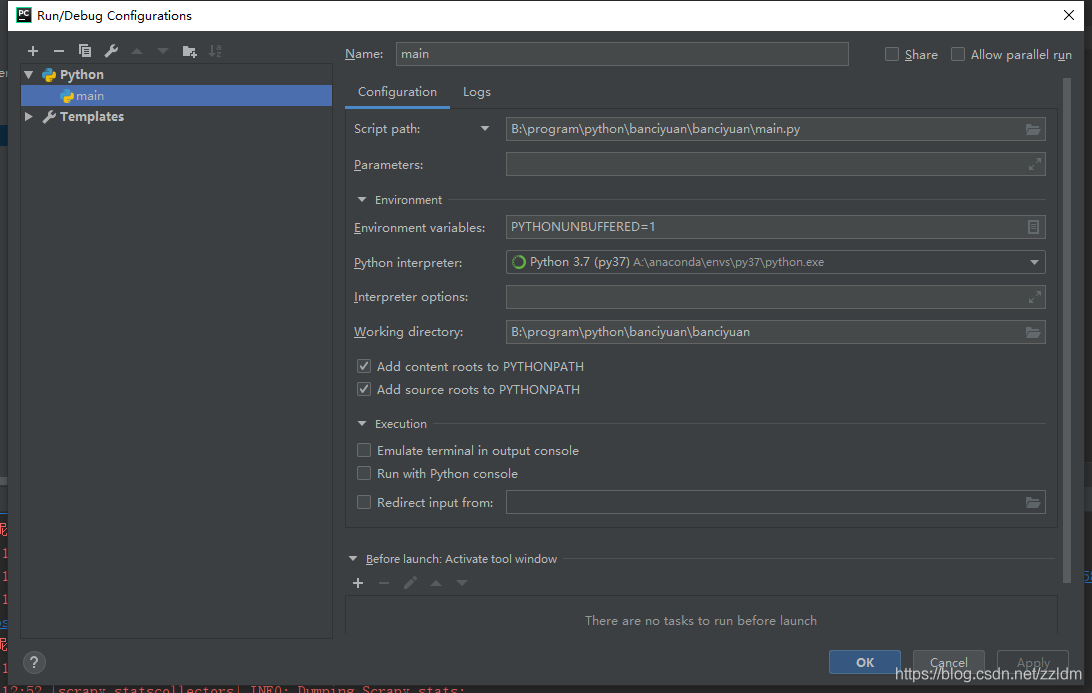
2.дёәдәҶж–№дҫҝдҪҝз”Ёpycharmжү§иЎҢscrapyйЎ№зӣ®пјҢж–°е»әmain.py
from scrapy import cmdline

cmdline.execute("scrapy crawl banciyuan".split())еҶҚedit configuration
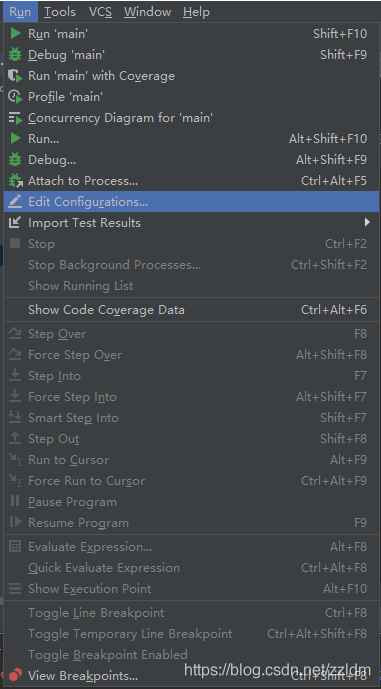
然еҗҺиҝӣиЎҢеҰӮдёӢи®ҫзҪ®пјҢи®ҫзҪ®еҗҺд№ӢеҗҺе°ұиғҪйҖҡиҝҮиҝҗиЎҢmain.pyиҝҗиЎҢscrapyйЎ№зӣ®дәҶ
3.еҲҶжһҗиҜҘHTMLйЎөйқўпјҢеҲӣе»әеҜ№еә”spider

from scrapy import Spider
import scrapy

from banciyuan.items import BanciyuanItem


class BanciyuanSpider(Spider):
    name = 'banciyuan'
    allowed_domains = ['movie.douban.com']
    start_urls = ["https://movie.douban.com/celebrity/1025156/photos/"]
    url = "https://movie.douban.com/celebrity/1025156/photos/"

    def parse(self, response):
        num = response.xpath('//div[@class="paginator"]/a[last()]/text()').extract_first('')
        print(num)
        for i in range(int(num)):
            suffix = '?type=C&start=' + str(i * 30) + '&sortby=like&size=a&subtype=a'
            yield scrapy.Request(url=self.url + suffix, callback=self.get_page)

    def get_page(self, response):
        href_list = response.xpath('//div[@class="article"]//div[@class="cover"]/a/@href').extract()
        # print(href_list)
        for href in href_list:
            yield scrapy.Request(url=href, callback=self.get_info)

    def get_info(self, response):
        src = response.xpath(
            '//div[@class="article"]//div[@class="photo-show"]//div[@class="photo-wp"]/a[1]/img/@src').extract_first('')
        title = response.xpath('//div[@id="content"]/h2/text()').extract_first('')
        # print(response.body)
        item = BanciyuanItem()
        item['title'] = title
        item['src'] = [src]
        yield item
4.items.py
# Define here the models for your scraped items
#
# See documentation in:
# https://docs.scrapy.org/en/latest/topics/items.html

import scrapy


class BanciyuanItem(scrapy.Item):
    # define the fields for your item here like:
    src = scrapy.Field()
    title = scrapy.Field()
pipelines.py
# Define your item pipelines here
#
# Don't forget to add your pipeline to the ITEM_PIPELINES setting
# See: https://docs.scrapy.org/en/latest/topics/item-pipeline.html


# useful for handling different item types with a single interface
from itemadapter import ItemAdapter
from scrapy.pipelines.images import ImagesPipeline
import scrapy

class BanciyuanPipeline(ImagesPipeline):
    def get_media_requests(self, item, info):
        yield scrapy.Request(url=item['src'][0], meta={'item': item})

    def file_path(self, request, response=None, info=None, *, item=None):
        item = request.meta['item']
        image_name = item['src'][0].split('/')[-1]
        # image_name.replace('.webp', '.jpg')
        path = '%s/%s' % (item['title'].split(' ')[0], image_name)

        return path
settings.py
# Scrapy settings for banciyuan project
#
# For simplicity, this file contains only settings considered important or
# commonly used. You can find more settings consulting the documentation:
#
#     https://docs.scrapy.org/en/latest/topics/settings.html
#     https://docs.scrapy.org/en/latest/topics/downloader-middleware.html
#     https://docs.scrapy.org/en/latest/topics/spider-middleware.html

BOT_NAME = 'banciyuan'

SPIDER_MODULES = ['banciyuan.spiders']
NEWSPIDER_MODULE = 'banciyuan.spiders'


# Crawl responsibly by identifying yourself (and your website) on the user-agent
USER_AGENT = {'User-Agent':'Mozilla/5.0 (Windows NT 10.0; Win64; x64) AppleWebKit/537.36 (KHTML, like Gecko) Chrome/71.0.3578.80 Safari/537.36'}


# Obey robots.txt rules
ROBOTSTXT_OBEY = False

# Configure maximum concurrent requests performed by Scrapy (default: 16)
#CONCURRENT_REQUESTS = 32

# Configure a delay for requests for the same website (default: 0)
# See https://docs.scrapy.org/en/latest/topics/settings.html#download-delay
# See also autothrottle settings and docs
#DOWNLOAD_DELAY = 3
# The download delay setting will honor only one of:
#CONCURRENT_REQUESTS_PER_DOMAIN = 16
#CONCURRENT_REQUESTS_PER_IP = 16

# Disable cookies (enabled by default)
#COOKIES_ENABLED = False

# Disable Telnet Console (enabled by default)
#TELNETCONSOLE_ENABLED = False

# Override the default request headers:
#DEFAULT_REQUEST_HEADERS = {
#   'Accept': 'text/html,application/xhtml+xml,application/xml;q=0.9,*/*;q=0.8',
#   'Accept-Language': 'en',
#}

# Enable or disable spider middlewares
# See https://docs.scrapy.org/en/latest/topics/spider-middleware.html
#SPIDER_MIDDLEWARES = {
#    'banciyuan.middlewares.BanciyuanSpiderMiddleware': 543,
#}

# Enable or disable downloader middlewares
# See https://docs.scrapy.org/en/latest/topics/downloader-middleware.html
#DOWNLOADER_MIDDLEWARES = {
#    'banciyuan.middlewares.BanciyuanDownloaderMiddleware': 543,
#}

# Enable or disable extensions
# See https://docs.scrapy.org/en/latest/topics/extensions.html
#EXTENSIONS = {
#    'scrapy.extensions.telnet.TelnetConsole': None,
#}

# Configure item pipelines
# See https://docs.scrapy.org/en/latest/topics/item-pipeline.html
ITEM_PIPELINES = {
   'banciyuan.pipelines.BanciyuanPipeline': 1,
}
IMAGES_STORE = './images'

# Enable and configure the AutoThrottle extension (disabled by default)
# See https://docs.scrapy.org/en/latest/topics/autothrottle.html
#AUTOTHROTTLE_ENABLED = True
# The initial download delay
#AUTOTHROTTLE_START_DELAY = 5
# The maximum download delay to be set in case of high latencies
#AUTOTHROTTLE_MAX_DELAY = 60
# The average number of requests Scrapy should be sending in parallel to
# each remote server
#AUTOTHROTTLE_TARGET_CONCURRENCY = 1.0
# Enable showing throttling stats for every response received:
#AUTOTHROTTLE_DEBUG = False

# Enable and configure HTTP caching (disabled by default)
# See https://docs.scrapy.org/en/latest/topics/downloader-middleware.html#httpcache-middleware-settings
#HTTPCACHE_ENABLED = True
#HTTPCACHE_EXPIRATION_SECS = 0
#HTTPCACHE_DIR = 'httpcache'
#HTTPCACHE_IGNORE_HTTP_CODES = []
#HTTPCACHE_STORAGE = 'scrapy.extensions.httpcache.FilesystemCacheStorage'5.зҲ¬еҸ–з»“жһң

дёҠиҝ°еҶ…е®№е°ұжҳҜжҖҺд№ҲеңЁPythonдёӯдҪҝз”ЁScrapyзҲ¬еҸ–иұҶз“ЈеӣҫзүҮпјҢдҪ 们еӯҰеҲ°зҹҘиҜҶжҲ–жҠҖиғҪдәҶеҗ—пјҹеҰӮжһңиҝҳжғіеӯҰеҲ°жӣҙеӨҡжҠҖиғҪжҲ–иҖ…дё°еҜҢиҮӘе·ұзҡ„зҹҘиҜҶеӮЁеӨҮпјҢж¬ўиҝҺе…іжіЁдәҝйҖҹдә‘иЎҢдёҡиө„и®Ҝйў‘йҒ“гҖӮ
е…ҚиҙЈеЈ°жҳҺпјҡжң¬з«ҷеҸ‘еёғзҡ„еҶ…е®№пјҲеӣҫзүҮгҖҒи§Ҷйў‘е’Ңж–Үеӯ—пјүд»ҘеҺҹеҲӣгҖҒиҪ¬иҪҪе’ҢеҲҶдә«дёәдё»пјҢж–Үз« и§ӮзӮ№дёҚд»ЈиЎЁжң¬зҪ‘з«ҷз«ӢеңәпјҢеҰӮжһңж¶үеҸҠдҫөжқғиҜ·иҒ”зі»з«ҷй•ҝйӮ®з®ұпјҡis@yisu.comиҝӣиЎҢдёҫжҠҘпјҢ并жҸҗдҫӣзӣёе…іиҜҒжҚ®пјҢдёҖз»ҸжҹҘе®һпјҢе°Ҷз«ӢеҲ»еҲ йҷӨж¶үе«ҢдҫөжқғеҶ…е®№гҖӮ
жӮЁеҘҪпјҢзҷ»еҪ•еҗҺжүҚиғҪдёӢи®ўеҚ•е“ҰпјҒ