您好,登录后才能下订单哦!
密码登录
登录注册
点击 登录注册 即表示同意《亿速云用户服务条款》
这篇文章主要讲解了“C++种string的实现方式”,文中的讲解内容简单清晰,易于学习与理解,下面请大家跟着小编的思路慢慢深入,一起来研究和学习“C++种string的实现方式”吧!
常见的string实现方式有两种,一种是深拷贝的方式,一种是COW(copy on write)写时拷贝方式,以前多数使用COW方式,但由于目前多线程使用越来越多,COW技术在多线程中会有额外的性能恶化,所以现在多数使用深拷贝的方式,但了解COW的技术实现还是很有必要的。
这里会对这两种方式都进行源码分析,正文内容较少,更多内容都在源码的注释中。
string的内容主要在gcc源码的三个文件中:<string>、<basic_string.h>、<basic_string.tcc>
在分析前先介绍下string或者C++ stl中几个基本的概念:
size: 表示真实数据的大小,一般resize函数改变的就是这个值。
capacity:表示内部实际已经分配的内存大小,capacity一定大于等于size,当size超过这个容量时会触发重新分配机制,一般reserve函数改变的就是这个值。
深拷贝下string的实现
<string>文件中有如下代码:
// file: string using string = basic_string<char>;
这里可以看到string其实真实的样子是basic_string,这里可以看下basic_string真实的结构:
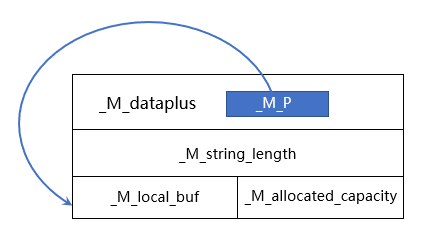
template <typename _CharT, typename _Traits, typename _Alloc> class basic_string { // Use empty-base optimization: http://www.cantrip.org/emptyopt.html struct _Alloc_hider : allocator_type // TODO check __is_final { _Alloc_hider(pointer __dat, const _Alloc& __a) : allocator_type(__a), _M_p(__dat) {} _Alloc_hider(pointer __dat, _Alloc&& __a = _Alloc()) : allocator_type(std::move(__a)), _M_p(__dat) {} /** * _M_p指向实际的数据 */ pointer _M_p; // The actual data. }; _Alloc_hider _M_dataplus; /** * 真实数据的长度,等价于前面介绍的STL中的size */ size_type _M_string_length; enum { _S_local_capacity = 15 / sizeof(_CharT) }; /** * 这里有个小技巧,用了union * 因为使用_M_local_buf时候不需要关注_M_allocated_capacity * 使用_M_allocated_capacity时就不需要关注_M_local_buf * 继续向下看完您就会明白。 */ union { _CharT _M_local_buf[_S_local_capacity + 1]; /** * 内部已经分配的内存的大小,等价于前面介绍的STL中的capacity */ size_type _M_allocated_capacity; }; };从这里可以看见整个basic_string的结构如图:
看下面代码:
string str;
这段代码会调用普通构造函数,对应的源码实现如下:
basic_string() : _M_dataplus(_M_local_data()) { _M_set_length(0); }而_M_local_data()的实现如下:
const_pointer _M_local_data() const { return std::pointer_traits<const_pointer>::pointer_to(*_M_local_buf); }这里可以看见M_dataplus表示实际存放数据的地方,当string是空的时候,其实就是指向M_local_buf,且_M_string_length是0。
当由char*构造string时,构造函数如下:
basic_string(const _CharT* __s, size_type __n, const _Alloc& __a = _Alloc()) : _M_dataplus(_M_local_data(), __a) { _M_construct(__s, __s + __n); }首先让M_dataplus指向local_buf,再看下M_construct的实现,具体分析可以看下我代码中添加的注释:
/*** * _M_construct有很多种不同的实现,不同的迭代器类型有不同的优化实现, * 这里我们只需要关注一种即可,整体思路是相同的。 */ template <typename _CharT, typename _Traits, typename _Alloc> template <typename _InIterator> void basic_string<_CharT, _Traits, _Alloc>::_M_construct(_InIterator __beg, _InIterator __end, std::input_iterator_tag) { size_type __len = 0; size_type __capacity = size_type(_S_local_capacity); // 现在__capacity是15,注意这个值等会可能会改变 while (__beg != __end && __len < __capacity) { _M_data()[__len++] = *__beg; ++__beg; } /** 现在_M_data()指向的是_M_local_buf * 上面最多会拷贝_S_local_capacity即15个字节,继续往下看, * 当超过_S_local_capacity时会重新申请一块堆内存,_M_data()会去指向这块新内存 */ __try { while (__beg != __end) { if (__len == __capacity) { /** * 就是在这里,当string内capacity不够容纳len个字符时,会使用_M_create去扩容 * 这里你可能会有疑惑,貌似每次while循环都会去重新使用_M_create来申请多一个字节的内存 * 但其实不是,_M_create的第一个参数的传递方式是引用传递,__capacity会在内部被修改,稍后会分析 */ __capacity = __len + 1; pointer __another = _M_create(__capacity, __len); /** * 把旧数据拷贝到新的内存区域,_M_data()指向的是旧数据,__another指向的是新申请的内存 */ this->_S_copy(__another, _M_data(), __len); /** * __M_dispose() * 释放_M_data()指向的旧数据内存,如果是_M_local_buf则不需要释放,稍后分析 */ _M_dispose(); /** * _M_data() * 内部的指向内存的指针指向这块新申请的内存__another,它的实现其实就是 * void _M_data(pointer __p) { _M_dataplus._M_p = __p; } */ _M_data(__another); /** * _M_allocated_capacity设置为__capacity * 实现为 void _M_capacity(size_type __capacity) { _M_allocated_capacity = __capacity; } */ _M_capacity(__capacity); } _M_data()[__len++] = *__beg; ++__beg; } } __catch(...) { /** * 异常发生时,避免内存泄漏,会释放掉内部申请的内存 */ _M_dispose(); __throw_exception_again; } /** * 最后设置string的长度为__len * 实现为void _M_length(size_type __length) { _M_string_length = __length; } */ _M_set_length(__len); }再分析下内部的内存申请函数_M_create:
/** * @brief _M_create表示申请新内存 * @param __capacity 想要申请的内存大小,注意这里参数传递方式是引用传递,内部会改变其值 * @param __old_capacity 以前的内存大小 */ template <typename _CharT, typename _Traits, typename _Alloc> typename basic_string<_CharT, _Traits, _Alloc>::pointer basic_string<_CharT, _Traits, _Alloc>::_M_create( size_type& __capacity, size_type __old_capacity) { /** * max_size()表示标准库容器规定的一次性可以分配到最大内存大小 * 当想要申请的内存大小最大规定长度时,会抛出异常 */ if (__capacity > max_size()) std::__throw_length_error(__N("basic_string::_M_create")); /** * 这里就是常见的STL动态扩容机制,其实常见的就是申请为__old_capacity的2倍大小的内存,最大只能申请max_size() * 注释只是说了常见的内存分配大小思想,不全是下面代码的意思,具体可以直接看下面这几行代码哈 */ if (__capacity > __old_capacity && __capacity < 2 * __old_capacity) { __capacity = 2 * __old_capacity; // Never allocate a string bigger than max_size. if (__capacity > max_size()) __capacity = max_size(); } /** * 使用内存分配子去分配__capacity+1大小的内存,+1是为了多存储个\0 */ return _Alloc_traits::allocate(_M_get_allocator(), __capacity + 1); }再分析下内部的内存释放函数_M_dispose函数:
/** * 如果当前指向的是本地内存那15个字节,则不需要释放 * 如果不是,则需要使用_M_destroy去释放其指向的内存 */ void _M_dispose() { if (!_M_is_local()) _M_destroy(_M_allocated_capacity); } /** * 判断下当前内部指向的是不是本地内存 * _M_local_data()即返回_M_local_buf的地址 */ bool _M_is_local() const { return _M_data() == _M_local_data(); } void _M_destroy(size_type __size) throw() { _Alloc_traits::deallocate(_M_get_allocator(), _M_data(), __size + 1); }再分析下basic_string的拷贝构造函数:
/** * basic_string的拷贝构造函数 * 其实就是每次都做一次深拷贝 */ basic_string(const basic_string& __str) : _M_dataplus(_M_local_data(), _Alloc_traits::_S_select_on_copy(__str._M_get_allocator())) { _M_construct(__str._M_data(), __str._M_data() + __str.length()); }再分析下basic_string的赋值构造函数:
/** * 赋值构造函数,调用了assign函数 */ basic_string& operator=(const basic_string& __str) { return this->assign(__str); } /** * 调用了_M_assign函数 */ basic_string& assign(const basic_string& __str) { this->_M_assign(__str); return *this; } /** * 赋值的核心函数 */ template <typename _CharT, typename _Traits, typename _Alloc> void basic_string<_CharT, _Traits, _Alloc>::_M_assign(const basic_string& __str) { if (this != &__str) { const size_type __rsize = __str.length(); const size_type __capacity = capacity(); /** * 如果capacity不够用,需要进行重新分配 */ if (__rsize > __capacity) { size_type __new_capacity = __rsize; pointer __tmp = _M_create(__new_capacity, __capacity); _M_dispose(); _M_data(__tmp); _M_capacity(__new_capacity); } /** * 将__str指向的内存拷贝到当前对象指向的内存上 */ if (__rsize) this->_S_copy(_M_data(), __str._M_data(), __rsize); _M_set_length(__rsize); } }再分析下移动构造函数:
/** * 移动构造函数,其实就是把src指向的内存移动到了dst种 */ basic_string(basic_string&& __str) noexcept : _M_dataplus(_M_local_data(), std::move(__str._M_get_allocator())) { if (__str._M_is_local()) { traits_type::copy(_M_local_buf, __str._M_local_buf, _S_local_capacity + 1); } else { _M_data(__str._M_data()); _M_capacity(__str._M_allocated_capacity); } // Must use _M_length() here not _M_set_length() because // basic_stringbuf relies on writing into unallocated capacity so // we mess up the contents if we put a '\0' in the string. _M_length(__str.length()); __str._M_data(__str._M_local_data()); __str._M_set_length(0); }移动赋值函数和移动构造函数类似,就不作过多分析啦。
COW方式下string的实现
先看下部分源代码了解下COW的basic_string的结构:
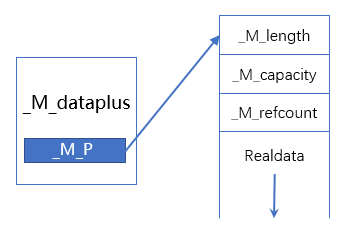
template <typename _CharT, typename _Traits, typename _Alloc> class basic_string { private: struct _Rep_base { /** * string实际数据的大小 * 字符串真正存储的是正常字符串数据加上一个\0,真正的长度其实是_M_length+1 */ size_type _M_length; /** * string当前已经分配了的内存大小 * _M_capacity一定不小于_M_length,内存分配总是以_M_capacity+1为单位 */ size_type _M_capacity; /** * _M_refcount表示string的引用计数,取值可以分为三种: * -1:可能内存泄漏,有一个变量指向字符串,字符串可以被更改,不允许拷贝,当 * _M_refcount为-1时,表示这个string对象不会再和其它string对象共享啦。 * 0:有一个变量指向字符串,字符串可以被更改。 * n>=1:有n+1个变量指向字符串,对该字符串操作时应该加锁,字符串不可以被更改。 */ _Atomic_word _M_refcount; }; /** * _Rep继承自_Rep_base * 主要目的就是继承_Rep_base的三个成员_M_length、_M_capacity、_M_refcount */ struct _Rep : _Rep_base { // Types: typedef typename _Alloc::template rebind<char>::other _Raw_bytes_alloc; static const size_type _S_max_size; static const _CharT _S_terminal; // \0 static size_type _S_empty_rep_storage[]; // 这里大小不是0,稍后分析 static _Rep& _S_empty_rep() _GLIBCXX_NOEXCEPT { // NB: Mild hack to avoid strict-aliasing warnings. Note that // _S_empty_rep_storage is never modified and the punning should // be reasonably safe in this case. void* __p = reinterpret_cast<void*>(&_S_empty_rep_storage); return *reinterpret_cast<_Rep*>(__p); } }; // Use empty-base optimization: http://www.cantrip.org/emptyopt.html struct _Alloc_hider : _Alloc { _Alloc_hider(_CharT* __dat, const _Alloc& __a) _GLIBCXX_NOEXCEPT : _Alloc(__a), _M_p(__dat) {} _CharT* _M_p; // The actual data,这里的_M_p指向存储实际数据的对象地址 }; public: static const size_type npos = static_cast<size_type>(-1); // 0xFFFFFFFF private: /** * _M_dataplus是basic_string内部唯一的一个成员变量, * 内部有个_M_p成员,指向存储实际的数据的对象,是_Rep对象的指针 */ mutable _Alloc_hider _M_dataplus; };具体分析可以看代码中注释,可以分析出COW的string结构如图:
前面程序喵分析过深拷贝方式下string的局部内存为M_local_buf,那COW下string的S_empty_rep_storage是什么样子呢?直接看源代码:
// Linker sets _S_empty_rep_storage to all 0s (one reference, empty string) // at static init time (before static ctors are run). template <typename _CharT, typename _Traits, typename _Alloc> typename basic_string<_CharT, _Traits, _Alloc>::size_type basic_string<_CharT, _Traits, _Alloc>::_Rep:: _S_empty_rep_storage[(sizeof(_Rep_base) + sizeof(_CharT) + sizeof(size_type) - 1) / sizeof(size_type)];
再分析下构造函数:
/** * 使_M_dataplus指向_S_construct函数返回的内存 */ template <typename _CharT, typename _Traits, typename _Alloc> basic_string<_CharT, _Traits, _Alloc>::basic_string(const _CharT* __s, size_type __n, const _Alloc& __a) : _M_dataplus(_S_construct(__s, __s + __n, __a), __a) {} /** * 返回一段内存,这段内存可以是本地空字符的内存,也可以是内存分配单元分配的内存 */ template <typename _CharT, typename _Traits, typename _Alloc> template <typename _InIterator> _CharT* basic_string<_CharT, _Traits, _Alloc>::_S_construct(_InIterator __beg, _InIterator __end, const _Alloc& __a, input_iterator_tag) { #if _GLIBCXX_FULLY_DYNAMIC_STRING == 0 if (__beg == __end && __a == _Alloc()) return _S_empty_rep()._M_refdata(); #endif // Avoid reallocation for common case. _CharT __buf[128]; size_type __len = 0; while (__beg != __end && __len < sizeof(__buf) / sizeof(_CharT)) { __buf[__len++] = *__beg; ++__beg; } /** * len < 128字节时,分配len字节 * 否则,以128为单位,每次扩容2倍大小 * 稍后相信分析 */ _Rep* __r = _Rep::_S_create(__len, size_type(0), __a); /** * 将__buf指向的内存拷贝到数据真实存放的地址,_M_refdata()指向数据真实存放的地址 * _M_refdata()函数实现如下,可以通过上面画的string结构图分析: * _CharT* _M_refdata() throw() { return reinterpret_cast<_CharT*>(this + 1); } * this+1就是数据真正的地址,这里的1代表sizeof(_Rep) */ _M_copy(__r->_M_refdata(), __buf, __len); __try { /** * 这里的扩容机制和上面介绍的相同,这里就不过多介绍 */ while (__beg != __end) { if (__len == __r->_M_capacity) { // Allocate more space. _Rep* __another = _Rep::_S_create(__len + 1, __len, __a); _M_copy(__another->_M_refdata(), __r->_M_refdata(), __len); __r->_M_destroy(__a); __r = __another; } __r->_M_refdata()[__len++] = *__beg; ++__beg; } } __catch(...) { __r->_M_destroy(__a); __throw_exception_again; } /** * 设置string的长度,同时设置该string是可共享的,稍后分析 */ __r->_M_set_length_and_sharable(__len); return __r->_M_refdata(); }再看下string内部_M_create是如何申请内存的
template <typename _CharT, typename _Traits, typename _Alloc> typename basic_string<_CharT, _Traits, _Alloc>::_Rep* basic_string<_CharT, _Traits, _Alloc>::_Rep::_S_create( size_type __capacity, size_type __old_capacity, const _Alloc& __alloc) { if (__capacity > _S_max_size) __throw_length_error(__N("basic_string::_S_create")); /** * __pagesize是页的大小,每次内存分配的最小单位 * __malloc_header_zize是malloc分配内存额外需要的空间,存储内存实际的长度信息 */ const size_type __pagesize = 4096; const size_type __malloc_header_size = 4 * sizeof(void*); /** * 每次两倍扩容 */ if (__capacity > __old_capacity && __capacity < 2 * __old_capacity) __capacity = 2 * __old_capacity; /** * 看了前面的结构图您应该就能明白为什么是这么计算,这里的+1是存储字符串的结束符 */ size_type __size = (__capacity + 1) * sizeof(_CharT) + sizeof(_Rep); /** * 因为内存是以页为基本单位分配的,所以这里做了一些优化,保证分配内存的大小是内存页的整数倍 */ const size_type __adj_size = __size + __malloc_header_size; if (__adj_size > __pagesize && __capacity > __old_capacity) { const size_type __extra = __pagesize - __adj_size % __pagesize; __capacity += __extra / sizeof(_CharT); // Never allocate a string bigger than _S_max_size. if (__capacity > _S_max_size) __capacity = _S_max_size; __size = (__capacity + 1) * sizeof(_CharT) + sizeof(_Rep); } // NB: Might throw, but no worries about a leak, mate: _Rep() // does not throw. void* __place = _Raw_bytes_alloc(__alloc).allocate(__size); /** * 这里是placement new,表示在__place内存位置处调用_Rep构造函数 */ _Rep* __p = new (__place) _Rep; __p->_M_capacity = __capacity; /** * 设置其可共享,实现如下 * void _M_set_sharable() _GLIBCXX_NOEXCEPT { this->_M_refcount = 0; } */ __p->_M_set_sharable(); return __p; } 这里有关于malloc的知识点可以看我之前写的文章:xxx前面Rep有个_M_set_length_and_sharable方法,看下它的源码: /** * 如果当前内存指向地址是本地内存则什么都不做,否则 * 设置长度为n * 设置其可共享,其实就是设置引用计数为0 * 同时在最后添加一个结束符\0 */ void _M_set_length_and_sharable(size_type __n) _GLIBCXX_NOEXCEPT { #if _GLIBCXX_FULLY_DYNAMIC_STRING == 0 if (__builtin_expect(this != &_S_empty_rep(), false)) #endif { this->_M_set_sharable(); // One reference. this->_M_length = __n; traits_type::assign(this->_M_refdata()[__n], _S_terminal); } } void _M_set_sharable() _GLIBCXX_NOEXCEPT { this->_M_refcount = 0; }COW版本主要就是为了避免过多的拷贝,这里看下string的拷贝构造函数:
/** * 这里是string的构造函数,主要是调用_Rep的_M_grab函数 */ basic_string(const basic_string& __str, const _Alloc& __a) : _M_dataplus(__str._M_rep()->_M_grab(__a, __str.get_allocator()), __a) {} /** * 前面已经介绍过为什么+1,这里您应该就知道为什么-1啦 */ _Rep* _M_rep() const _GLIBCXX_NOEXCEPT { return &((reinterpret_cast<_Rep*>(_M_data()))[-1]); } /** * _M_grab函数决定是将引用计数+1还是拷贝一份 * 如果_M_is_leaked()表示不可以共享,则需要拷贝一份 */ _CharT* _M_grab(const _Alloc& __alloc1, const _Alloc& __alloc2) { return (!_M_is_leaked() && __alloc1 == __alloc2) ? _M_refcopy() : _M_clone(__alloc1); } /** * 如果引用计数小于0,则为true,前面有过约定 */ bool _M_is_leaked() const _GLIBCXX_NOEXCEPT { #if defined(__GTHREADS) // _M_refcount is mutated concurrently by _M_refcopy/_M_dispose, // so we need to use an atomic load. However, _M_is_leaked // predicate does not change concurrently (i.e. the string is either // leaked or not), so a relaxed load is enough. return __atomic_load_n(&this->_M_refcount, __ATOMIC_RELAXED) < 0; #else return this->_M_refcount < 0; #endif } /** * 引用拷贝,其实就是引用计数+1 */ _CharT* _M_refcopy() throw() { #if _GLIBCXX_FULLY_DYNAMIC_STRING == 0 if (__builtin_expect(this != &_S_empty_rep(), false)) #endif __gnu_cxx::__atomic_add_dispatch(&this->_M_refcount, 1); return _M_refdata(); } // XXX MT /** * 深拷贝 */ template <typename _CharT, typename _Traits, typename _Alloc> _CharT* basic_string<_CharT, _Traits, _Alloc>::_Rep::_M_clone(const _Alloc& __alloc, size_type __res) { // Requested capacity of the clone. const size_type __requested_cap = this->_M_length + __res; _Rep* __r = _Rep::_S_create(__requested_cap, this->_M_capacity, __alloc); if (this->_M_length) _M_copy(__r->_M_refdata(), _M_refdata(), this->_M_length); __r->_M_set_length_and_sharable(this->_M_length); return __r->_M_refdata(); } 再分析下string的析构函数: /** * string的析构函数,调用了_M_dispose函数 */ ~basic_string() _GLIBCXX_NOEXCEPT { _M_rep()->_M_dispose(this->get_allocator()); } /** * 将引用计数-1,如果引用计数 <= 0,则释放内存 */ void _M_dispose(const _Alloc& __a) _GLIBCXX_NOEXCEPT { #if _GLIBCXX_FULLY_DYNAMIC_STRING == 0 if (__builtin_expect(this != &_S_empty_rep(), false)) #endif { // Be race-detector-friendly. For more info see bits/c++config. _GLIBCXX_SYNCHRONIZATION_HAPPENS_BEFORE(&this->_M_refcount); if (__gnu_cxx::__exchange_and_add_dispatch(&this->_M_refcount, -1) <= 0) { _GLIBCXX_SYNCHRONIZATION_HAPPENS_AFTER(&this->_M_refcount); _M_destroy(__a); } } } // XXX MT template <typename _CharT, typename _Traits, typename _Alloc> void basic_string<_CharT, _Traits, _Alloc>::_Rep::_M_destroy(const _Alloc& __a) throw() { const size_type __size = sizeof(_Rep_base) + (this->_M_capacity + 1) * sizeof(_CharT); _Raw_bytes_alloc(__a).deallocate(reinterpret_cast<char*>(this), __size); }data()和c_str()的区别
我们以前学习工作过程中都知道str有data和c_str函数,看资料都说它们的区别是一个带\0结束符,一个不带。这里看下源码:
const _CharT* c_str() const _GLIBCXX_NOEXCEPT { return _M_data(); } const _CharT* data() const _GLIBCXX_NOEXCEPT { return _M_data(); }这里可以看见它俩没有任何区别,因为\0结束符其实在最开始构造string对象的时候就已经添加啦。
to_string是怎么实现的?
这里直接看代码:
inline string to_string(int __val) { return __gnu_cxx::__to_xstring<string>(&std::vsnprintf, 4 * sizeof(int), "%d", __val); } inline string to_string(unsigned __val) { return __gnu_cxx::__to_xstring<string>(&std::vsnprintf, 4 * sizeof(unsigned), "%u", __val); } inline string to_string(long __val) { return __gnu_cxx::__to_xstring<string>(&std::vsnprintf, 4 * sizeof(long), "%ld", __val); } template <typename _String, typename _CharT = typename _String::value_type> _String __to_xstring(int (*__convf)(_CharT*, std::size_t, const _CharT*, __builtin_va_list), std::size_t __n, const _CharT* __fmt, ...) { // XXX Eventually the result should be constructed in-place in // the __cxx11 string, likely with the help of internal hooks. _CharT* __s = static_cast<_CharT*>(__builtin_alloca(sizeof(_CharT) * __n)); __builtin_va_list __args; __builtin_va_start(__args, __fmt); const int __len = __convf(__s, __n, __fmt, __args); __builtin_va_end(__args); return _String(__s, __s + __len); }这里可以看出所有的数值类型转string,都是通过vsnprintf来实现,具体vsnprintf是什么这里就不过多介绍啦,读者可以自行查找下相关用法。
感谢各位的阅读,以上就是“C++种string的实现方式”的内容了,经过本文的学习后,相信大家对C++种string的实现方式这一问题有了更深刻的体会,具体使用情况还需要大家实践验证。这里是亿速云,小编将为大家推送更多相关知识点的文章,欢迎关注!
免责声明:本站发布的内容(图片、视频和文字)以原创、转载和分享为主,文章观点不代表本网站立场,如果涉及侵权请联系站长邮箱:is@yisu.com进行举报,并提供相关证据,一经查实,将立刻删除涉嫌侵权内容。