жӮЁеҘҪпјҢзҷ»еҪ•еҗҺжүҚиғҪдёӢи®ўеҚ•е“ҰпјҒ
жң¬зҜҮеҶ…е®№дё»иҰҒи®Іи§ЈвҖңspring mvcжҖҺд№Ҳе®һзҺ°йЎөйқўи®ҝй—®вҖқпјҢж„ҹе…ҙи¶Јзҡ„жңӢеҸӢдёҚеҰЁжқҘзңӢзңӢгҖӮжң¬ж–Үд»Ӣз»Қзҡ„ж–№жі•ж“ҚдҪңз®ҖеҚ•еҝ«жҚ·пјҢе®һз”ЁжҖ§ејәгҖӮдёӢйқўе°ұи®©е°Ҹзј–жқҘеёҰеӨ§е®¶еӯҰд№ вҖңspring mvcжҖҺд№Ҳе®һзҺ°йЎөйқўи®ҝй—®вҖқеҗ§!
servletзҡ„е®ҡд№ү
Servlet is a technology which is used to create a web application. servletжҳҜдёҖйЎ№з”ЁжқҘеҲӣе»әweb applicationзҡ„жҠҖжңҜгҖӮ
Servlet is an API that provides many interfaces and classes including documentation. servletжҳҜдёҖдёӘжҸҗдҫӣеҫҲеӨҡжҺҘеҸЈе’Ңзұ»apiеҸҠе…¶зӣёе…іж–ҮжЎЈгҖӮ
Servlet is an interface that must be implemented for creating any Servlet.servletжҳҜдёҖдёӘжҺҘеҸЈпјҢеҲӣе»әд»»дҪ•servletйғҪиҰҒе®һзҺ°зҡ„жҺҘеҸЈгҖӮ
Servlet is a class that extends the capabilities of the servers and responds to the incoming requests. It can respond to any requests. servletжҳҜдёҖдёӘе®һзҺ°дәҶжңҚеҠЎеҷЁеҗ„з§ҚиғҪеҠӣзҡ„зұ»пјҢеҜ№иҜ·жұӮеҒҡеҮәе“Қеә”гҖӮе®ғеҸҜд»ҘеҜ№д»»дҪ•иҜ·жұӮеҒҡеҮәе“Қеә”гҖӮ
Servlet is a web component that is deployed on the server to create a dynamic web page.servletжҳҜдёҖдёӘweb组件пјҢйғЁзҪІеҲ°дёҖдёӘweb serverдёҠ(еҰӮtomcatпјҢjetty)пјҢз”ЁжқҘдә§з”ҹдёҖдёӘеҠЁжҖҒwebйЎөйқўгҖӮ
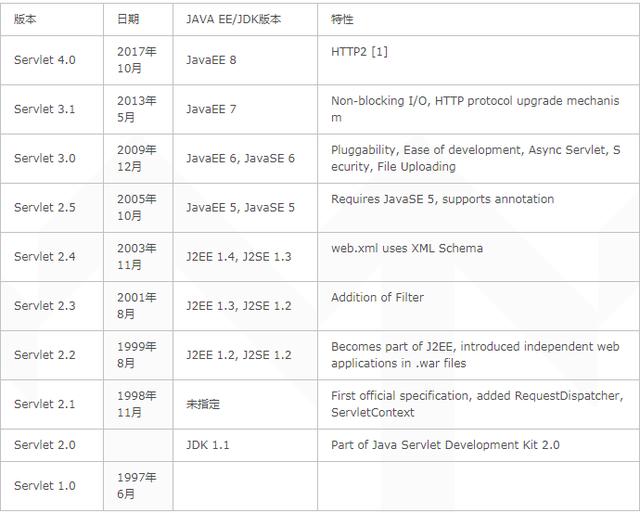
servletзҡ„еҺҶеҸІ
web Container
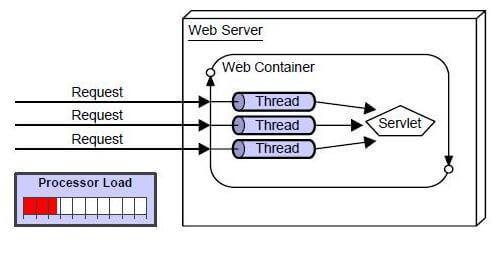
webе®№еҷЁд№ҹеҸ«servletе®№еҷЁпјҢиҙҹиҙЈservletзҡ„з”ҹе‘Ҫе‘ЁжңҹпјҢжҳ е°„urlиҜ·жұӮеҲ°зӣёеә”зҡ„servletгҖӮ
A web container (also known as a servlet container;[1] and compare "webcontainer"[2]) is the component of a web server that interacts with Java servlets. A web container is responsible for managing the lifecycle of servlets, mapping a URL to a particular servlet and ensuring that the URL requester has the correct access-rights.A web container handles requests to servlets, JavaServer Pages (JSP) files, and other types of files that include server-side code. The Web container creates servlet instances, loads and unloads servlets, creates and manages request and response objects, and performs other servlet-management tasks.A web container implements the web component contract of the Java EE architecture. This architecture specifies a runtime environment for additional web components, including security, concurrency, lifecycle management, transaction, deployment, and other services.
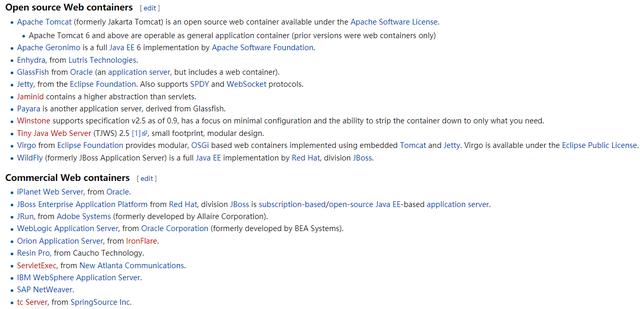
еёёи§Ғзҡ„webе®№еҷЁеҰӮдёӢпјҡ
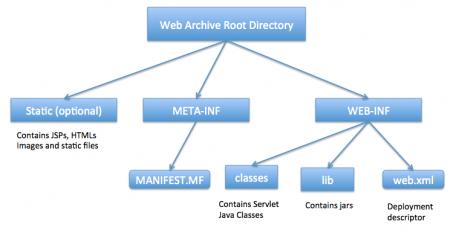
еңЁwebе®№еҷЁдёӯпјҢwebеә”з”ЁжңҚеҠЎеҷЁзҡ„з»“жһ„еҰӮдёӢпјҡ
1.жҷ®йҖҡservletе®һзҺ°йЎөйқўи®ҝй—®
1.1 е®һдҫӢ1пјҡдҪҝз”Ёweb.xmlе®һзҺ°дёҖдёӘhttpжңҚеҠЎ
е®һзҺ°дёҖдёӘз®ҖеҚ•зҡ„servlet
package com.howtodoinjava.servlets; import java.io.IOException; import java.io.PrintWriter; import javax.servlet.ServletException; import javax.servlet.http.HttpServlet; import javax.servlet.http.HttpServletRequest; import javax.servlet.http.HttpServletResponse; public class MyFirstServlet extends HttpServlet { private static final long serialVersionUID = -1915463532411657451L; @Override protected void doGet(HttpServletRequest request, HttpServletResponse response) throws ServletException, IOException { response.setContentType("text/html;charset=UTF-8"); PrintWriter out = response.getWriter(); try { // Write some content out.println("<html>"); out.println("<head>"); out.println("<title>MyFirstServlet</title>"); out.println("</head>"); out.println("<body>"); out.println("<h3>Servlet MyFirstServlet at " + request.getContextPath() + "</h3>"); out.println("</body>"); out.println("</html>"); } finally { out.close(); } } @Override protected void doPost(HttpServletRequest request, HttpServletResponse response) throws ServletException, IOException { //Do some other work } @Override public String getServletInfo() { return "MyFirstServlet"; } }web.xmlй…ҚзҪ®servlet
/MyFirstServlet MyFirstServlet com.howtodoinjava.servlets.MyFirstServlet MyFirstServlet /MyFirstServlet
1.2 зј–зЁӢж–№ејҸе®һзҺ°дёҖдёӘhttpжңҚеҠЎиҜ·жұӮ
дёҚйңҖиҰҒxml
package com.journaldev.first; import java.io.IOException; import java.io.PrintWriter; import java.util.Date; import javax.servlet.ServletException; import javax.servlet.annotation.WebInitParam; import javax.servlet.annotation.WebServlet; import javax.servlet.http.HttpServlet; import javax.servlet.http.HttpServletRequest; import javax.servlet.http.HttpServletResponse; /** * Servlet implementation class FirstServlet */ @WebServlet(description = "My First Servlet", urlPatterns = { "/FirstServlet" , "/FirstServlet.do"}, initParams = {@WebInitParam(name="id",value="1"),@WebInitParam(name="name",value="pankaj")}) public class FirstServlet extends HttpServlet { private static final long serialVersionUID = 1L; public static final String HTML_START="<html><body>"; public static final String HTML_END="</body></html>"; /** * @see HttpServlet#HttpServlet() */ public FirstServlet() { super(); // TODO Auto-generated constructor stub } /** * @see HttpServlet#doGet(HttpServletRequest request, HttpServletResponse response) */ protected void doGet(HttpServletRequest request, HttpServletResponse response) throws ServletException, IOException { PrintWriter out = response.getWriter(); Date date = new Date(); out.println(HTML_START + "<h3>Hi There!</h3><br/><h4>Date="+date +"</h4>"+HTML_END); } /** * @see HttpServlet#doPost(HttpServletRequest request, HttpServletResponse response) */ protected void doPost(HttpServletRequest request, HttpServletResponse response) throws ServletException, IOException { // TODO Auto-generated method stub } }2.spring mvcе®һзҺ°йЎөйқўи®ҝй—®
2.1 web.xmlж–№ејҸ
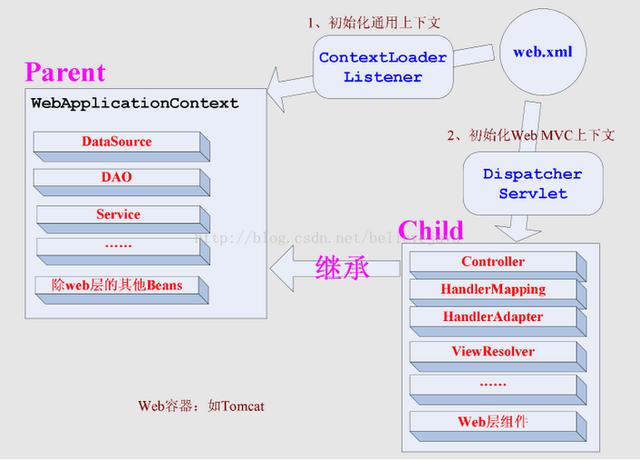
зӨәдҫӢпјҡ
<web-app xmlns="http://java.sun.com/xml/ns/javaee" xmlns:xsi="http://www.w3.org/2001/XMLSchema-instance" xsi:schemaLocation="http://java.sun.com/xml/ns/javaee http://java.sun.com/xml/ns/javaee/web-app_2_5.xsd" version="2.5"> <display-name>Gradle + Spring MVC Hello World + XML</display-name> <description>Spring MVC web application</description> <!-- For web context --> <servlet> <servlet-name>hello-dispatcher</servlet-name> <servlet-class>org.springframework.web.servlet.DispatcherServlet</servlet-class> <init-param> <param-name>contextConfigLocation</param-name> <param-value>/WEB-INF/spring-mvc-config.xml</param-value> </init-param> <load-on-startup>1</load-on-startup> </servlet> <servlet-mapping> <servlet-name>hello-dispatcher</servlet-name> <url-pattern>/</url-pattern> </servlet-mapping> <!-- For root context --> <listener> <listener-class>org.springframework.web.context.ContextLoaderListener</listener-class> </listener> <context-param> <param-name>contextConfigLocation</param-name> <param-value>/WEB-INF/spring-core-config.xml</param-value> </context-param> </web-app>
2.2 зј–з Ғж–№ејҸ
public class MyWebAppInitializer implements WebApplicationInitializer { @Override public void onStartup(ServletContext container) { // Create the 'root' Spring application context AnnotationConfigWebApplicationContext rootContext = new AnnotationConfigWebApplicationContext(); rootContext.register(AppConfig.class); // Manage the lifecycle of the root application context container.addListener(new ContextLoaderListener(rootContext)); // Create the dispatcher servlet's Spring application context AnnotationConfigWebApplicationContext dispatcherContext = new AnnotationConfigWebApplicationContext(); dispatcherContext.register(DispatcherConfig.class); // Register and map the dispatcher servlet ServletRegistration.Dynamic dispatcher = container.addServlet("dispatcher", new DispatcherServlet(dispatcherContext)); dispatcher.setLoadOnStartup(1); dispatcher.addMapping("/"); } }еҶ…йғЁе®һзҺ°

3.spring boot
继жүҝдәҶspring mvcзҡ„жЎҶжһ¶пјҢе®һзҺ°SpringBootServletInitializer
package com.mkyong; import org.springframework.boot.SpringApplication; import org.springframework.boot.autoconfigure.SpringBootApplication; import org.springframework.boot.builder.SpringApplicationBuilder; import org.springframework.boot.web.support.SpringBootServletInitializer; @SpringBootApplication public class SpringBootWebApplication extends SpringBootServletInitializer { @Override protected SpringApplicationBuilder configure(SpringApplicationBuilder application) { return application.sources(SpringBootWebApplication.class); } public static void main(String[] args) throws Exception { SpringApplication.run(SpringBootWebApplication.class, args); } }然еҗҺcontroller
package com.mkyong; import java.util.Map; import org.springframework.beans.factory.annotation.Value; import org.springframework.stereotype.Controller; import org.springframework.web.bind.annotation.RequestMapping; @Controller public class WelcomeController { // inject via application.properties @Value("${welcome.message:test}") private String message = "Hello World"; @RequestMapping("/") public String welcome(Map<String, Object> model) { model.put("message", this.message); return "welcome"; } }еҲ°жӯӨпјҢзӣёдҝЎеӨ§е®¶еҜ№вҖңspring mvcжҖҺд№Ҳе®һзҺ°йЎөйқўи®ҝй—®вҖқжңүдәҶжӣҙж·ұзҡ„дәҶи§ЈпјҢдёҚеҰЁжқҘе®һйҷ…ж“ҚдҪңдёҖз•Әеҗ§пјҒиҝҷйҮҢжҳҜдәҝйҖҹдә‘зҪ‘з«ҷпјҢжӣҙеӨҡзӣёе…іеҶ…е®№еҸҜд»Ҙиҝӣе…Ҙзӣёе…ійў‘йҒ“иҝӣиЎҢжҹҘиҜўпјҢе…іжіЁжҲ‘们пјҢ继з»ӯеӯҰд№ пјҒ
е…ҚиҙЈеЈ°жҳҺпјҡжң¬з«ҷеҸ‘еёғзҡ„еҶ…е®№пјҲеӣҫзүҮгҖҒи§Ҷйў‘е’Ңж–Үеӯ—пјүд»ҘеҺҹеҲӣгҖҒиҪ¬иҪҪе’ҢеҲҶдә«дёәдё»пјҢж–Үз« и§ӮзӮ№дёҚд»ЈиЎЁжң¬зҪ‘з«ҷз«ӢеңәпјҢеҰӮжһңж¶үеҸҠдҫөжқғиҜ·иҒ”зі»з«ҷй•ҝйӮ®з®ұпјҡis@yisu.comиҝӣиЎҢдёҫжҠҘпјҢ并жҸҗдҫӣзӣёе…іиҜҒжҚ®пјҢдёҖз»ҸжҹҘе®һпјҢе°Ҷз«ӢеҲ»еҲ йҷӨж¶үе«ҢдҫөжқғеҶ…е®№гҖӮ
жӮЁеҘҪпјҢзҷ»еҪ•еҗҺжүҚиғҪдёӢи®ўеҚ•е“ҰпјҒ