您好,登录后才能下订单哦!
密码登录
登录注册
点击 登录注册 即表示同意《亿速云用户服务条款》
这篇文章主要讲解了“如何使用Spring Boot+Thymeleaf技术”,文中的讲解内容简单清晰,易于学习与理解,下面请大家跟着小编的思路慢慢深入,一起来研究和学习“如何使用Spring Boot+Thymeleaf技术”吧!
Thymeleaf 是新一代 Java 模板引擎,它类似于 Velocity、FreeMarker 等传统 Java 模板引擎,但是与传统 Java 模板引擎不同的是,Thymeleaf 支持 HTML 原型。
它既可以让前端工程师在浏览器中直接打开查看样式,也可以让后端工程师结合真实数据查看显示效果,同时,SpringBoot 提供了 Thymeleaf 自动化配置解决方案,因此在 SpringBoot 中使用 Thymeleaf 非常方便。
事实上, Thymeleaf 除了展示基本的 HTML ,进行页面渲染之外,也可以作为一个 HTML 片段进行渲染,例如我们在做邮件发送时,可以使用 Thymeleaf 作为邮件发送模板。
另外,由于 Thymeleaf 模板后缀为 .html,可以直接被浏览器打开,因此,预览时非常方便。
Spring Boot 中整合 Thymeleaf 非常容易,只需要创建项目时添加 Thymeleaf 即可:
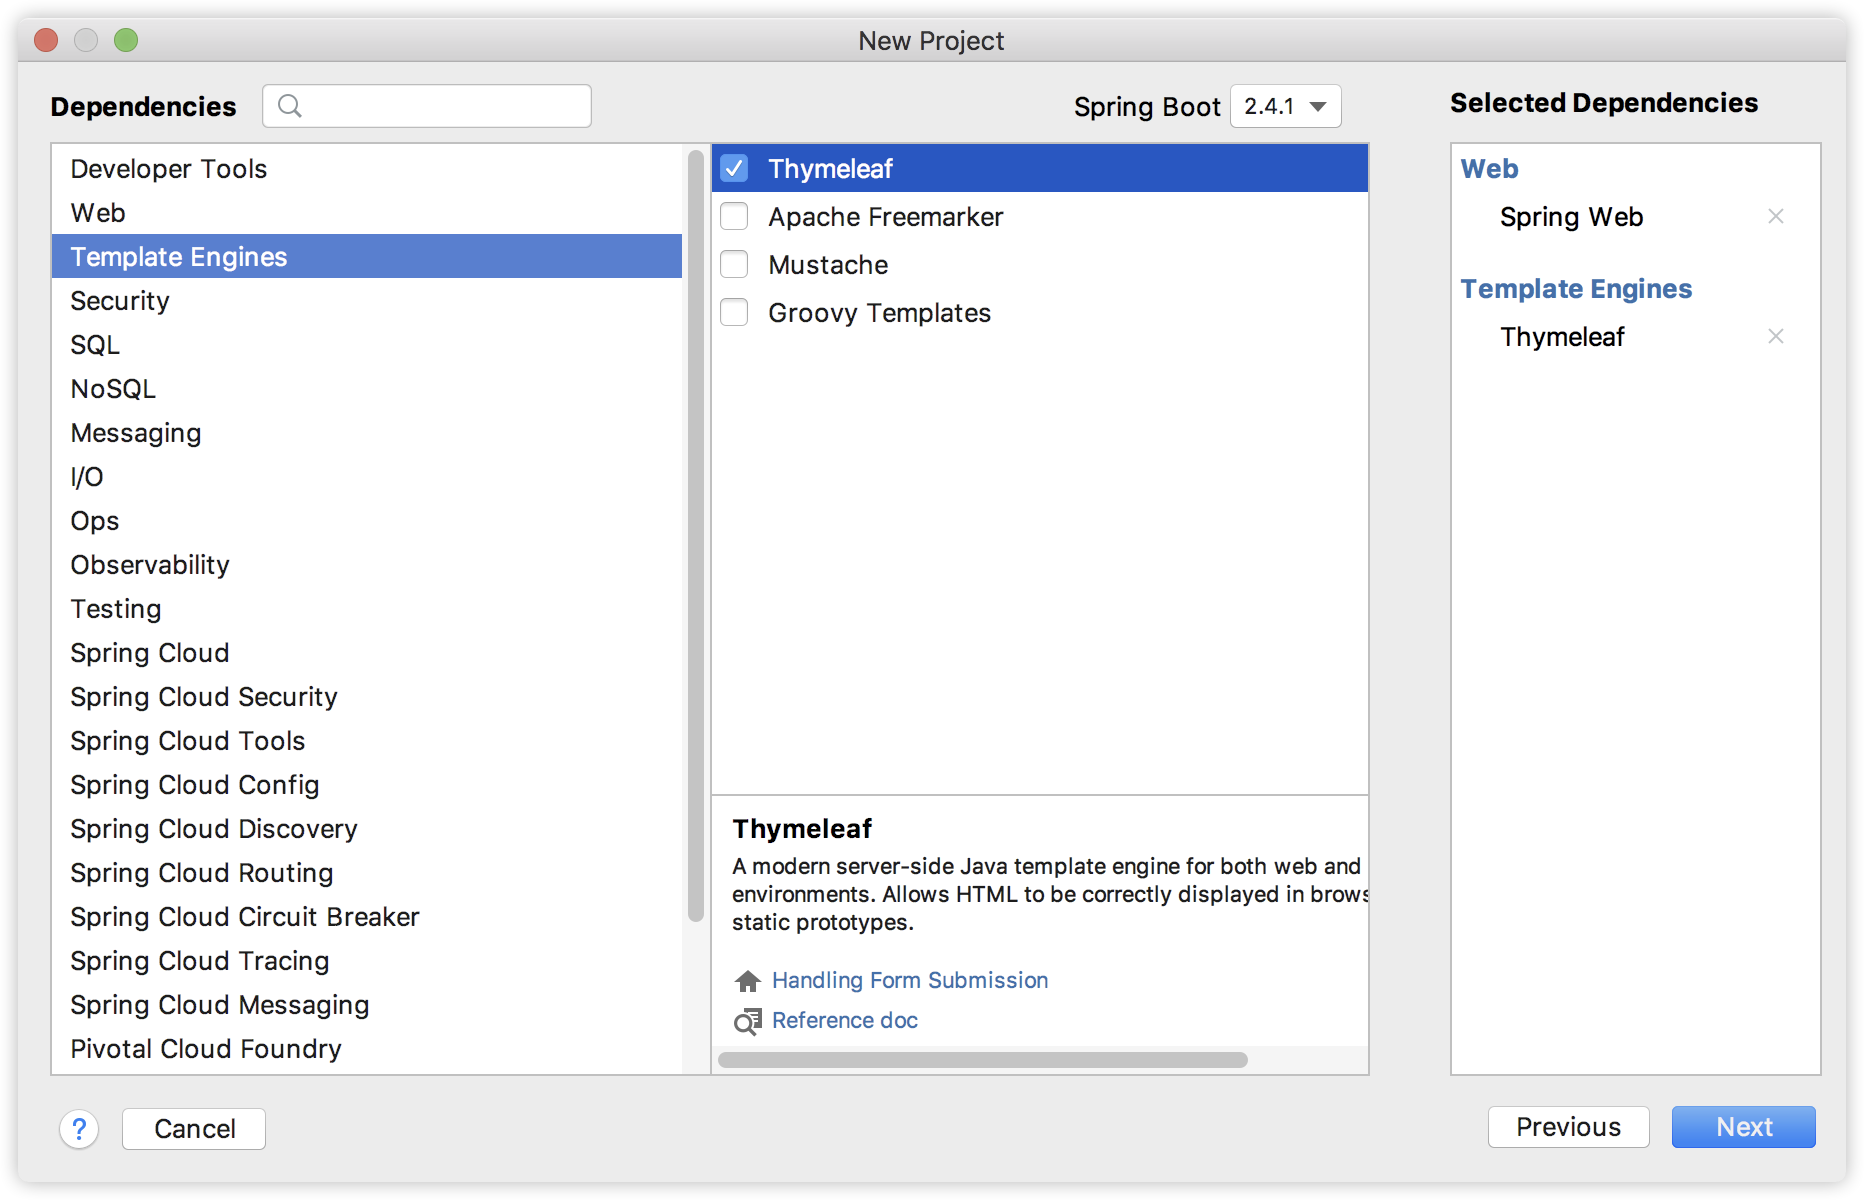
创建完成后,pom.xml 依赖如下:
<dependency>
    <groupid>org.springframework.boot</groupid>
    <artifactid>spring-boot-starter-thymeleaf</artifactid>
</dependency>
<dependency>
    <groupid>org.springframework.boot</groupid>
    <artifactid>spring-boot-starter-web</artifactid>
</dependency>
当然,Thymeleaf 不仅仅能在 Spring Boot 中使用,也可以使用在其他地方,只不过 Spring Boot 针对 Thymeleaf 提供了一整套的自动化配置方案,这一套配置类的属性在 org.springframework.boot.autoconfigure.thymeleaf.ThymeleafProperties 中,部分源码如下:
@ConfigurationProperties(prefix = "spring.thymeleaf")
public class ThymeleafProperties {
        private static final Charset DEFAULT_ENCODING = StandardCharsets.UTF_8;
        public static final String DEFAULT_PREFIX = "classpath:/templates/";
        public static final String DEFAULT_SUFFIX = ".html";
        private boolean checkTemplate = true;
        private boolean checkTemplateLocation = true;
        private String prefix = DEFAULT_PREFIX;
        private String suffix = DEFAULT_SUFFIX;
        private String mode = "HTML";
        private Charset encoding = DEFAULT_ENCODING;
        private boolean cache = true;
        //...
}
首先通过 @ConfigurationProperties 注解,将 application.properties 前缀为 spring.thymeleaf 的配置和这个类中的属性绑定。
前三个 static 变量定义了默认的编码格式、视图解析器的前缀、后缀等。
从前三行配置中,可以看出来,Thymeleaf 模板的默认位置在 resources/templates 目录下,默认的后缀是 html 。
这些配置,如果开发者不自己提供,则使用 默认的,如果自己提供,则在 application.properties 中以 spring.thymeleaf 开始相关的配置。
而我们刚刚提到的,Spring Boot 为 Thymeleaf 提供的自动化配置类,则是 org.springframework.boot.autoconfigure.thymeleaf.ThymeleafAutoConfiguration ,部分源码如下:
@Configuration
@EnableConfigurationProperties(ThymeleafProperties.class)
@ConditionalOnClass({ TemplateMode.class, SpringTemplateEngine.class })
@AutoConfigureAfter({ WebMvcAutoConfiguration.class, WebFluxAutoConfiguration.class })
public class ThymeleafAutoConfiguration {
}
可以看到,在这个自动化配置类中,首先导入 ThymeleafProperties ,然后 @ConditionalOnClass 注解表示当当前系统中存在 TemplateMode 和 SpringTemplateEngine 类时,当前的自动化配置类才会生效,即只要项目中引入了 Thymeleaf 相关的依赖,这个配置就会生效。
这些默认的配置我们几乎不需要做任何更改就可以直接使用了。如果开发者有特殊需求,则可以在 application.properties 中配置以 spring.thymeleaf 开头的属性即可。
接下来我们就可以创建 Controller 了,实际上引入 Thymeleaf 依赖之后,我们可以不做任何配置。新建的 IndexController 如下:
@Controller
public class IndexController {
@GetMapping("/index")
public String index(Model model) {
List<user> users = new ArrayList<>();
for (int i = 0; i < 10; i++) {
User u = new User();
u.setId((long) i);
u.setName("javaboy:" + i);
u.setAddress("深圳:" + i);
users.add(u);
}
model.addAttribute("users", users);
return "index";
}
}
public class User {
private Long id;
private String name;
private String address;
//省略 getter/setter
}在 IndexController 中返回逻辑视图名+数据,逻辑视图名为 index ,意思我们需要在 resources/templates 目录下提供一个名为 index.html 的 Thymeleaf 模板文件。
创建 Thymeleaf
<meta charset="UTF-8">
<title>Title</title>
<table border="1">
<tbody><tr>
<td>编号</td>
<td>用户名</td>
<td>地址</td>
</tr>
<tr th:each="user : ${users}">
<td th:text="${user.id}"></td>
<td th:text="${user.name}"></td>
<td th:text="${user.address}"></td>
</tr>
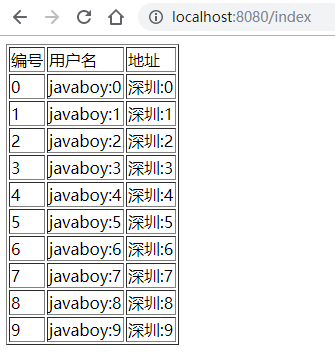
</tbody></table>在 Thymeleaf 中,通过 th:each 指令来遍历一个集合,数据的展示通过 th:text 指令来实现,
注意 index.html 最上面引入 thymeleaf 名称空间(最新版并无强制要求)。
配置完成后,就可以启动项目了,访问 /index 接口,就能看到集合中的数据了:
前面我们说的是返回一个 Thymeleaf 模板,我们也可以手动渲染 Thymeleaf 模板,这个一般在邮件发送时候有用,例如我在 resources/templates 目录下新建一个邮件模板,如下:
<meta charset="UTF-8">
    <title>Title</title>


<p>hello 欢迎 <span th:text="${username}"></span>加入 XXX 集团,您的入职信息如下:</p>
<table border="1">
    <tbody><tr>
        <td>职位</td>
        <td th:text="${position}"></td>
    </tr>
    <tr>
        <td>薪水</td>
        <td th:text="${salary}"></td>
    </tr>
</tbody></table>
<img src="https://oscimg.oschina.net/oscnet/javaboy.jpg" alt="">
这一个 HTML 模板中,有几个变量,我们要将这个 HTML 模板渲染成一个 String 字符串,再把这个字符串通过邮件发送出去,那么如何手动渲染呢?
@Autowired
TemplateEngine templateEngine;
@Test
public void test1() throws MessagingException {
    Context context = new Context();
    context.setVariable("username", "javaboy");
    context.setVariable("position", "Java工程师");
    context.setVariable("salary", 99999);
    String mail = templateEngine.process("mail", context);
    //省略邮件发送
}
渲染时,我们需要首先注入一个 TemplateEngine 对象,这个对象就是在 Thymeleaf 的自动化配置类中配置的(即当我们引入 Thymeleaf 的依赖之后,这个实例就有了)。
然后构造一个 Context 对象用来存放变量。
调用 process 方法进行渲染,该方法的返回值就是渲染后的 HTML 字符串,然后我们将这个字符串发送出去。
前面两个案例让小伙伴们大致上理解了在 Spring Boot 中要如何使用 Thymeleaf,接下来,松哥将详细介绍 Thymeleaf 本身的一些具体用法。
${...}
直接使用 th:xx = "${}" 获取对象属性。这个在前面的案例中已经演示过了,不再赘述。
*{...}
可以像 ${...} 一样使用,也可以通过 th:object 获取对象,然后使用 th:xx = "*{}" 获取对象属性,这种简写风格极为清爽,推荐大家在实际项目中使用。
<table border="1" th:object="${user}">
<tbody><tr>
    <td>用户名</td>
    <td th:text="*{username}"></td>
</tr>
<tr>
    <td>地址</td>
    <td th:text="*{address}"></td>
</tr>
</tbody></table>
#{...}
通常的国际化属性:#{...} 用于获取国际化语言翻译值。
在 resources 目录下新建两个文件:messages.properties 和 messages_zh_CN.properties,内容如下:
messages.properties:
message = javaboy
messages_zh_CN.properties:
message = 江南一点雨
然后在 thymeleaf 中引用 message,系统会根据浏览器的语言环境显示不同的值:
<div th:text="#{message}"></div>@{...}
引用绝对 URL:
<script type="text/javascript" th:src="@{http://localhost:8080/hello.js}"></script>等价于:
<script type="text/javascript" src="http://localhost:8080/hello.js"></script>
上下文相关的 URL:
首先在 application.properties 中配置 Spring Boot 的上下文,以便于测试:
server.servlet.context-path=/myapp
引用路径:
<script type="text/javascript" th:src="@{/hello.js}"></script>等价于:
<script type="text/javascript" src="/myapp/hello.js"></script>
相对 URL:
这个相对是指相对于服务器的 URL,例如如下引用:
<script type="text/javascript" th:src="@{~/hello.js}"></script>等价于:
<script type="text/javascript" src="/hello.js"></script>
应用程序的上下文 /myapp 将被忽略。
协议相对 URL:
<script type="text/javascript" th:src="@{//localhost:8080/hello.js}"></script>等价于:
<script type="text/javascript" src="//localhost:8080/hello.js"></script>
带参数的 URL:
<script type="text/javascript" th:src="@{//localhost:8080/hello.js(name='javaboy',age=99)}"></script>等价于:
<script type="text/javascript" th:src="//localhost:8080/hello.js?name=javaboy&age=99"></script>
~{...}
片段表达式是 Thymeleaf 的特色之一,细粒度可以达到标签级别,这是 JSP 无法做到的。片段表达式拥有三种语法:
~{ viewName }:表示引入完整页面
~{ viewName ::selector}:表示在指定页面寻找片段,其中 selector 可为片段名、jquery选择器等
~{ ::selector}: 表示在当前页寻找
举个简单例子。
在 resources/templates 目录下新建 my_fragment.html 文件,内容如下:
<div th:fragment="javaboy_link"><a href="http://www.javaboy.org">www.javaboy</a></div>
<div th:fragment="itboyhub_link"><a href="http://www.itboyhub.com">www.itboyhub.com</a></div>
这里有两个 div,通过 th:fragment 来定义片段,两个 div 分别具有不同的名字。
然后在另外一个页面中引用该片段:
<table border="1" th:object="${user}" th:fragment="aaa">
<tbody><tr>
    <td>用户名</td>
    <td th:text="*{username}"></td>
</tr>
<tr>
    <td>地址</td>
    <td th:text="*{address}"></td>
</tr>
</tbody></table>
<hr>
<div th:replace="my_fragment.html"></div>
<hr>
<div th:replace="~{my_fragment.html::javaboy_link}"></div>
<hr>
<div th:replace="~{::aaa}"></div>
通过 th:replace 来引用片段。第一个表示引用完整的 my_fragment.html 页面;第二个表示引用 my_fragment.html 中的名为 javaboy_link 的片段;第三个表示引用当前页面名为 aaa 的片段,也就是上面那个 table。
这些是一些可以直接写在表达式中的字符,主要有如下几种:
文本字面量: 'one text', 'Another one!',…
数字字面量: 0, 34, 3.0, 12.3,…
布尔字面量: true, false
Null字面量: null
字面量标记:one, sometext, main,…
案例:
<div th:text="'这是 文本字面量(有空格)'"></div>
<div th:text="javaboy"></div>
<div th:text="99"></div>
<div th:text="true"></div>
如果文本是英文,并且不包含空格、逗号等字符,可以不用加单引号。
文本可以使用 + 进行拼接。
<div th:text="'hello '+'javaboy'"></div>
<div th:text="'hello '+${user.username}"></div>
如果字符串中包含变量,也可以使用另一种简单的方式,叫做字面量置换,用 | 代替 '...' + '...',如下:
<div th:text="|hello ${user.username}|"></div>
<div th:text="'hello '+${user.username}+' '+|Go ${user.address}|"></div>算术运算有:+, -, *, / 和 %。
<div th:with="age=(99*99/99+99-1)">
    <div th:text="${age}"></div>
</div>
th:with 定义了一个局部变量 age,在其所在的 div 中可以使用该局部变量。
二元运算符:and, or
布尔非(一元运算符):!, not
案例:
<div th:with="age=(99*99/99+99-1)">
    <div th:text="9 eq 9 or 8 ne 8"></div>
    <div th:text="!(9 eq 9 or 8 ne 8)"></div>
    <div th:text="not(9 eq 9 or 8 ne 8)"></div>
</div>
表达式里的值可以使用 >, <, >= 和 <= 符号比较。== 和 != 运算符用于检查相等(或者不相等)。注意 XML规定 < 和 > 标签不能用于属性值,所以应当把它们转义为 < 和 >。
如果不想转义,也可以使用别名:gt (>);lt (<);ge (>=);le (<=);not (!)。还有 eq (==), neq/ne (!=)。
举例:
<div th:with="age=(99*99/99+99-1)">
    <div th:text="${age} eq 197"></div>
    <div th:text="${age} ne 197"></div>
    <div th:text="${age} ge 197"></div>
    <div th:text="${age} gt 197"></div>
    <div th:text="${age} le 197"></div>
    <div th:text="${age} lt 197"></div>
</div>类似于我们 Java 中的三目运算符。
<div th:with="age=(99*99/99+99-1)">
    <div th:text="(${age} ne 197)?'yes':'no'"></div>
</div>
其中,: 后面的部分可以省略,如果省略了,又同时计算结果为 false 时,将返回 null。
基本内置对象:
#ctx:上下文对象。
#vars: 上下文变量。
#locale:上下文区域设置。
#request:(仅在 Web 上下文中)HttpServletRequest 对象。
#response:(仅在 Web 上下文中)HttpServletResponse 对象。
#session:(仅在 Web 上下文中)HttpSession 对象。
#servletContext:(仅在 Web 上下文中)ServletContext 对象。
在页面可以访问到上面这些内置对象,举个简单例子:
<div th:text="${#session.getAttribute("name")}"></div>实用内置对象:
#execInfo:有关正在处理的模板的信息。
#messages:在变量表达式中获取外部化消息的方法,与使用#{...}语法获得的方式相同。
#uris:转义URL / URI部分的方法
#conversions:执行配置的转换服务(如果有)的方法。
#dates:java.util.Date对象的方法:格式化,组件提取等
#calendars:类似于#dates但是java.util.Calendar对象。
#numbers:用于格式化数字对象的方法。
#strings:String对象的方法:contains,startsWith,prepending / appending等
#objects:一般对象的方法。
#bools:布尔评估的方法。
#arrays:数组方法。
#lists:列表的方法。
#sets:集合的方法。
#maps:地图方法。
#aggregates:在数组或集合上创建聚合的方法。
#ids:处理可能重复的id属性的方法(例如,作为迭代的结果)。
这是一些内置对象以及工具方法,使用方式也都比较容易,如果使用的是 IntelliJ IDEA,都会自动提示对象中的方法,很方便。
举例:
<div th:text="${#execInfo.getProcessedTemplateName()}"></div>
<div th:text="${#arrays.length(#request.getAttribute('names'))}"></div>这个是给 HTML 元素设置属性值。可以一次设置多个,多个之间用 , 分隔开。
例如:
<img th:attr="src=@{/1.png},title=${user.username},alt=${user.username}" src="">会被渲染成:
<img src="/myapp/1.png" title="javaboy" alt="javaboy">
当然这种设置方法不太美观,可读性也不好。Thymeleaf 还支持在每一个原生的 HTML 属性前加上 th: 前缀的方式来使用动态值,像下面这样:
<img th:src="@{/1.png}" th:alt="${user.username}" th:title="${user.username}" src="">这种写法看起来更清晰一些,渲染效果和前面一致。
上面案例中的 alt 和 title 则是两个特殊的属性,可以一次性设置,像下面这样:
<img th:src="@{/1.png}" th:alt-title="${user.username}" src="">这个等价于前文的设置。
数组/集合/Map/Enumeration/Iterator 等的遍历也算是一个非常常见的需求,Thymeleaf 中通过 th:each 来实现遍历,像下面这样:
<table border="1">
    <tbody><tr th:each="u : ${users}">
        <td th:text="${u.username}"></td>
        <td th:text="${u.address}"></td>
    </tr>
</tbody></table>
users 是要遍历的集合/数组,u 则是集合中的单个元素。
遍历的时候,我们可能需要获取遍历的状态,Thymeleaf 也对此提供了支持:
index:当前的遍历索引,从0开始。
count:当前的遍历索引,从1开始。
size:被遍历变量里的元素数量。
current:每次遍历的遍历变量。
even/odd:当前的遍历是偶数次还是奇数次。
first:当前是否为首次遍历。
last:当前是否为最后一次遍历。
u 后面的 state 表示遍历状态,通过遍历状态可以引用上面的属性。
<table border="1">
    <tbody><tr th:each="u,state : ${users}">
        <td th:text="${u.username}"></td>
        <td th:text="${u.address}"></td>
        <td th:text="${state.index}"></td>
        <td th:text="${state.count}"></td>
        <td th:text="${state.size}"></td>
        <td th:text="${state.current}"></td>
        <td th:text="${state.even}"></td>
        <td th:text="${state.odd}"></td>
        <td th:text="${state.first}"></td>
        <td th:text="${state.last}"></td>
    </tr>
</tbody></table>只显示奇数次的遍历,可以使用 th:if,如下:
<table border="1">
    <tbody><tr th:each="u,state : ${users}" th:if="${state.odd}">
        <td th:text="${u.username}"></td>
        <td th:text="${u.address}"></td>
        <td th:text="${state.index}"></td>
        <td th:text="${state.count}"></td>
        <td th:text="${state.size}"></td>
        <td th:text="${state.current}"></td>
        <td th:text="${state.even}"></td>
        <td th:text="${state.odd}"></td>
        <td th:text="${state.first}"></td>
        <td th:text="${state.last}"></td>
    </tr>
</tbody></table>
th:if 不仅仅只接受布尔值,也接受其他类型的值,例如如下值都会判定为 true:
如果值是布尔值,并且为 true。
如果值是数字,并且不为 0。
如果值是字符,并且不为 0。
如果值是字符串,并且不为 “false”, “off” 或者 “no”。
如果值不是布尔值,数字,字符或者字符串。
但是如果值为 null,th:if 会求值为 false。
th:unless 的判定条件则与 th:if 完全相反。
<table border="1">
    <tbody><tr th:each="u,state : ${users}" th:unless="${state.odd}">
        <td th:text="${u.username}"></td>
        <td th:text="${u.address}"></td>
        <td th:text="${state.index}"></td>
        <td th:text="${state.count}"></td>
        <td th:text="${state.size}"></td>
        <td th:text="${state.current}"></td>
        <td th:text="${state.even}"></td>
        <td th:text="${state.odd}"></td>
        <td th:text="${state.first}"></td>
        <td th:text="${state.last}"></td>
    </tr>
</tbody></table>
这个显示效果则与上面的完全相反。
当可能性比较多的时候,也可以使用 switch:
<table border="1">
    <tbody><tr th:each="u,state : ${users}">
        <td th:text="${u.username}"></td>
        <td th:text="${u.address}"></td>
        <td th:text="${state.index}"></td>
        <td th:text="${state.count}"></td>
        <td th:text="${state.size}"></td>
        <td th:text="${state.current}"></td>
        <td th:text="${state.even}"></td>
        <td th:text="${state.odd}"></td>
        <td th:text="${state.first}"></td>
        <td th:text="${state.last}"></td>
        <td th:switch="${state.odd}">
            <span th:case="true">odd</span>
            <span th:case="*">even</span>
        </td>
    </tr>
</tbody></table>
th:case="*" 则表示默认选项。
这个我们前面已经涉及到了,使用 th:with 可以定义一个本地变量。
我们可以使用属性将数据放入页面模版中,但是很多时候,内联的方式看起来更加直观一些,像下面这样:
<div>hello [[${user.username}]]</div>用内联的方式去做拼接也显得更加自然。
[[...]] 对应于 th:text (结果会是转义的 HTML),[(...)]对应于 th:utext,它不会执行任何的 HTML 转义。
像下面这样:
<div th:with="str='hello <strong>javaboy</strong>'">
    <div>[[${str}]]</div>
    <div>[(${str})]</div>
</div>
最终的显示效果如下:

不过内联方式有一个问题。我们使用 Thymeleaf 的一大优势在于不用动态渲染就可以直接在浏览器中看到显示效果,当我们使用属性配置的时候确实是这样,但是如果我们使用内联的方式,各种表达式就会直接展示在静态网页中。
也可以在 js 或者 css 中使用内联,以 js 为例,使用方式如下:
<script th:inline="javascript">
    var username=[[${user.username}]]
    console.log(username)
</script>
js 中需要通过 th:inline="javascript" 开启内联。
感谢各位的阅读,以上就是“如何使用Spring Boot+Thymeleaf技术”的内容了,经过本文的学习后,相信大家对如何使用Spring Boot+Thymeleaf技术这一问题有了更深刻的体会,具体使用情况还需要大家实践验证。这里是亿速云,小编将为大家推送更多相关知识点的文章,欢迎关注!
免责声明:本站发布的内容(图片、视频和文字)以原创、转载和分享为主,文章观点不代表本网站立场,如果涉及侵权请联系站长邮箱:is@yisu.com进行举报,并提供相关证据,一经查实,将立刻删除涉嫌侵权内容。