жӮЁеҘҪпјҢзҷ»еҪ•еҗҺжүҚиғҪдёӢи®ўеҚ•е“ҰпјҒ
еҜҶз Ғзҷ»еҪ•
зҷ»еҪ•жіЁеҶҢ
зӮ№еҮ» зҷ»еҪ•жіЁеҶҢ еҚіиЎЁзӨәеҗҢж„ҸгҖҠдәҝйҖҹдә‘з”ЁжҲ·жңҚеҠЎжқЎж¬ҫгҖӢ
зҺҜеўғCentOS7
е®үиЈ…дәҶJDK1.8
иҝҷйҮҢз”Ёзҡ„elasticsearch6.2.2дёәдҫӢпјҢдҪ д№ҹеҸҜд»Ҙз”Ё5.6.1жҲ–иҖ…жӣҙй«ҳзҡ„зүҲжң¬
1.жңҖеҘҪд»Ҙйқһrootз”ЁжҲ·и§ЈеҺӢElasticSearchпјҢеҰӮжһңз”Ёrootз”ЁжҲ·пјҢиҰҒдёҚ然д»ҘеҗҺиҝҳиҰҒе°Ҷж–Ү件зҡ„жқғйҷҗд»ҘеҸҠз»„иҪ¬з§»з»ҷйқһfootз”ЁжҲ·
1пјүи§ЈеҺӢelasticsearch-5.2.2.tar.gzеҲ°/opt/moduleзӣ®еҪ•дёӢ
[root@hdp21 ~]# su asy
[asy@hdp21 root]$ tar -zxvf elasticsearch-5.2.2.tar.gz -C /opt/module
2пјүеңЁ/opt/module/elasticsearch-5.2.2и·Ҝеҫ„дёӢеҲӣе»әdataе’Ңlogsж–Ү件еӨ№
mkdir data
mkdir logs
еҰӮжһңдҪ з”ЁrootиҙҰеҸ·пјҢиҜ·е…Ҳж·»еҠ дёҖдёӘйқһrootиҙҰеҸ·пјҢеӣ дёәelaticsearchдёҚиғҪз”ЁrootиҙҰеҸ·иҝҗиЎҢ
user add asy
chown -R asy:asy /opt/module/elasticsearch-5.2.2/
3пјүrootиҙҰеҸ·дҝ®ж”№й…ҚзҪ®ж–Ү件/opt/module/elasticsearch-5.2.2/config/elasticsearch.yml
[root@hdp21 config]# pwd
/opt/module/elasticsearch-5.2.2/config
[root@hdp21 config]# vi elasticsearch.yml
дҝ®ж”№д»ҘдёӢеҸӮж•°
cluster.name: Asy
node.name: node-1
path.data: /opt/module/elasticsearch-5.2.2/data
path.logs: /opt/module/elasticsearch-5.2.2/logs
bootstrap.memory_lock: false
bootstrap.system_call_filter: false
network.host: hdp21
http.port: 9200
discovery.zen.ping.unicast.hosts: ["hdp21"]
path.data
path.logs dataе’Ңlogsзҡ„и·Ҝеҫ„
network.host ipең°еқҖжҲ–иҖ…hostеҹҹеҗҚең°еқҖ
http.portз«ҜеҸЈеҸ·
5пјүй…ҚзҪ®linuxзі»з»ҹзҺҜеўғпјҲеҸӮиҖғпјҡ
пјҲ1пјүзј–иҫ‘limits.conf ж·»еҠ зұ»дјјеҰӮдёӢеҶ…е®№
[root@hdp21 config]# vi /etc/security/limits.conf
ж·»еҠ еҰӮдёӢеҶ…е®№:
йҖҖеӣһеҲ°дёҠдёҖзә§зӣ®еҪ•
并жү§иЎҢе‘Ҫд»Өпјҡ
[root@hdp21 config]# cd ..
[root@hdp21 elasticsearch-5.2.2]# pwd
/opt/module/elasticsearch-5.2.2
[root@hdp21 elasticsearch-5.2.2]# sysctl -p
然еҗҺпјҢйҮҚж–°еҗҜеҠЁelasticsearchпјҢеҚіеҸҜеҗҜеҠЁжҲҗеҠҹгҖӮ
6пјүеҗҜеҠЁelasticsearch
[asy@hdp21 elasticsearch-5.2.2]$ bin/elasticsearch
еҗҺеҸ°еҗҜеҠЁж–№ејҸ
[asy@hdp21 elasticsearch-5.2.2]$ bin/elasticsearch-d
7пјүжөӢиҜ•elasticsearch
[root@hdp21 ~]# curl http://hdp21:9200
{
"name" : "node1",
"cluster_name" : "Asy",
"cluster_uuid" : "8T7xJ-NLTbmYHOPKa3a4tA",
"version" : {
"number" : "5.2.2",
"build_hash" : "f9d9b74",
"build_date" : "2017-02-24T17:26:45.835Z",
"build_snapshot" : false,
"lucene_version" : "6.4.1"
},
"tagline" : "You Know, for Search"
}
жү§иЎҢbin/elasticsearchзҡ„ж—¶еҖҷ
еҰӮжһңжңү max file descriptors [4096] for elasticsearch process is too low, increase to at least [65536] зҡ„жҠҘй”ҷ
иҝҷдёӘеҜ№еә”v/etc/security/limits.conf
GoogleжөҸи§ҲеҷЁи°ғиҜ•Elastic Search
жү“ејҖжӣҙеӨҡе·Ҙе…·пјҢжү©еұ•зЁӢеәҸ并且жү“ејҖејҖеҸ‘иҖ…жЁЎејҸ
е°Ҷelasticsearch-head.crxжӢ–е…ҘжөҸи§ҲеҷЁзӘ—еҸЈжҲҗеҠҹе®ҢжҲҗжҸ’件зҡ„е®үиЈ…
иҫ“е…Ҙhttp://192.168.234.21:9200/
е…¶дёӯ192.168.234.21дёәlinuxдё»жңәзҡ„IPең°еқҖпјҢ9200дёәз«ҜеҸЈеҸ·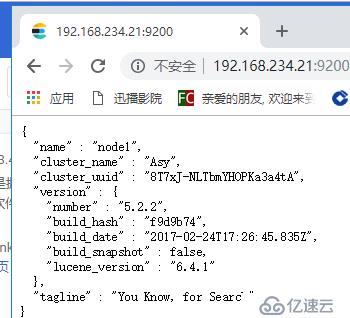
е…ҚиҙЈеЈ°жҳҺпјҡжң¬з«ҷеҸ‘еёғзҡ„еҶ…е®№пјҲеӣҫзүҮгҖҒи§Ҷйў‘е’Ңж–Үеӯ—пјүд»ҘеҺҹеҲӣгҖҒиҪ¬иҪҪе’ҢеҲҶдә«дёәдё»пјҢж–Үз« и§ӮзӮ№дёҚд»ЈиЎЁжң¬зҪ‘з«ҷз«ӢеңәпјҢеҰӮжһңж¶үеҸҠдҫөжқғиҜ·иҒ”зі»з«ҷй•ҝйӮ®з®ұпјҡis@yisu.comиҝӣиЎҢдёҫжҠҘпјҢ并жҸҗдҫӣзӣёе…іиҜҒжҚ®пјҢдёҖз»ҸжҹҘе®һпјҢе°Ҷз«ӢеҲ»еҲ йҷӨж¶үе«ҢдҫөжқғеҶ…е®№гҖӮ
жӮЁеҘҪпјҢзҷ»еҪ•еҗҺжүҚиғҪдёӢи®ўеҚ•е“ҰпјҒ