жӮЁеҘҪпјҢзҷ»еҪ•еҗҺжүҚиғҪдёӢи®ўеҚ•е“ҰпјҒ
еҜҶз Ғзҷ»еҪ•
зҷ»еҪ•жіЁеҶҢ
зӮ№еҮ» зҷ»еҪ•жіЁеҶҢ еҚіиЎЁзӨәеҗҢж„ҸгҖҠдәҝйҖҹдә‘з”ЁжҲ·жңҚеҠЎжқЎж¬ҫгҖӢ
жң¬ж–Үе°Ҹзј–дёәеӨ§е®¶иҜҰз»Ҷд»Ӣз»ҚвҖңNginxй…ҚеҗҲApacheжҲ–Tomcatзҡ„еҠЁйқҷеҲҶзҰ»жҖҺд№Ҳй…ҚзҪ®вҖқпјҢеҶ…е®№иҜҰз»ҶпјҢжӯҘйӘӨжё…жҷ°пјҢз»ҶиҠӮеӨ„зҗҶеҰҘеҪ“пјҢеёҢжңӣиҝҷзҜҮвҖңNginxй…ҚеҗҲApacheжҲ–Tomcatзҡ„еҠЁйқҷеҲҶзҰ»жҖҺд№Ҳй…ҚзҪ®вҖқж–Үз« иғҪеё®еҠ©еӨ§е®¶и§ЈеҶіз–‘жғ‘пјҢдёӢйқўи·ҹзқҖе°Ҹзј–зҡ„жҖқи·Ҝж…ўж…ўж·ұе…ҘпјҢдёҖиө·жқҘеӯҰд№ ж–°зҹҘиҜҶеҗ§гҖӮ
1гҖҒnginxе’Ңapacheзҡ„еҠЁйқҷеҲҶзҰ»й…ҚзҪ®пјҡ
жҠҠдёӢйқўй…ҚзҪ®ж”ҫеҲ°nginxй…ҚзҪ®ж–Ү件зӣёеә”зҡ„server { пҪқйҮҢйқўпјҢеҰӮжһңдҪҝз”Ёе…¶д»–з«ҜеҸЈеҸ·пјҢж”№дёҖдёӢе°ұиЎҢпјҡ
#жүҖжңүphpзҡ„еҠЁжҖҒйЎөйқўеқҮдәӨз”ұapacheеӨ„зҗҶ
location ~ \.(php)?$ {
proxy_set_header host $host;
proxy_set_header x-real-ip $remote_addr;
proxy_set_header x-forwarded-for $proxy_add_x_forwarded_for;
proxy_pass http://127.0.0.1:88;
}#жүҖжңүйқҷжҖҒж–Ү件з”ұnginxзӣҙжҺҘиҜ»еҸ–дёҚз»ҸиҝҮapache
location ~ .*\.(htm|html|gif|jpg|jpeg|png|bmp|swf|ioc|rar|zip|txt|flv|mid|doc|ppt|pdf|xls|mp3|wma)$
{ expires 15d; }
location ~ .*\.(js|css)?$
{ expires 1h; }еҰӮжһңд№ӢеүҚи®ҫзҪ®дәҶfastcgiзҡ„пјҢжҠҠдёӢйқўзҡ„й…ҚзҪ®жіЁйҮҠжҺүпјҡ
# pass the php scripts to fastcgi server listening on 127.0.0.1:9000
#
#location ~ \.php$ {
# root /var/www/html;
# fastcgi_pass 127.0.0.1:9000;
# fastcgi_index index.php;
# include fastcgi.conf;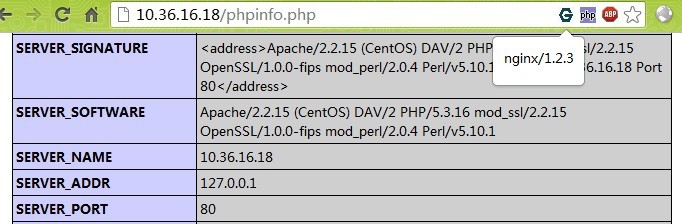
#}йҮҚеҗҜnginxе°ұз”ҹж•ҲпјҢеҰӮеӣҫжүҖзӨәпјҢж ҮеӨҙжҳҫзӨәnginxпјҢphpinfoйҮҢйқўжҳҫзӨәжҳҜapacheпјҢиҜҙжҳҺеҠЁйқҷеҲҶзҰ»з”ҹж•ҲгҖӮ
2.niginxе’Ңtomcatзҡ„еҠЁйқҷеҲҶзҰ»й…ҚзҪ®пјҡ
#дё»й…ҚзҪ®ж–Ү件й…ҚзҪ®
[root@localhost ~]# vi /usr/local/nginx/conf/nginx.conf
user nginx;
worker_processes 1;
error_log logs/error.log;
pid logs/nginx.pid;
events {
worker_connections 1024;
}
http {
include mime.types;
default_type application/octet-stream;
#ж—Ҙеҝ—ж јејҸе®ҡд№ү
log_format main '$remote_addr - $remote_user[$time_local] "$request" '
'$status $body_bytes_sent"$http_referer" '
'"$http_user_agent" "$http_x_forwarded_for"';
access_log logs/access.log main;
sendfile on;
keepalive_timeout 65;
#gzipеҺӢзј©еҠҹиғҪи®ҫзҪ®
gzip on;
gzip_min_length 1k;
gzip_buffers 4 16k;
gzip_http_version 1.0;
gzip_comp_level 2;
gzip_types text/plain application/x-javascripttext/css application/xml;
gzip_vary on;
server {
listen 80;
server_name www.test.com;
location / {
#jspзҪ‘з«ҷзЁӢеәҸж №зӣ®еҪ•пјҢдёҖиҲ¬nginxдёҺtomcatеңЁеҗҢдёҖдёӘзӣ®еҪ•
root /usr/local/tomcat/webapps/root;
index index.html index.jsp index.html;
}
location ~ .*.jsp$ {
index index.jsp;
proxy_pass http://127.0.0.1:8080; #жқҘиҮӘjspиҜ·жұӮдәӨз»ҷtomcatеӨ„зҗҶ
proxy_redirect off;
proxy_set_header host $host; #еҗҺз«Ҝзҡ„webжңҚеҠЎеҷЁеҸҜд»ҘйҖҡиҝҮx-forwarded-forиҺ·еҸ–з”ЁжҲ·зңҹе®һip
proxy_set_header x-real-ip $remote_addr;
proxy_set_header x-forwarded-for $proxy_add_x_forwarded_for;
client_max_body_size 10m; #е…Ғи®ёе®ўжҲ·з«ҜиҜ·жұӮзҡ„жңҖеӨ§еҚ•ж–Ү件еӯ—иҠӮж•°
client_body_buffer_size 128k; #зј“еҶІеҢәд»ЈзҗҶзј“еҶІз”ЁжҲ·з«ҜиҜ·жұӮзҡ„жңҖеӨ§еӯ—иҠӮж•°
proxy_connect_timeout 90; #nginxи·ҹеҗҺз«ҜжңҚеҠЎеҷЁиҝһжҺҘи¶…ж—¶ж—¶й—ҙ(д»ЈзҗҶиҝһжҺҘи¶…ж—¶)
proxy_read_timeout 90; #иҝһжҺҘжҲҗеҠҹеҗҺпјҢеҗҺз«ҜжңҚеҠЎеҷЁе“Қеә”ж—¶й—ҙ(д»ЈзҗҶжҺҘ收超时)
proxy_buffer_size 4k; #и®ҫзҪ®д»ЈзҗҶжңҚеҠЎеҷЁпјҲnginxпјүдҝқеӯҳз”ЁжҲ·еӨҙдҝЎжҒҜзҡ„зј“еҶІеҢәеӨ§е°Ҹ
proxy_buffers 6 32k; #proxy_buffersзј“еҶІеҢәпјҢзҪ‘йЎөе№іеқҮеңЁ32kд»ҘдёӢзҡ„иҜқпјҢиҝҷж ·и®ҫзҪ®
proxy_busy_buffers_size 64k;#й«ҳиҙҹиҚ·дёӢзј“еҶІеӨ§е°ҸпјҲproxy_buffers*2пјү
proxy_temp_file_write_size 64k; #и®ҫе®ҡзј“еӯҳж–Ү件еӨ№еӨ§е°ҸпјҢеӨ§дәҺиҝҷдёӘеҖјпјҢе°Ҷд»ҺupstreamжңҚеҠЎеҷЁдј
}
location ~ .*\.(gif|jpg|png|bmp|swf)$ #з”ұnginxеӨ„зҗҶйқҷжҖҒйЎөйқў
{
expires 30d; #дҪҝз”Ёexpiresзј“еӯҳжЁЎеқ—пјҢзј“еӯҳеҲ°е®ўжҲ·з«Ҝ30еӨ©
}
location ~ .*\.( jsp|js|css)?$
{
expires 1d;
}
error_page 404 /404.html; #й”ҷиҜҜйЎөйқў
error_page 500 502 503 504 /50x.html;
location = /50x.html {
root html;
}
}#зј–еҶҷnginxеҗҜеҠЁгҖҒеҒңжӯўгҖҒйҮҚеҗҜзӯүsysvз®ЎзҗҶи„ҡжң¬пјҢж–№дҫҝдҪҝз”Ё
[root@localhost ~]# vi /etc/init.d/nginx
#!/bin/bash
# chkconfig: 345 99 20
# description: nginx servicecontrol script
prog="/usr/local/nginx/sbin/nginx"
pidf="/usr/local/nginx/logs/nginx.pid"
case "$1" in
start)
$prog
echo "nginx servicestart success."
;;
stop)
kill -s quit $(cat $pidf)
echo "nginx service stopsuccess."
;;
restart)
$0 stop
$0 start
;;
reload)
kill -s hup $(cat $pidf)
echo"reload nginx configsuccess."
;;
*)
echo "usage: $0{start|stop|restart|reload}"
exit 1
esac
[root@localhost ~]# chmod +x /etc/init.d/nginx [root@localhost ~]# service nginx restart [root@localhost ~]# chkconfig --add nginx [root@localhost ~]# chkconfig nginx on
иҜ»еҲ°иҝҷйҮҢпјҢиҝҷзҜҮвҖңNginxй…ҚеҗҲApacheжҲ–Tomcatзҡ„еҠЁйқҷеҲҶзҰ»жҖҺд№Ҳй…ҚзҪ®вҖқж–Үз« е·Із»Ҹд»Ӣз»Қе®ҢжҜ•пјҢжғіиҰҒжҺҢжҸЎиҝҷзҜҮж–Үз« зҡ„зҹҘиҜҶзӮ№иҝҳйңҖиҰҒеӨ§е®¶иҮӘе·ұеҠЁжүӢе®һи·өдҪҝз”ЁиҝҮжүҚиғҪйўҶдјҡпјҢеҰӮжһңжғідәҶи§ЈжӣҙеӨҡзӣёе…іеҶ…е®№зҡ„ж–Үз« пјҢж¬ўиҝҺе…іжіЁдәҝйҖҹдә‘иЎҢдёҡиө„и®Ҝйў‘йҒ“гҖӮ
е…ҚиҙЈеЈ°жҳҺпјҡжң¬з«ҷеҸ‘еёғзҡ„еҶ…е®№пјҲеӣҫзүҮгҖҒи§Ҷйў‘е’Ңж–Үеӯ—пјүд»ҘеҺҹеҲӣгҖҒиҪ¬иҪҪе’ҢеҲҶдә«дёәдё»пјҢж–Үз« и§ӮзӮ№дёҚд»ЈиЎЁжң¬зҪ‘з«ҷз«ӢеңәпјҢеҰӮжһңж¶үеҸҠдҫөжқғиҜ·иҒ”зі»з«ҷй•ҝйӮ®з®ұпјҡis@yisu.comиҝӣиЎҢдёҫжҠҘпјҢ并жҸҗдҫӣзӣёе…іиҜҒжҚ®пјҢдёҖз»ҸжҹҘе®һпјҢе°Ҷз«ӢеҲ»еҲ йҷӨж¶үе«ҢдҫөжқғеҶ…е®№гҖӮ
жӮЁеҘҪпјҢзҷ»еҪ•еҗҺжүҚиғҪдёӢи®ўеҚ•е“ҰпјҒ