您好,登录后才能下订单哦!
密码登录
登录注册
点击 登录注册 即表示同意《亿速云用户服务条款》
这篇文章主要介绍微信小程序如何实现联动菜单,文中介绍的非常详细,具有一定的参考价值,感兴趣的小伙伴们一定要看完!
第1步:了解一下
左右侧菜单其实简单来讲就是把一个区域分成左右两个部分。关于组件,我觉得可以直接去微信开发文档看。通过代码,我觉得应该是可以理解的。直接上代码。
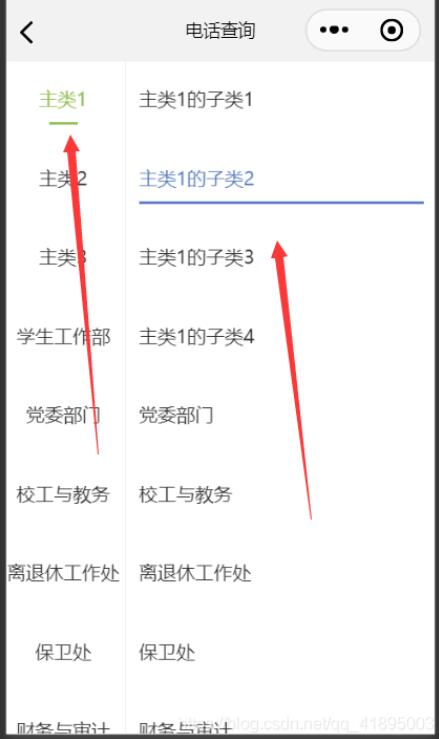
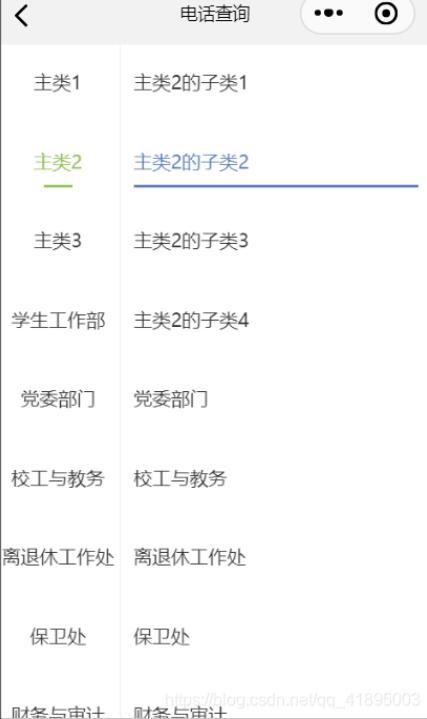
第2步:先看一下效果啦


运行效率还是可以的很快,无卡顿现象。
第3步:实现(代码)
这里我只放了其中一部分,也是可以直接实现的,没有问题,可以根据自己的需要修改。
wxml
<!-- 左侧滚动栏 -->
<view class ='total'>
<view class='under_line'></view>
<view style='float: left' class='left'>
  <scroll-view scroll-y scroll-with-animation scroll-left="{{scrollLength}}" class='scrollY' style='height: {{winHeight}}px'>
    <view class='all clear'>
      <block wx:key="lists" wx:for="{{lists}}">
        <view bindtap='jumpIndex' data-menuindex='{{index}}'>
          <view class='text-style'>
            <text class="{{indexId==index?'active1':''}}">{{item}}</text>
            <text class="{{indexId==index?'active':''}}"></text>
          </view>
        </view>
      </block>
    </view>
  </scroll-view>
</view>

<!--右侧栏-->
<view class="right">
    <!--判断indexId值显示不同页面-->
     <view wx:if="{{indexId==0}}">
        <scroll-view scroll-y scroll-with-animation scroll-left="{{scrollLength}}" class='scrollY2' style='height: {{winHeight}}px'>
        <view class='all clear'>
        <block wx:key="lists_r0" wx:for="{{lists_r0}}">
        <view bindtap='jumpIndexR0' data-menuindex='{{index}}'>
          <view class='text-style2'>
            <text class="{{indexIdr0==index?'active2':''}}">{{item}}</text>
            <text class="{{indexIdr0==index?'active3':''}}"></text>
          </view>
        </view>
        </block>
        </view>
        </scroll-view>
      </view>

      <view wx:if="{{indexId==1}}">
      <scroll-view scroll-y scroll-with-animation scroll-left="{{scrollLength}}" class='scrollY2' style='height: {{winHeight}}px'>
        <view class='all clear'>
        <block wx:key="lists_r1" wx:for="{{lists_r1}}">
        <view bindtap='jumpIndexR0' data-menuindex='{{index}}'>
          <view class='text-style2'>
            <text class="{{indexIdr0==index?'active2':''}}">{{item}}</text>
            <text class="{{indexIdr0==index?'active3':''}}"></text>
          </view>
        </view>
        </block>
        </view>
        </scroll-view>
      </view>

     </view>
</view>
wxss
.under_line{
  width: 100%;
  border-top: 1rpx solid #efefef;
}

.left {
  border-top: 1rpx solid #efefef;
  border-right: 1rpx solid #efefef;
}

.text-style {
  width: 200rpx;
  height: 140rpx;
  line-height: 140rpx;
  text-align: center;
  font-size: 34rpx;
  font-family: PingFangSC-Semibold;
  color: rgba(51, 51, 51, 1);
}


.active3 {
  display: block;
  width: 500rpx;
  height: 6rpx;
  background: rgb(88, 123, 193);
  position: relative;
  left: 0rpx;
  bottom: 30rpx;
}

.active2 {
  color: rgb(88, 123, 193);
}

.active1 {
  color: #96C158;
}

.active {
  display: block;
  width: 50rpx;
  height: 6rpx;
  background: #96C158;
  position: relative;
  left: 75rpx;
  bottom: 30rpx;
}

.scrollY {
  width: 210rpx;
  position: fixed;
  left: 0;
  top: 0;
  border-right: 1rpx solid #efefef;
}

.right{
  border-top: 1rpx solid #efefef;
  border-left: 1rpx solid  rgba(0,0,0,0.0);
  margin-left: 2rpx;
}

.scrollY2 {
  width: 520rpx;
  position: fixed;
  right: 0;
  top: 0;
  border-left: 1rpx solid rgba(0,0,0,0);
  margin-left: 2rpx;
}

.text-style2 {
  width: 520rpx;
  height: 140rpx;
  line-height: 140rpx;
  text-align: left;
  font-size: 34rpx;
  font-family: PingFangSC-Semibold;
  color: rgba(51, 51, 51, 1);
}

.button_call{
  height: 90rpx;
  width: 90rpx;
  position: fixed;
  bottom: 150rpx;
  right: 13rpx;
  opacity: 0.7;
  z-index: 100;
}
js
Page({

  /**
   * 页面的初始数据
   */
  data: {
    lists: [
      "主类1", "主类2", "主类3", "学生工作部", "党委部门", "校工与教务", "离退休工作处", "保卫处", "财务与审计", "实验室与设备", "人事处", "保卫处", "学院", "直属单位", "其他"
    ],
    lists_r0: [
      "主类1的子类1",
      "主类1的子类2", "主类1的子类3", "主类1的子类4", "党委部门", "校工与教务", "离退休工作处", "保卫处", "财务与审计", "实验室与设备", "人事处", "保卫处", "学院", "直属单位", "其他"
    ],
    lists_r1: [
      "主类2的子类1",
      "主类2的子类2", "主类2的子类3", "主类2的子类4", "党委部门", "校工与教务", "离退休工作处", "保卫处", "财务与审计", "实验室与设备", "人事处", "保卫处", "学院", "直属单位", "其他"
    ],
    indexId: 0,
    indexIdr0: 0,
    indexIdr0: 1,
  },
  // 左侧点击事件
  jumpIndex(e) {
    let index = e.currentTarget.dataset.menuindex
    let that = this
    that.setData({
      indexId: index
    });
  },

  jumpIndexR0(e) {
    let index = e.currentTarget.dataset.menuindex
    let that = this
    that.setData({
      indexIdr0: index
    });
  },


  /**
   * 生命周期函数--监听页面加载
   */
  onLoad: function(options) {
    var that = this
    wx.getSystemInfo({
      success: function(res) {
        that.setData({
          winHeight: res.windowHeight
        });
      }
    });
  },

  /**
   * 生命周期函数--监听页面初次渲染完成
   */
  onReady: function() {

  },

  /**
   * 生命周期函数--监听页面显示
   */
  onShow: function() {

  },

  /**
   * 生命周期函数--监听页面隐藏
   */
  onHide: function() {

  },

  /**
   * 生命周期函数--监听页面卸载
   */
  onUnload: function() {

  },

  /**
   * 页面相关事件处理函数--监听用户下拉动作
   */
  onPullDownRefresh: function() {

  },

  /**
   * 页面上拉触底事件的处理函数
   */
  onReachBottom: function() {

  },

  /**
   * 用户点击右上角分享
   */
  onShareAppMessage: function() {

  }
})
json
{
  "usingComponents": { },
  "navigationBarBackgroundColor":"自己想要的背景色",
  "navigationBarTitleText": "电话查询",
  "navigationBarTextStyle":"black",
  "enablePullDownRefresh": true
}
以上是“微信小程序如何实现联动菜单”这篇文章的所有内容,感谢各位的阅读!希望分享的内容对大家有帮助,更多相关知识,欢迎关注亿速云行业资讯频道!
免责声明:本站发布的内容(图片、视频和文字)以原创、转载和分享为主,文章观点不代表本网站立场,如果涉及侵权请联系站长邮箱:is@yisu.com进行举报,并提供相关证据,一经查实,将立刻删除涉嫌侵权内容。