您好,登录后才能下订单哦!
密码登录
登录注册
点击 登录注册 即表示同意《亿速云用户服务条款》
这篇文章给大家分享的是有关Spring Boot如何解决Redis缓存+MySQL批量入库问题的内容。小编觉得挺实用的,因此分享给大家做个参考,一起跟随小编过来看看吧。
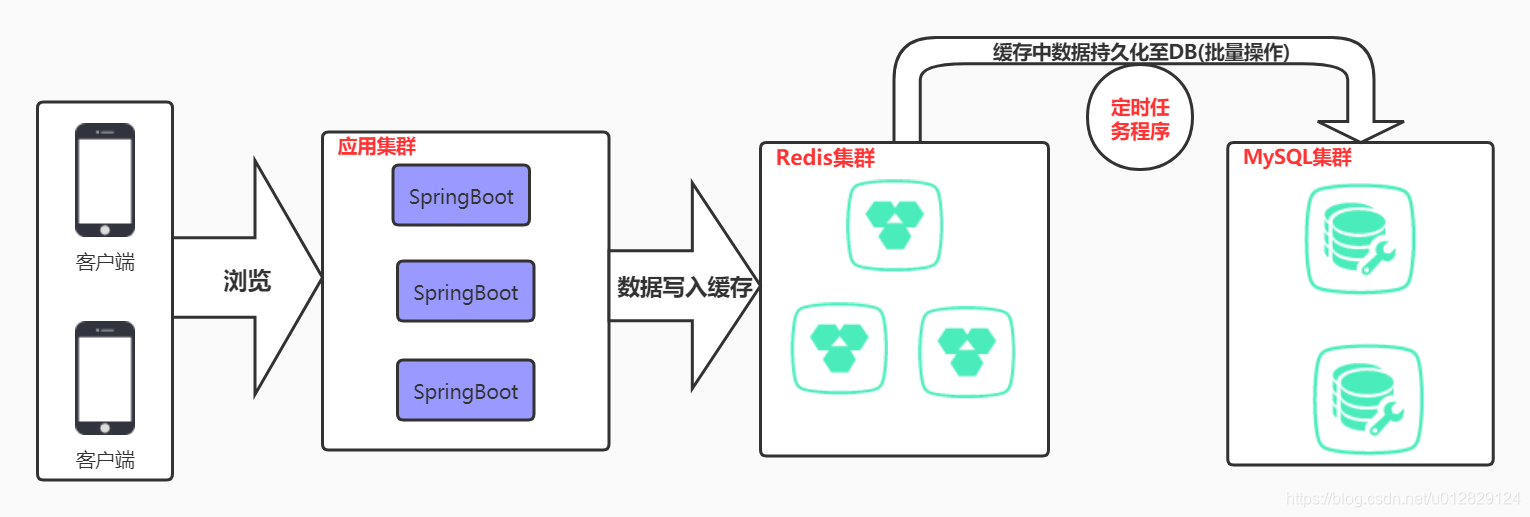
架构图:

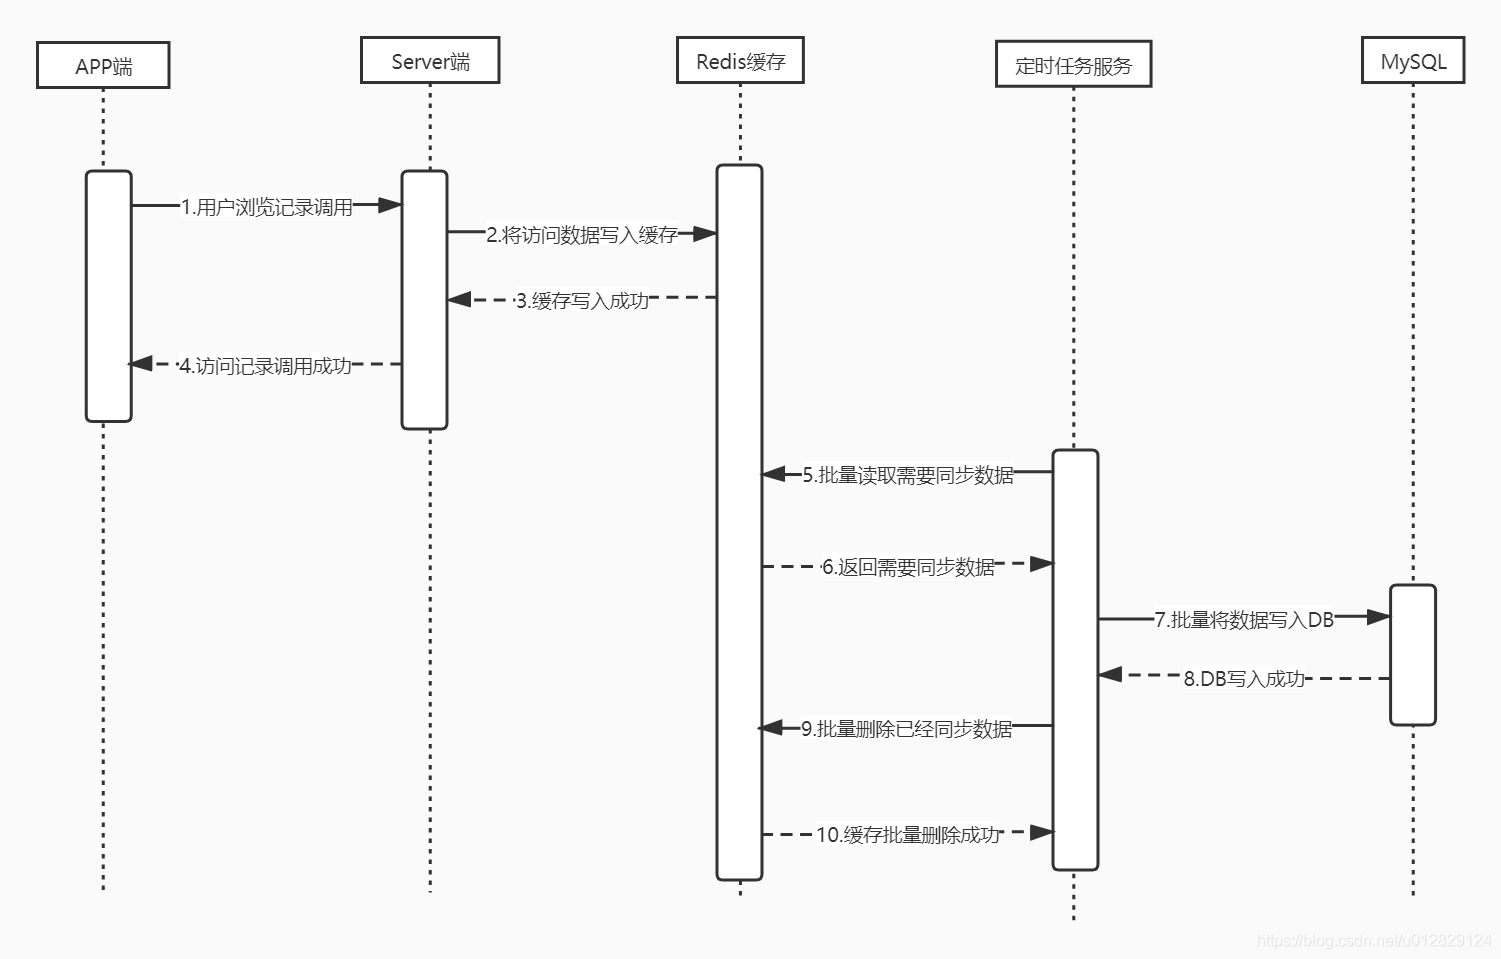
时序图

记录基础数据MySQL表结构
CREATE TABLE `zh_article_count` (
  `id` bigint(20) NOT NULL AUTO_INCREMENT,
  `bu_no` varchar(32) DEFAULT NULL COMMENT '业务编码',
  `customer_id` varchar(32) DEFAULT NULL COMMENT '用户编码',
  `type` int(2) DEFAULT '0' COMMENT '统计类型:0APP内文章阅读',
  `article_no` varchar(32) DEFAULT NULL COMMENT '文章编码',
  `read_time` datetime DEFAULT NULL COMMENT '阅读时间',
  `create_time` datetime DEFAULT CURRENT_TIMESTAMP COMMENT '创建时间',
  `update_time` datetime DEFAULT CURRENT_TIMESTAMP COMMENT '更新时间',
  `param1` int(2) DEFAULT NULL COMMENT '预留字段1',
  `param2` int(4) DEFAULT NULL COMMENT '预留字段2',
  `param3` int(11) DEFAULT NULL COMMENT '预留字段3',
  `param4` varchar(20) DEFAULT NULL COMMENT '预留字段4',
  `param5` varchar(32) DEFAULT NULL COMMENT '预留字段5',
  `param6` varchar(64) DEFAULT NULL COMMENT '预留字段6',
  PRIMARY KEY (`id`) USING BTREE,
  UNIQUE KEY `uk_zh_article_count_buno` (`bu_no`),
  KEY `key_zh_article_count_csign` (`customer_id`),
  KEY `key_zh_article_count_ano` (`article_no`),
  KEY `key_zh_article_count_rtime` (`read_time`)
) ENGINE=InnoDB DEFAULT CHARSET=utf8mb4 COMMENT='文章阅读统计表';
技术实现方案
SpringBoot
Redis
MySQL
完整代码(GitHub,欢迎大家Star,Fork,Watch)
https://github.com/dangnianchuntian/springboot
主要代码展示
Controller
/*
 * Copyright (c) 2020. zhanghan_java@163.com All Rights Reserved.
 * 项目名称:Spring Boot实战解决高并发数据入库: Redis 缓存+MySQL 批量入库
 * 类名称:ArticleCountController.java
 * 创建人:张晗
 * 联系方式:zhanghan_java@163.com
 * 开源地址: https://github.com/dangnianchuntian/springboot
 * 博客地址: https://zhanghan.blog.csdn.net
 */

package com.zhanghan.zhredistodb.controller;
import org.springframework.beans.factory.annotation.Autowired;
import org.springframework.validation.annotation.Validated;
import org.springframework.web.bind.annotation.RequestBody;
import org.springframework.web.bind.annotation.RequestMapping;
import org.springframework.web.bind.annotation.RequestMethod;
import org.springframework.web.bind.annotation.RestController;
import com.zhanghan.zhredistodb.controller.request.PostArticleViewsRequest;
import com.zhanghan.zhredistodb.service.ArticleCountService;
@RestController
public class ArticleCountController {
    @Autowired
    private ArticleCountService articleCountService;
   /**
    * 记录用户访问记录
    */
    @RequestMapping(value = "/post/article/views", method = RequestMethod.POST)
    public Object postArticleViews(@RequestBody @Validated PostArticleViewsRequest postArticleViewsRequest) {
        return articleCountService.postArticleViews(postArticleViewsRequest);
    }
    /**
     *  批量将缓存中的数据同步到MySQL(模拟定时任务操作)
     */
    @RequestMapping(value = "/post/batch", method = RequestMethod.POST)
    public Object postBatch() {
        return articleCountService.postBatchRedisToDb();
}
Service
/*
 * Copyright (c) 2020. zhanghan_java@163.com All Rights Reserved.
 * 项目名称:Spring Boot实战解决高并发数据入库: Redis 缓存+MySQL 批量入库
 * 类名称:ArticleCountServiceImpl.java
 * 创建人:张晗
 * 联系方式:zhanghan_java@163.com
 * 开源地址: https://github.com/dangnianchuntian/springboot
 * 博客地址: https://zhanghan.blog.csdn.net
 */

package com.zhanghan.zhredistodb.service.impl;
import java.util.ArrayList;
import java.util.Date;
import java.util.List;
import java.util.stream.Collectors;
import org.slf4j.Logger;
import org.slf4j.LoggerFactory;
import org.springframework.beans.factory.annotation.Autowired;
import org.springframework.beans.factory.annotation.Value;
import org.springframework.data.redis.core.RedisTemplate;
import org.springframework.stereotype.Service;
import org.springframework.util.CollectionUtils;
import com.alibaba.fastjson.JSON;
import com.zhanghan.zhredistodb.controller.request.PostArticleViewsRequest;
import com.zhanghan.zhredistodb.dto.ArticleCountDto;
import com.zhanghan.zhredistodb.mybatis.mapper.XArticleCountMapper;
import com.zhanghan.zhredistodb.service.ArticleCountService;
import com.zhanghan.zhredistodb.util.wrapper.WrapMapper;
import cn.hutool.core.util.IdUtil;
@Service
public class ArticleCountServiceImpl implements ArticleCountService {
    private static Logger logger = LoggerFactory.getLogger(ArticleCountServiceImpl.class);
    @Autowired
    private RedisTemplate<String, String> strRedisTemplate;
    private XArticleCountMapper xArticleCountMapper;
    @Value("${zh.article.count.redis.key:zh}")
    private String zhArticleCountRedisKey;
    @Value("#{T(java.lang.Integer).parseInt('${zh..article.read.num:3}')}")
    private Integer articleReadNum;
    /**
     * 记录用户访问记录
     */
    @Override
    public Object postArticleViews(PostArticleViewsRequest postArticleViewsRequest) {
        ArticleCountDto articleCountDto = new ArticleCountDto();
        articleCountDto.setBuNo(IdUtil.simpleUUID());
        articleCountDto.setCustomerId(postArticleViewsRequest.getCustomerId());
        articleCountDto.setArticleNo(postArticleViewsRequest.getArticleNo());
        articleCountDto.setReadTime(new Date());
        String strArticleCountDto = JSON.toJSONString(articleCountDto);
        strRedisTemplate.opsForList().rightPush(zhArticleCountRedisKey, strArticleCountDto);
        return WrapMapper.ok();
    }
     * 批量将缓存中的数据同步到MySQL
    public Object postBatchRedisToDb() {
        Date now = new Date();
        while (true) {
            List<String> strArticleCountList =
                    strRedisTemplate.opsForList().range(zhArticleCountRedisKey, 0, articleReadNum);
            if (CollectionUtils.isEmpty(strArticleCountList)) {
                return WrapMapper.ok();
            }
            List<ArticleCountDto> articleCountDtoList = new ArrayList<>();
            strArticleCountList.stream().forEach(x -> {
                ArticleCountDto articleCountDto = JSON.parseObject(x, ArticleCountDto.class);
                articleCountDtoList.add(articleCountDto);
            });
            //过滤出本次定时任务之前的缓存中数据,防止死循环
            List<ArticleCountDto> beforeArticleCountDtoList = articleCountDtoList.stream().filter(x -> x.getReadTime()
                    .before(now)).collect(Collectors.toList());
            if (CollectionUtils.isEmpty(beforeArticleCountDtoList)) {
            xArticleCountMapper.batchAdd(beforeArticleCountDtoList);
            Integer delSize = beforeArticleCountDtoList.size();
            strRedisTemplate.opsForList().trim(zhArticleCountRedisKey, delSize, -1L);
        }
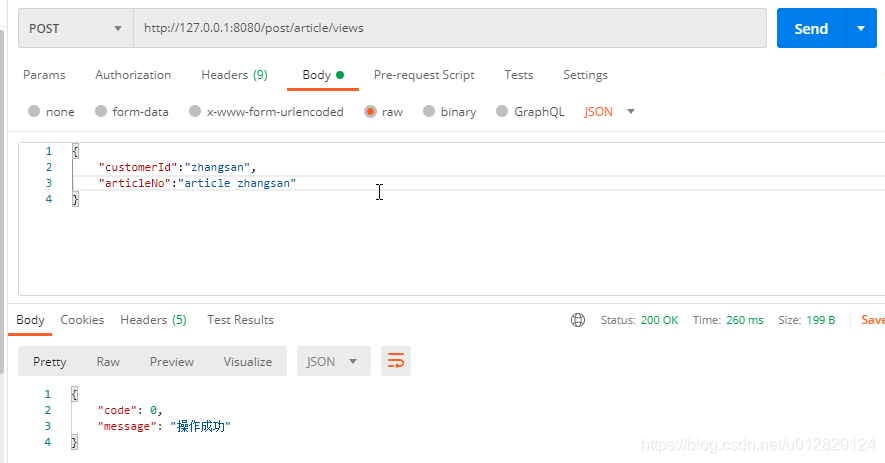
}模拟用户请求访问后台(多次请求)

查看缓存中访问数据

模拟定时任务将缓存中数据同步到DB中

这时查看缓存中的数据已经没了

查看数据库表结构

感谢各位的阅读!关于“Spring Boot如何解决Redis缓存+MySQL批量入库问题”这篇文章就分享到这里了,希望以上内容可以对大家有一定的帮助,让大家可以学到更多知识,如果觉得文章不错,可以把它分享出去让更多的人看到吧!
免责声明:本站发布的内容(图片、视频和文字)以原创、转载和分享为主,文章观点不代表本网站立场,如果涉及侵权请联系站长邮箱:is@yisu.com进行举报,并提供相关证据,一经查实,将立刻删除涉嫌侵权内容。