жӮЁеҘҪпјҢзҷ»еҪ•еҗҺжүҚиғҪдёӢи®ўеҚ•е“ҰпјҒ
еҜҶз Ғзҷ»еҪ•
зҷ»еҪ•жіЁеҶҢ
зӮ№еҮ» зҷ»еҪ•жіЁеҶҢ еҚіиЎЁзӨәеҗҢж„ҸгҖҠдәҝйҖҹдә‘з”ЁжҲ·жңҚеҠЎжқЎж¬ҫгҖӢ
иҝҷзҜҮж–Үз« дё»иҰҒд»Ӣз»ҚдәҶuniapp组件uni-popupеј№еҮәеұӮжҖҺд№Ҳз”ЁпјҢе…·жңүдёҖе®ҡеҖҹйүҙд»·еҖјпјҢж„ҹе…ҙи¶Јзҡ„жңӢеҸӢеҸҜд»ҘеҸӮиҖғдёӢпјҢеёҢжңӣеӨ§е®¶йҳ…иҜ»е®ҢиҝҷзҜҮж–Үз« д№ӢеҗҺеӨ§жңү收иҺ·пјҢдёӢйқўи®©е°Ҹзј–еёҰзқҖеӨ§е®¶дёҖиө·дәҶи§ЈдёҖдёӢгҖӮ
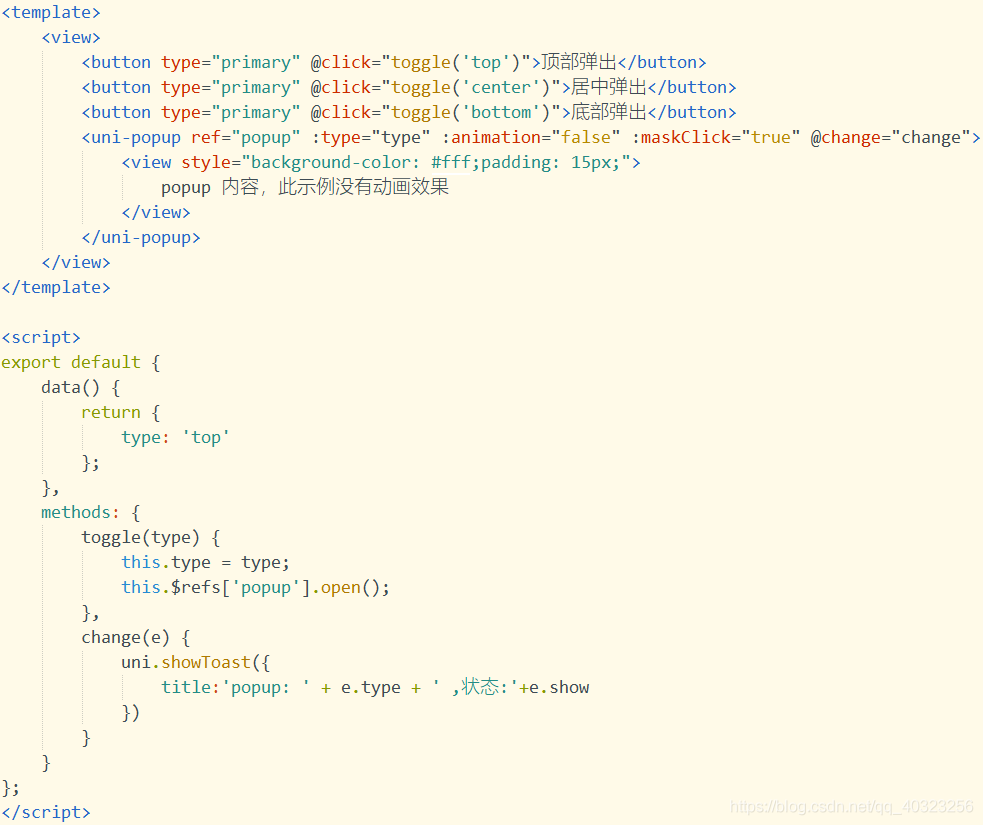
<template>
<view>
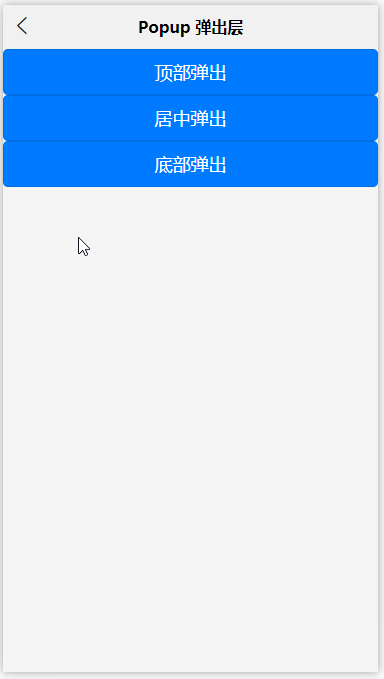
<button type="primary" @click="toggle('top')">йЎ¶йғЁеј№еҮә</button>
<button type="primary" @click="toggle('center')">еұ…дёӯеј№еҮә</button>
<button type="primary" @click="toggle('bottom')">еә•йғЁеј№еҮә</button>
<uni-popup ref="popup" :type="type" :animation="false" :maskClick="true" @change="change">
<view >
popup еҶ…е®№пјҢжӯӨзӨәдҫӢжІЎжңүеҠЁз”»ж•Ҳжһң
</view>
</uni-popup>
</view>
</template>
<script>
export default {
data() {
return {
type: 'top'
};
},
methods: {
toggle(type) {
this.type = type;
this.$refs['popup'].open();
},
change(e) {
uni.showToast({
title:'popup: ' + e.type + ' ,зҠ¶жҖҒ:'+e.show
})
}
}
};
</script>
<template>
<view>
<button @click="toggleMessage('success')">жҲҗеҠҹ</button>
<button @click="toggleMessage('error')">й”ҷиҜҜ</button>
<button @click="toggleMessage('warn')">иӯҰе‘Ҡ</button>
<button @click="toggleMessage('info')">дҝЎжҒҜ</button>
<!-- ж¶ҲжҒҜжҸҗзӨә -->
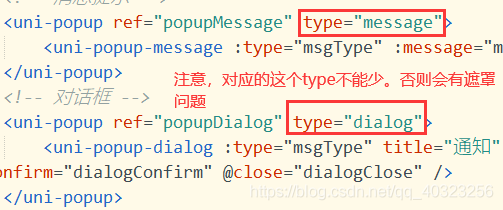
<uni-popup ref="popupMessage" type="message">
<uni-popup-message :type="msgType" :message="message" :duration="700" />
</uni-popup>
<!-- еҜ№иҜқжЎҶ -->
<uni-popup ref="popupDialog" type="dialog">
<uni-popup-dialog :type="msgType" title="йҖҡзҹҘ" content="ж¬ўиҝҺдҪҝз”Ё uni-popup!" :before-close="true" @confirm="dialogConfirm" @close="dialogClose" />
</uni-popup>
</view>
</template>
<script>
export default {
data() {
return {
msgType: 'success',
message: 'иҝҷжҳҜдёҖжқЎжҲҗеҠҹж¶ҲжҒҜжҸҗзӨә'
};
},
methods: {
toggleMessage(type) {
this.msgType = type;
switch (type) {
case 'success':
this.message = 'иҝҷжҳҜдёҖжқЎжҲҗеҠҹж¶ҲжҒҜжҸҗзӨә';
break;
case 'warn':
this.message = 'иҝҷжҳҜдёҖжқЎиӯҰе‘Ҡж¶ҲжҒҜжҸҗзӨә';
break;
case 'info':
this.message = 'иҝҷжҳҜдёҖжқЎж¶ҲжҒҜжҸҗзӨә';
break;
case 'error':
this.message = 'иҝҷжҳҜдёҖжқЎй”ҷиҜҜж¶ҲжҒҜжҸҗзӨә';
break;
}
this.$refs['popupDialog'].open();
},
dialogConfirm() {
this.$refs.popupMessage.open();
this.$refs['popupDialog'].close();
},
dialogClose() {
this.msgType = 'info';
this.message = 'зӮ№еҮ»дәҶеҜ№иҜқжЎҶзҡ„еҸ–ж¶ҲжҢүй’®';
this.$refs.popupMessage.open();
this.$refs.popupDialog.close();
}
}
};
</script>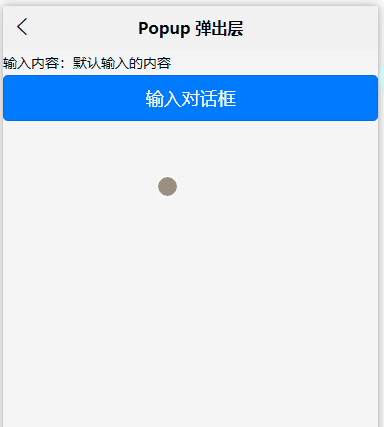
<template>
<view>
иҫ“е…ҘеҶ…е®№пјҡ{{value}}
<button type="primary" @click="confirmDialog">иҫ“е…ҘеҜ№иҜқжЎҶ</button>
<uni-popup ref="dialogInput" type="dialog">
<uni-popup-dialog mode="input" title="иҫ“е…ҘеҶ…е®№" value="еҜ№иҜқжЎҶйў„зҪ®жҸҗзӨәеҶ…е®№!" placeholder="иҜ·иҫ“е…ҘеҶ…е®№" @confirm="dialogInputConfirm"/>
</uni-popup>
</view>
</template>
<script>
export default {
data() {
return {
msgType: 'success',
value: 'й»ҳи®Өиҫ“е…Ҙзҡ„еҶ…е®№'
}
},
methods: {
confirmDialog() {
this.$refs['dialogInput'].open()
},
dialogConfirm(done) {
this.$refs['popupMessage'].open()
},
dialogInputConfirm( val) {
uni.showLoading({
title: '1з§’еҗҺдјҡе…ій—ӯ'
})
this.value = val
setTimeout(() => {
uni.hideLoading()
}, 1000)
}
},
}
</script>
<template>
<view>
<button type="primary" @click="confirmShare">еҲҶдә«жЁЎзүҲзӨәдҫӢ</button>
<uni-popup ref="popupShare" type="share">
<uni-popup-share title="еҲҶдә«еҲ°" @select="select"></uni-popup-share>
</uni-popup>
</view>
</template>
<script>
export default {
data() {
return {
}
},
methods: {
confirmShare() {
this.$refs.popupShare.open()
},
select(e) {
uni.showToast({
title: `жӮЁйҖүжӢ©дәҶ第${e.index+1}йЎ№пјҡ${e.item.text}`,
icon: 'none'
})
}
},
}
</script>ж„ҹи°ўдҪ иғҪеӨҹи®Өзңҹйҳ…иҜ»е®ҢиҝҷзҜҮж–Үз« пјҢеёҢжңӣе°Ҹзј–еҲҶдә«зҡ„вҖңuniapp组件uni-popupеј№еҮәеұӮжҖҺд№Ҳз”ЁвҖқиҝҷзҜҮж–Үз« еҜ№еӨ§е®¶жңүеё®еҠ©пјҢеҗҢж—¶д№ҹеёҢжңӣеӨ§е®¶еӨҡеӨҡж”ҜжҢҒдәҝйҖҹдә‘пјҢе…іжіЁдәҝйҖҹдә‘иЎҢдёҡиө„и®Ҝйў‘йҒ“пјҢжӣҙеӨҡзӣёе…ізҹҘиҜҶзӯүзқҖдҪ жқҘеӯҰд№ !
е…ҚиҙЈеЈ°жҳҺпјҡжң¬з«ҷеҸ‘еёғзҡ„еҶ…е®№пјҲеӣҫзүҮгҖҒи§Ҷйў‘е’Ңж–Үеӯ—пјүд»ҘеҺҹеҲӣгҖҒиҪ¬иҪҪе’ҢеҲҶдә«дёәдё»пјҢж–Үз« и§ӮзӮ№дёҚд»ЈиЎЁжң¬зҪ‘з«ҷз«ӢеңәпјҢеҰӮжһңж¶үеҸҠдҫөжқғиҜ·иҒ”зі»з«ҷй•ҝйӮ®з®ұпјҡis@yisu.comиҝӣиЎҢдёҫжҠҘпјҢ并жҸҗдҫӣзӣёе…іиҜҒжҚ®пјҢдёҖз»ҸжҹҘе®һпјҢе°Ҷз«ӢеҲ»еҲ йҷӨж¶үе«ҢдҫөжқғеҶ…е®№гҖӮ
жӮЁеҘҪпјҢзҷ»еҪ•еҗҺжүҚиғҪдёӢи®ўеҚ•е“ҰпјҒ