您好,登录后才能下订单哦!
密码登录
登录注册
点击 登录注册 即表示同意《亿速云用户服务条款》
本文小编为大家详细介绍“如何利用Python实现多种风格的照片处理”,内容详细,步骤清晰,细节处理妥当,希望这篇“如何利用Python实现多种风格的照片处理”文章能帮助大家解决疑惑,下面跟着小编的思路慢慢深入,一起来学习新知识吧。
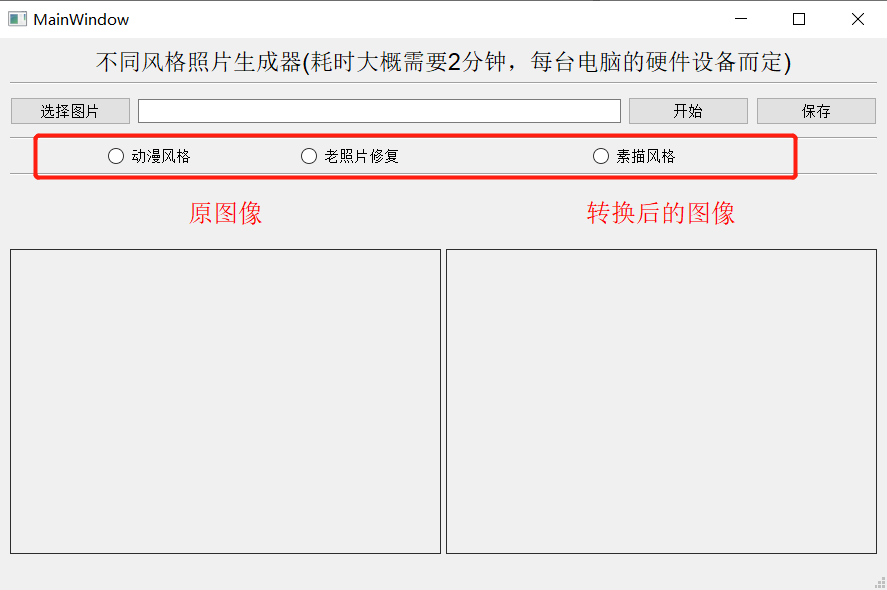
那么我们就在已经完成的UI界面上面再添加几个按钮,如下图所示,分别是“动漫风格”、“老照片修复”以及“素描风格”
当我们点击“动漫风格”时,程序会针对先前的步骤将上传的图片变成动漫风格的头像,当我们点击“老照片修复”时,会针对上传的照片进行修复,对应的代码是Github上面一个名叫DeOldify的项目,在Github上面获得了15.2K的小星星,可谓是非常的火爆,该作者给我们提供了一个多语言版本的接口,调用这个接口我们可以快速的使用该项目的能力,为老照片上色,代码如下
import requests
r = requests.post(
    "https://api.deepai.org/api/colorizer",
    files={
        'image': open('自己本地图片的路径', 'rb'),
    },
    headers={'api-key': '........'}
)
output_url = r.json()["output_url"]
同时我们也需要将图片保存在本地,代码如下
def deoldify_action(self):
    r = requests.post(
        "https://api.deepai.org/api/colorizer",
        files={
            'image': open(imgNamepath, 'rb'),
        },
        headers={'api-key': 'fe26be2a-b66e-4cfc-8f4d-514f683e9812'}
    )
    output_url = r.json()["output_url"]
    ## 将图片保存在本地
    response = requests.get(output_url, stream=True)
    image_name = imgNamepath.split(".")[0]
    try:
        with open(image_name + '_oldified.png', 'wb') as logFile:
            for chunk in response:
                logFile.write(chunk)
            logFile.close()
            print("Download done!")
    except Exception as e:
        print("Download log error!")

    image_name = imgNamepath.split(".")[0]
    imgShow = QtGui.QPixmap(image_name + '_oldified' + ".png").scaled(self.ui.label_5.size(), aspectMode=Qt.KeepAspectRatio)
    ## 将变换过之后的照片显示在界面上
    self.ui.label_5.setFixedSize(imgShow.width(), imgShow.height())
    self.ui.label_5.setScaledContents(True)
    self.ui.label_5.setPixmap(imgShow)
    print(f"image saved: {image_name}")
最后出来的效果如下图所示
而当我们点击“素描风格”的单选框之后,便开始将上传的图片变成素描风格,代码如下
def startAction_sumiao(self):
    img = cv2.imread(imgNamepath)
    gray_image = cv2.cvtColor(img, cv2.COLOR_BGR2GRAY)
    inverted_gray_image = 255 - gray_image
    blurred_inverted_gray_image = cv2.GaussianBlur(inverted_gray_image, (19, 19), 0)
    image_name = imgNamepath.split(".")[0]
    inverted_blurred_image = 255 - blurred_inverted_gray_image
    sketck = cv2.divide(gray_image, inverted_blurred_image, scale=256.0)
    ## 图像保存在本地
    cv2.imwrite(image_name + '_sumiao.png', sketck)
    ## 将变换过之后的照片显示在界面上
    imgShow = QtGui.QPixmap(image_name + '_sumiao' + ".png").scaled(self.ui.label_5.size(), aspectMode=Qt.KeepAspectRatio)
    self.ui.label_5.setFixedSize(imgShow.width(), imgShow.height())
    self.ui.label_5.setScaledContents(True)
    self.ui.label_5.setPixmap(imgShow)
我们来看一下具体的效果,如下图所示

读到这里,这篇“如何利用Python实现多种风格的照片处理”文章已经介绍完毕,想要掌握这篇文章的知识点还需要大家自己动手实践使用过才能领会,如果想了解更多相关内容的文章,欢迎关注亿速云行业资讯频道。
免责声明:本站发布的内容(图片、视频和文字)以原创、转载和分享为主,文章观点不代表本网站立场,如果涉及侵权请联系站长邮箱:is@yisu.com进行举报,并提供相关证据,一经查实,将立刻删除涉嫌侵权内容。