您好,登录后才能下订单哦!
密码登录
登录注册
点击 登录注册 即表示同意《亿速云用户服务条款》
Android 的 RelaliveLayout 布局的参数定义:
android:layout_above="@id/xxx" --将控件置于给定ID控件之上
android:layout_below="@id/xxx" --将控件置于给定ID控件之下
android:layout_toLeftOf="@id/xxx" --将控件的右边缘和给定ID控件的左边缘对齐
android:layout_toRightOf="@id/xxx" --将控件的左边缘和给定ID控件的右边缘对齐
android:layout_alignLeft="@id/xxx" --将控件的左边缘和给定ID控件的左边缘对齐
android:layout_alignTop="@id/xxx" --将控件的上边缘和给定ID控件的上边缘对齐
android:layout_alignRight="@id/xxx" --将控件的右边缘和给定ID控件的右边缘对齐
android:layout_alignBottom="@id/xxx" --将控件的底边缘和给定ID控件的底边缘对齐
android:layout_alignParentLeft="true" --将控件的左边缘和父控件的左边缘对齐
android:layout_alignParentTop="true" --将控件的上边缘和父控件的上边缘对齐
android:layout_alignParentRight="true" --将控件的右边缘和父控件的右边缘对齐
android:layout_alignParentBottom="true" --将控件的底边缘和父控件的底边缘对齐
android:layout_centerInParent="true" --将控件置于父控件的中心位置
android:layout_centerHorizontal="true" --将控件置于水平方向的中心位置
android:layout_centerVertical="true" --将控件置于垂直方向的中心位置
编程实例:
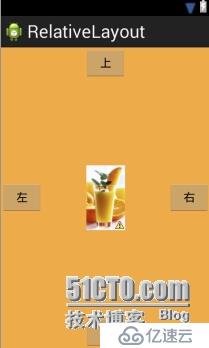
定义布局 activity_main.xml
<RelativeLayout xmlns:android="http://schemas.android.com/apk/res/android"
android:id="@+id/r1"
android:layout_width="fill_parent"
android:layout_height="fill_parent"
android:background="#edab4a" >
<Button
android:id="@+id/Shang"
android:layout_width="wrap_content"
android:layout_height="wrap_content"
android:layout_alignParentTop="true"
android:layout_centerHorizontal="true"
android:text="@string/shang" />
<Button
android:id="@+id/Xia"
android:layout_width="wrap_content"
android:layout_height="wrap_content"
android:layout_alignParentBottom="true"
android:layout_centerHorizontal="true"
android:text="@string/xia" />
<Button
android:id="@+id/Zuo"
android:layout_width="wrap_content"
android:layout_height="wrap_content"
android:layout_alignParentLeft="true"
android:layout_centerVertical="true"
android:text="@string/zuo" />
<Button
android:id="@+id/You"
android:layout_width="wrap_content"
android:layout_height="wrap_content"
android:layout_alignParentRight="true"
android:layout_centerVertical="true"
android:text="@string/you" />
<ImageButton
android:contentDescription="@string/wutu"
android:id="@+id/Start"
android:layout_width="60dip"
android:layout_height="100dip"
android:layout_centerInParent="true"
android:src="@drawable/fengjing" />
</RelativeLayout>
字符串资源 sring.xml
<?xml version="1.0" encoding="utf-8"?>
<resources>
<string name="app_name">RelativeLayout</string>
<string name="action_settings">Settings</string>
<string name="hello_world">Hello world!</string>
<string name="shang">上</string>
<string name="xia">下</string>
<string name="zuo">左</string>
<string name="you">右</string>
<string name="wutu">无图</string>
<string name="shuoming">图片说明</string>
</resources>
主活动 MainActivity.java
package com.malakana.relativelayout;
import android.os.Bundle;
import android.view.View;
import android.view.View.OnClickListener;
import android.view.ViewGroup;
import android.widget.Button;
import android.widget.EditText;
import android.widget.ImageView;
import android.widget.RelativeLayout;
import android.app.Activity;
public class MainActivity extends Activity {
RelativeLayout r1;
Button shang;
Button xia;
Button zuo;
Button you;
ImageView currButton;
ImageView start;
@Override
protected void onCreate(Bundle savedInstanceState) {
super.onCreate(savedInstanceState);
setContentView(R.layout.activity_main);
r1 = (RelativeLayout) findViewById(R.id.r1);
shang = (Button) findViewById(R.id.Shang);
xia = (Button) findViewById(R.id.Xia);
zuo = (Button) findViewById(R.id.Zuo);
you = (Button) findViewById(R.id.You);
start = (ImageView) findViewById(R.id.Start);
currButton = start;
shang.setOnClickListener(new OnClickListener() {
@Override
public void onClick(View arg0) {
// TODO Auto-generated method stub
EditText temp = new EditText(MainActivity.this);
temp.setText(R.string.shuoming);
//设置控件位置
RelativeLayout.LayoutParams lp_1 =
new RelativeLayout.LayoutParams(
ViewGroup.LayoutParams.WRAP_CONTENT,95);
lp_1.addRule(RelativeLayout.ABOVE,currButton.getId()); //ABOVE 在currButton之上
lp_1.addRule(RelativeLayout.CENTER_HORIZONTAL,currButton.getId());
//将控件添加到布局中
r1.addView(temp,lp_1);
}});
xia.setOnClickListener(new OnClickListener() {
@Override
public void onClick(View arg0) {
// TODO Auto-generated method stub
EditText temp = new EditText(MainActivity.this);
temp.setText(R.string.shuoming);
//设置控件位置
RelativeLayout.LayoutParams lp_1 =
new RelativeLayout.LayoutParams(
ViewGroup.LayoutParams.WRAP_CONTENT,95);
lp_1.addRule(RelativeLayout.BELOW,currButton.getId()); //BELOW 在currButton之下
lp_1.addRule(RelativeLayout.CENTER_HORIZONTAL,currButton.getId());
//将控件添加到布局中
r1.addView(temp,lp_1);
}});
zuo.setOnClickListener(new OnClickListener() {
@Override
public void onClick(View arg0) {
// TODO Auto-generated method stub
EditText temp = new EditText(MainActivity.this);
temp.setText(R.string.shuoming);
//设置控件位置
RelativeLayout.LayoutParams lp_1 =
new RelativeLayout.LayoutParams(
ViewGroup.LayoutParams.WRAP_CONTENT,95);
lp_1.addRule(RelativeLayout.LEFT_OF,currButton.getId()); //LEFT_OF 将控件的右边缘和currButton的左边缘对齐
lp_1.addRule(RelativeLayout.CENTER_VERTICAL,currButton.getId()); //将控件置于垂直方向的中心位置
//将控件添加到布局中
r1.addView(temp,lp_1);
}});
you.setOnClickListener(new OnClickListener() {
@Override
public void onClick(View arg0) {
// TODO Auto-generated method stub
EditText temp = new EditText(MainActivity.this);
temp.setText(R.string.shuoming);
//设置控件位置
RelativeLayout.LayoutParams lp_1 =
new RelativeLayout.LayoutParams(
ViewGroup.LayoutParams.WRAP_CONTENT,95);
lp_1.addRule(RelativeLayout.RIGHT_OF,currButton.getId()); //RIGHT_OF 将控件的左边缘和currButton的右边缘对齐
lp_1.addRule(RelativeLayout.CENTER_VERTICAL,currButton.getId()); //将控件置于垂直方向的中心位置
//将控件添加到布局中
r1.addView(temp,lp_1);
}});
}
}
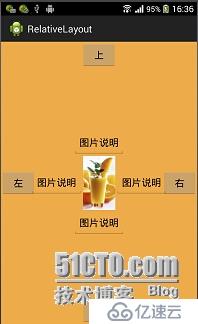
效果图:
免责声明:本站发布的内容(图片、视频和文字)以原创、转载和分享为主,文章观点不代表本网站立场,如果涉及侵权请联系站长邮箱:is@yisu.com进行举报,并提供相关证据,一经查实,将立刻删除涉嫌侵权内容。