您好,登录后才能下订单哦!
密码登录
登录注册
点击 登录注册 即表示同意《亿速云用户服务条款》
SpringBoot是由Pivotal团队在2013年开始研发、2014年4月发布第一个版本的全新开源的轻量级框架。它基于Spring4.0设计,不仅继承了Spring框架原有的优秀特性,而且还通过简化配置来进一步简化了Spring应用的整个搭建和开发过程。另外SpringBoot通过集成大量的框架使得依赖包的版本冲突,以及引用的不稳定性等问题得到了很好的解决。
WebSocket协议是基于TCP的一种新的网络协议。它实现了浏览器与服务器全双工(full-duplex)通信——允许服务器主动发送信息给客户端。
WebSocket通信协议于2011年被IETF定为标准RFC 6455,并被RFC7936所补充规范。
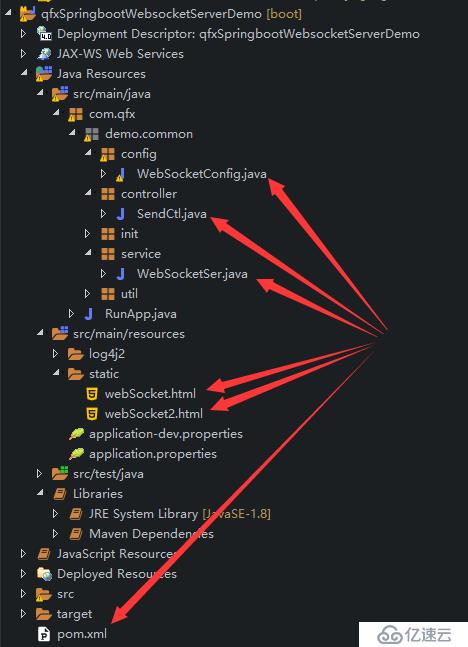
项目基本配置参考SpringBoot入门一,使用myEclipse新建一个SpringBoot项目,使用myEclipse新建一个SpringBoot项目即可。此示例springboot的版本已经升级到2.2.1.RELEASE,具体步骤如下:
<!-- 4. 引入websocket支持 -->
<dependency>
        <groupId>org.springframework.boot</groupId>
        <artifactId>spring-boot-starter-websocket</artifactId>
</dependency>
完整pom.xml
<?xml version="1.0" encoding="UTF-8"?>
<project xmlns="http://maven.apache.org/POM/4.0.0"
    xmlns:xsi="http://www.w3.org/2001/XMLSchema-instance"
    xsi:schemaLocation="http://maven.apache.org/POM/4.0.0 http://maven.apache.org/xsd/maven-4.0.0.xsd">

    <!-- 项目基本信息 -->
    <modelVersion>4.0.0</modelVersion>
    <groupId>com.qfx</groupId>
    <artifactId>qfxSpringbootWebsocketServerDemo</artifactId>
    <version>1.0</version>
    <packaging>war</packaging>
    <name>qfxSpringbootWebsocketServerDemo</name>
    <description>Springboot和Websock整合的示例</description>

    <!-- 设置父类,整合第三方常用框架依赖信息(各种依赖信息),这里继承SpringBoot提供的父工程 -->
    <parent>
        <groupId>org.springframework.boot</groupId>
        <artifactId>spring-boot-starter-parent</artifactId>
        <version>2.2.1.RELEASE</version>
        <relativePath /> <!-- lookup parent from repository -->
    </parent>

    <!-- 设置公共参数 -->
    <properties>
        <project.build.sourceEncoding>UTF-8</project.build.sourceEncoding>
        <project.reporting.outputEncoding>UTF-8</project.reporting.outputEncoding>
        <java.version>1.8</java.version>
        <!-- Maven install 时,测试环境@Test中如果有中文输出是乱码,加上这句话试试 -->
        <argLine>-Dfile.encoding=UTF-8</argLine>
    </properties>

    <dependencies>
        <!-- 1.开启springboot核心包,整合SpringMVC Web组件 -->
        <!-- 实现原理:Maven依赖继承关系,相当于把第三方常用Maven依赖信息,在parent项目中已经封装好了 -->
        <dependency>
            <groupId>org.springframework.boot</groupId>
            <artifactId>spring-boot-starter-web</artifactId>
            <exclusions><!-- 去掉默认日志配置 -->
                <exclusion>
                    <groupId>org.springframework.boot</groupId>
                    <artifactId>spring-boot-starter-logging</artifactId>
                </exclusion>
            </exclusions>
        </dependency>

        <!-- 2.引入log4j2支持 -->
        <dependency>
            <groupId>org.springframework.boot</groupId>
            <artifactId>spring-boot-starter-log4j2</artifactId>
        </dependency>

        <!-- 3.打war包时加入此项, 告诉spring-boot tomcat相关jar包用外部的,不要打进去 -->
        <dependency>
            <groupId>org.springframework.boot</groupId>
            <artifactId>spring-boot-starter-tomcat</artifactId>
            <scope>provided</scope>
        </dependency>

        <!-- 4. 引入websocket支持 -->
        <dependency>
            <groupId>org.springframework.boot</groupId>
            <artifactId>spring-boot-starter-websocket</artifactId>
        </dependency>
    </dependencies>

    <build>
        <!-- 指定war包名称,以此处为准,否则会带上版本号 -->
        <finalName>qfxSpringbootWebsocketServerDemo</finalName>
        <pluginManagement>
            <plugins>
                <plugin>
                    <groupId>org.springframework.boot</groupId>
                    <artifactId>spring-boot-maven-plugin</artifactId>
                    <dependencies>
                        <!-- spring热部署 -->
                        <dependency>
                            <groupId>org.springframework</groupId>
                            <artifactId>springloaded</artifactId>
                            <version>1.2.8.RELEASE</version>
                        </dependency>
                    </dependencies>
                </plugin>
            </plugins>
        </pluginManagement>
    </build>
</project>如果使用外部Tomcat部署的话,则不需要此配置,否则启动会报异常
import org.springframework.context.annotation.Bean;
import org.springframework.context.annotation.Configuration;
import org.springframework.web.socket.server.standard.ServerEndpointExporter;

/**
 * <h6>描述:如果使用外部Tomcat部署的话,则不需要此配置</h6>
 *
 */
@Configuration
public class WebSocketConfig {
    @Bean
    public ServerEndpointExporter serverEndpointExporter() {
        return new ServerEndpointExporter();
    }
}import org.slf4j.Logger;
import org.slf4j.LoggerFactory;
import org.springframework.stereotype.Component;
import javax.websocket.*;
import javax.websocket.server.PathParam;
import javax.websocket.server.ServerEndpoint;
import java.io.IOException;
import java.util.concurrent.CopyOnWriteArraySet;
/**
* <h6>描述:WebSocket服务端</h6>
* WebSocket是类似客户端服务端的形式(采用ws协议),
* 所以 WebSocketServer其实就相当于一个ws协议的 Controller,
* 可以在里面实现 @OnOpen、@onClose、@onMessage等方法
*/
@ServerEndpoint("/websocket/{cid}")
@Component
public class WebSocketSer {
private static final Logger LOG = LoggerFactory.getLogger(WebSocketSer.class);
// 静态变量,用来记录当前在线连接数。应该把它设计成线程安全的。
private static int onlineCount = 0;
// concurrent包的线程安全Set,用来存放每个客户端对应的MyWebSocket对象。
private static CopyOnWriteArraySet<WebSocketSer> webSocketSet = new CopyOnWriteArraySet<WebSocketSer>();
//与某个客户端的连接会话,需要通过它来给客户端发送数据
private Session session;
// 接收cid
private String cid = "";
/**
* 连接建立成功调用的方法
*/
@OnOpen
public void onOpen(Session session, @PathParam("cid") String cid) {
this.session = session;
webSocketSet.add(this); // 加入set中
addOnlineCount(); // 在线数加1
LOG.info("客户端: " + cid + " 连接成功, 当前在线人数为:" + getOnlineCount());
this.cid = cid;
try {
sendMessage("连接成功");
} catch (IOException e) {
LOG.error("发送消息异常:", e);
}
}
/**
* 连接关闭调用的方法
*/
@OnClose
public void onClose() {
webSocketSet.remove(this); // 从set中删除
subOnlineCount(); // 在线数减1
LOG.info("有一个连接关闭,当前在线人数为:" + getOnlineCount());
}
/**
* 收到客户端消息后调用的方法
*
* @param message 客户端发送过来的消息
*/
@OnMessage
public void onMessage(String message, Session session) {
LOG.info("收到来自客户端 " + cid + " 的信息: " + message);
// 群发消息
for (WebSocketSer item : webSocketSet) {
try {
item.sendMessage(message);
} catch (IOException e) {
e.printStackTrace();
}
}
}
/**
* @param session
* @param error
*/
@OnError
public void onError(Session session, Throwable error) {
LOG.error("发生错误");
error.printStackTrace();
}
/**
* 实现服务器主动推送
*/
public void sendMessage(String message) throws IOException {
this.session.getBasicRemote().sendText(message);
}
/**
* 群发自定义消息
*/
public static void sendInfo(String message, @PathParam("cid") String cid) {
LOG.info("推送消息到客户端:" + cid + ",内容: " + message);
for (WebSocketSer item : webSocketSet) {
try {
// 这里可以设定只推送给这个cid的,为null则全部推送
if (cid == null) {
item.sendMessage(message);
} else if (item.cid.equals(cid)) {
item.sendMessage(message);
}
} catch (IOException e) {
continue;
}
}
}
public static synchronized int getOnlineCount() {
return onlineCount;
}
public static synchronized void addOnlineCount() {
WebSocketSer.onlineCount++;
}
public static synchronized void subOnlineCount() {
WebSocketSer.onlineCount--;
}
}webSocket.html 与 webSocket2.html 中的cid 分别是cid_0001 和 cid_0002,只要指定为不一样的即可
<!DOCTYPE HTML>
<html>
<head>
    <meta charset="UTF-8">
    <title>My WebSocket test page</title>
</head>

<body>
    Welcome<br/>
    <input id="text" type="text"/>
    <button onclick="send()">Send</button>
    <button onclick="closeWebSocket()">Close</button>
    <div id="message"></div>
</body>

<script type="text/javascript">
    var websocket = null;

    //判断当前浏览器是否支持WebSocket
    if ('WebSocket' in window) {
        // 端口默认为当前tomcat的端口,根据自己实际情况改变即可,"cid_0001"就是后端接收的参数cid
        // webSocket.html 配置
        websocket = new WebSocket("ws://localhost:80/qfxSpringbootWebsocketServerDemo/websocket/cid_0001");
        // webSocket2.html 配置
        // websocket = new WebSocket("ws://localhost:80/qfxSpringbootWebsocketServerDemo/websocket/cid_0002");
    } else {
        alert('Not support websocket')
    }

    //连接发生错误的回调方法
    websocket.onerror = function () {
        setMessageInnerHTML("error");
    };

    //连接成功建立的回调方法
    websocket.onopen = function (event) {
        setMessageInnerHTML(event.data);
    }

    //接收到消息的回调方法
    websocket.onmessage = function (event) {
        setMessageInnerHTML(event.data);
    }

    //连接关闭的回调方法
    websocket.onclose = function () {
        setMessageInnerHTML("close");
    }

    //监听窗口关闭事件,当窗口关闭时,主动去关闭websocket连接,防止连接还没断开就关闭窗口,server端会抛异常。
    window.onbeforeunload = function () {
        websocket.close();
    }

    //将消息显示在网页上
    function setMessageInnerHTML(innerHTML) {
        if (undefined != innerHTML) {
            document.getElementById('message').innerHTML += innerHTML + '<br/>';
        }
    }

    //关闭连接
    function closeWebSocket() {
        websocket.close();
    }

    //发送消息
    function send() {
        var message = document.getElementById('text').value;
        websocket.send(message);
    }
</script>
</html>import org.springframework.web.bind.annotation.RequestMapping;
import org.springframework.web.bind.annotation.RestController;
import com.qfx.demo.common.service.WebSocketSer;
/**
* <h6>描述:测试发送消息</h6>
*
*/
@RestController
@RequestMapping("message")
public class SendCtl {
/**
* <h6>功能:发送信息给正在连接websocket的所有用户</h6>
*
* @param msg 消息内容
* @return
*/
@RequestMapping("sendAllInfo")
public String sendAllInfo(String msg) {
WebSocketSer.sendInfo(msg, null);
return "success";
}
/**
* <h6>功能:发送信息给正在连接websocket的指定所有用户</h6>
*
* @param msg 消息内容
* @param cid 用户id
* @return
*/
@RequestMapping("sendInfo")
public String sendInfo(String msg, String cid) {
WebSocketSer.sendInfo(msg, cid);
return "success";
}
}
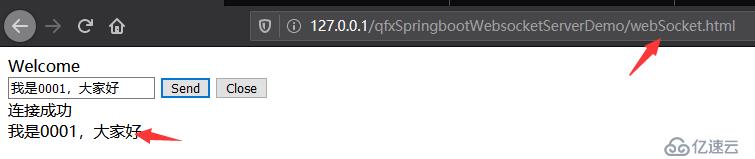
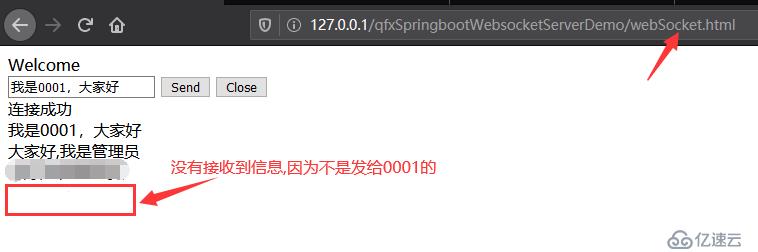
http://127.0.0.1/qfxSpringbootWebsocketServerDemo/webSocket.html
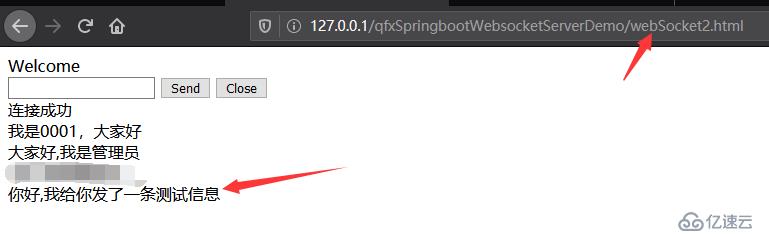
http://127.0.0.1/qfxSpringbootWebsocketServerDemo/webSocket2.htmlwebSocket.html发送信息,两个页面都能够接收到,因为WebSocketSer.java的onMessage方法里面会进行群发
webSocket.html(cid_0001)发送信息
webSocket2.html(cid_0002)不做操作,也接收到了cid_0001发送的信息

后台输出


后台输出

两个Html页面都接收到信息
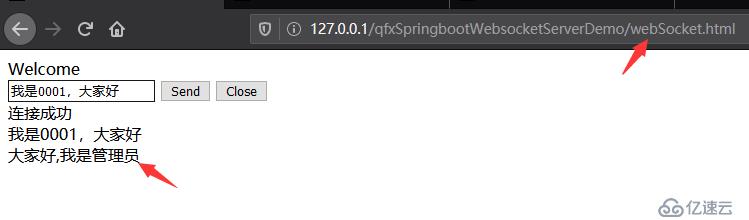

发送指定信息给cid_0002

后台输出

webSocket2.html(cid_0002)接收到信息
webSocket.html(cid_0001)没有接收到信息,因为不是发给他的
免责声明:本站发布的内容(图片、视频和文字)以原创、转载和分享为主,文章观点不代表本网站立场,如果涉及侵权请联系站长邮箱:is@yisu.com进行举报,并提供相关证据,一经查实,将立刻删除涉嫌侵权内容。