жӮЁеҘҪпјҢзҷ»еҪ•еҗҺжүҚиғҪдёӢи®ўеҚ•е“ҰпјҒ
еҜҶз Ғзҷ»еҪ•
зҷ»еҪ•жіЁеҶҢ
зӮ№еҮ» зҷ»еҪ•жіЁеҶҢ еҚіиЎЁзӨәеҗҢж„ҸгҖҠдәҝйҖҹдә‘з”ЁжҲ·жңҚеҠЎжқЎж¬ҫгҖӢ
жң¬зҜҮж–Үз« з»ҷеӨ§е®¶еҲҶдә«зҡ„жҳҜжңүе…іжҖҺд№ҲеңЁAndroidдёӯдҪҝз”ЁPaintиҝӣиЎҢз»ҳеӣҫпјҢе°Ҹзј–и§үеҫ—жҢәе®һз”Ёзҡ„пјҢеӣ жӯӨеҲҶдә«з»ҷеӨ§е®¶еӯҰд№ пјҢеёҢжңӣеӨ§е®¶йҳ…иҜ»е®ҢиҝҷзҜҮж–Үз« еҗҺеҸҜд»ҘжңүжүҖ收иҺ·пјҢиҜқдёҚеӨҡиҜҙпјҢи·ҹзқҖе°Ҹзј–дёҖиө·жқҘзңӢзңӢеҗ§гҖӮ
Paintзҡ„дҪҝз”Ё
дҪҝз”ЁPaintд№ӢеүҚйңҖиҰҒеҲқе§ӢеҢ–
mPaint = new Paint();
и®ҫзҪ®з¬”пјҲPaintпјүзҡ„йўңиүІе’ҢalphaеҖјпјҡ
mPaint.setColor(Color.BLUE);
mPaint.setAlpha(255);
жіЁж„Ҹпјҡalphaзҡ„иҢғеӣҙжҳҜ[0..255]пјҢиҖҢдёҚжҳҜ[0..1]пјҢжҳҜдёҖдёӘintеҖјгҖӮ
и®ҫзҪ®з”»з¬”зҡ„ж ·ејҸпјҡйҖҡиҝҮmPaint.setStyle()жқҘи®ҫзҪ®ж ·ејҸгҖӮ
 public enum Style {
 /**
  * Geometry and text drawn with this style will be filled, ignoring all
  * stroke-related settings in the paint.
  */
 FILL  (0),
 /**
  * Geometry and text drawn with this style will be stroked, respecting
  * the stroke-related fields on the paint.
  */
 STROKE  (1),
 /**
  * Geometry and text drawn with this style will be both filled and
  * stroked at the same time, respecting the stroke-related fields on
  * the paint. This mode can give unexpected results if the geometry
  * is oriented counter-clockwise. This restriction does not apply to
  * either FILL or STROKE.
  */
 FILL_AND_STROKE (2);

 Style(int nativeInt) {
  this.nativeInt = nativeInt;
 }
 final int nativeInt;
}жҖ»е…ұжңүдёүз§Қ画笔зҡ„ж ·ејҸ
FILLпјҡеЎ«е……еҶ…е®№пјӣ
STROKEпјҡжҸҸиҫ№пјӣ
FILL_AND_STROKEпјҡеЎ«е……еҶ…容并жҸҸиҫ№гҖӮ
и®ҫзҪ®з”»з¬”зҡ„е®ҪеәҰ
mPaint.setStrokeWidth(50);
и®ҫзҪ®з”»з¬”зҡ„зәҝеёҪ
йҖҡиҝҮmPaint.setStrokeCapжқҘи®ҫзҪ®зәҝеёҪпјҢжҖ»е…ұжңүдёүз§ҚзәҝеёҪ
 /**
 * The Cap specifies the treatment for the beginning and ending of
 * stroked lines and paths. The default is BUTT.
 */
 public enum Cap {
 /**
  * The stroke ends with the path, and does not project beyond it.
  */
 BUTT (0),
 /**
  * The stroke projects out as a semicircle, with the center at the
  * end of the path.
  */
 ROUND (1),
 /**
  * The stroke projects out as a square, with the center at the end
  * of the path.
  */
 SQUARE (2);

 private Cap(int nativeInt) {
  this.nativeInt = nativeInt;
 }
 final int nativeInt;
}BUTTпјҡжІЎжңүзәҝеёҪпјҢй»ҳи®ӨжЁЎејҸ
ROUNDпјҡеңҶеҪў
SQUAREпјҡж–№еҪў
дёүз§ҚзәҝеёҪеҜ№жҜ”пјҡ
@Override
protected void onDraw(Canvas canvas) {
super.onDraw(canvas);
mPaint.setColor(Color.BLUE);
mPaint.setAlpha(255);
//и®ҫзҪ®з”»з¬”зҡ„ж ·ејҸ
mPaint.setStyle(Paint.Style.FILL_AND_STROKE);
//画笔зҡ„е®ҪеәҰ
mPaint.setStrokeWidth(50);
mPaint.setStrokeCap(Paint.Cap.SQUARE);//ж–№еҪў
mPaint.setStrokeJoin(Paint.Join.BEVEL);//зӣҙзәҝ
Path path = new Path();
path.moveTo(100, 100);
path.lineTo(300, 100);
canvas.drawPath(path, mPaint);
mPaint.reset();//йҮҚзҪ®
mPaint.setColor(Color.RED);
mPaint.setStyle(Paint.Style.FILL_AND_STROKE);
mPaint.setStrokeWidth(50);
mPaint.setStrokeCap(Paint.Cap.ROUND);//еңҶеҪў
mPaint.setStrokeJoin(Paint.Join.BEVEL);//зӣҙзәҝ
Path path2 = new Path();
path2.moveTo(100, 200);
path2.lineTo(300, 200);
canvas.drawPath(path2, mPaint);
mPaint.reset();//йҮҚзҪ®
mPaint.setColor(Color.GREEN);
mPaint.setStyle(Paint.Style.FILL_AND_STROKE);
mPaint.setStrokeWidth(50);
mPaint.setStrokeCap(Paint.Cap.BUTT);//жІЎжңү
mPaint.setStrokeJoin(Paint.Join.BEVEL);//зӣҙзәҝ
Path path3 = new Path();
path3.moveTo(100, 300);
path3.lineTo(300, 300);
canvas.drawPath(path3, mPaint);
}дёҠйқўд»Јз ҒдёӯжңүдёӘйҮҚзҪ®з”»з¬”пјҢиҝҷж—¶еҖҷйңҖиҰҒйҮҚж–°и®ҫзҪ®з”»з¬”гҖӮ
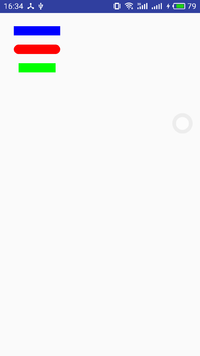
зәҝеёҪеҜ№жҜ”
и®ҫзҪ®Join
дҪҝз”ЁsetStrokeJoinж–№жі•жқҘи®ҫзҪ®JoinпјҢJoinжңүдёүз§Қзұ»еһӢпјҡ
BEVELпјҡзӣҙзәҝ
ROUNDпјҡеңҶи§’
MITERпјҡй”җи§’
@Override
protected void onDraw(Canvas canvas) {
super.onDraw(canvas);
mPaint.setColor(Color.BLUE);
mPaint.setAlpha(255);
mPaint.setStyle(Paint.Style.STROKE);//и®ҫзҪ®з”»з¬”зҡ„ж ·ејҸ
mPaint.setStrokeWidth(50);//画笔зҡ„е®ҪеәҰ
mPaint.setStrokeCap(Paint.Cap.BUTT);//зәҝеёҪ
mPaint.setStrokeJoin(Paint.Join.BEVEL);
Path path = new Path();
path.moveTo(100, 100);
path.lineTo(300, 100);
path.lineTo(100, 300);
path.close();
canvas.drawPath(path, mPaint);
mPaint.reset();//йҮҚзҪ®
mPaint.setColor(Color.RED);
mPaint.setStyle(Paint.Style.FILL_AND_STROKE);
mPaint.setStrokeWidth(50);
mPaint.setStrokeCap(Paint.Cap.BUTT);//еңҶеҪў
mPaint.setStrokeJoin(Paint.Join.ROUND);//еңҶеј§
Path path2 = new Path();
path2.moveTo(100, 400);
path2.lineTo(300, 400);
path2.lineTo(100, 700);
path2.close();
canvas.drawPath(path2, mPaint);
mPaint.reset();//йҮҚзҪ®
mPaint.setColor(Color.GREEN);
mPaint.setStyle(Paint.Style.FILL_AND_STROKE);
mPaint.setStrokeWidth(50);
mPaint.setStrokeCap(Paint.Cap.BUTT);//жІЎжңү
mPaint.setStrokeJoin(Paint.Join.MITER);//й”җи§’
Path path3 = new Path();
path3.moveTo(100, 800);
path3.lineTo(300, 800);
path3.lineTo(100, 1100);
path3.close();
canvas.drawPath(path3, mPaint);
}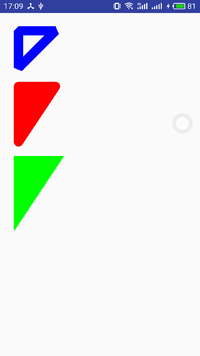
JoinеҜ№жҜ”
д»ҘдёҠе°ұжҳҜJoinдёүз§Қзұ»еһӢеҜ№жҜ”гҖӮ
и®ҫзҪ®йҳІй”ҜйҪҝ
mPaint.setAntiAlias(true);
еҰӮжһңи®ҫзҪ®йҳІй”ҜйҪҝпјҢдјҡжҚҹеӨұдёҖе®ҡзҡ„жҖ§иғҪ
жҠ–еҠЁеӨ„зҗҶ
дҪҝз”ЁmPaint.setDither()ж–№жі•пјҢи®ҫзҪ®жҳҜеҗҰдҪҝз”ЁеӣҫеғҸжҠ–еҠЁеӨ„зҗҶгҖӮдјҡдҪҝз»ҳеҲ¶зҡ„еӣҫзүҮзӯүйўңиүІжӣҙеҠ зҡ„жё…жҷ°д»ҘеҸҠйҘұж»ЎпјҢд№ҹжҳҜжҚҹеӨұжҖ§иғҪгҖӮ
дҪҝз”ЁPathз»ҳеҲ¶еӣҫеҪў
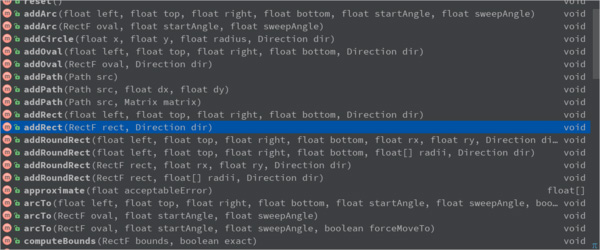
Pathз»ҳеҲ¶еӣҫеҪў
зӮ№з»„жҲҗзәҝпјҢзәҝз»„жҲҗйқўпјҢиҝҷж ·PathеҸҜд»Ҙз»ҳеҲ¶еҗ„з§Қеҗ„ж ·зҡ„еӣҫеҪўпјҢеҸҜд»ҘиҜҙжҳҜж— жүҖдёҚиғҪзҡ„дәҶпјҢдҪҶжҳҜPathд№ҹжҸҗдҫӣдәҶеҫҲеӨҡж–№жі•пјҢжқҘз»ҳеҲ¶еӣҫеҪўгҖӮ
ж–Үжң¬з»ҳеҲ¶
дёҠж–ҮдёӯпјҢд»Ӣз»ҚдәҶPaint画笔пјҢе’Ңз»ҳеҲ¶дәҶдёҖдәӣеӣҫеҪўгҖӮдҪҶжҳҜд»Ӣз»ҚPaintзҡ„ж—¶еҖҷпјҢжҲ‘们зҹҘйҒ“е®ғеҸҜд»Ҙз»ҳеҲ¶еӣҫеҪўпјҢж–Үжң¬е’ҢbitmapпјҢжүҖд»ҘPaintжҳҜйқһеёёејәеӨ§зҡ„дәҶпјҢжҲ‘们зңӢдёӢPaintжҳҜеҰӮдҪ•з»ҳеҲ¶ж–Үжң¬зҡ„гҖӮ
и®ҫзҪ®еӯ—з¬Ұд№Ӣй—ҙзҡ„й—ҙи·қ
setLetterSpacing
и®ҫзҪ®ж–Үжң¬еҲ йҷӨзәҝ
mPaint.setStrikeThruText(true);
жҳҜеҗҰи®ҫзҪ®дёӢеҲ’зәҝ
mPaint.setUnderlineText(true);
и®ҫзҪ®ж–Үжң¬еӨ§е°Ҹ
mPaint.setTextSize(textSize);
и®ҫзҪ®еӯ—дҪ“зұ»еһӢ
mPaint.setTypeface(Typeface.BOLD); // Style public static final int NORMAL = 0;//常规 public static final int BOLD = 1;//зІ—дҪ“ public static final int ITALIC = 2; //ж–ңдҪ“ public static final int BOLD_ITALIC = 3;//зІ—ж–ңдҪ“
еӯ—дҪ“зұ»еһӢжңүд»ҘдёҠеӣӣз§Қзұ»еһӢеҸҜд»Ҙи®ҫзҪ®гҖӮ
еҠ иҪҪиҮӘе®ҡд№үеӯ—дҪ“
Typeface.create(familyName, style)
ж–Үеӯ—еҖҫж–ң
mPaint.setTextSkewX(-0.25f);
ж–Үеӯ—еҖҫж–ңй»ҳи®Өдёә0пјҢе®ҳж–№жҺЁиҚҗзҡ„-0.25fжҳҜж–ңдҪ“
ж–Үжң¬еҜ№йҪҗж–№ејҸ
mPaint.setTextAlign(Align.LEFT)
жңүдёүз§Қпјҡ
public enum Align {
/**
* The text is drawn to the right of the x,y origin
*/
LEFT (0),//е·ҰеҜ№йҪҗ
/**
* The text is drawn centered horizontally on the x,y origin
*/
CENTER (1),//еұ…дёӯ
/**
* The text is drawn to the left of the x,y origin
*/
RIGHT (2);//еҸіеҜ№йҪҗ
private Align(int nativeInt) {
this.nativeInt = nativeInt;
}
final int nativeInt;
}и®Ўз®—еҲ¶е®ҡй•ҝеәҰзҡ„еӯ—з¬ҰдёІ
int breadText = mPaint.breakText(text, measureForwards, maxWidth, measuredWidth)
жіЁж„Ҹпјҡеӯ—з¬Ұй•ҝеәҰгҖҒеӯ—з¬ҰдёӘж•°гҖҒжҳҫзӨәзҡ„ж—¶еҖҷжҳҜзңҹе®һзҡ„й•ҝеәҰ
Rect boundsиҺ·еҸ–ж–Үжң¬зҡ„зҹ©еҪўеҢәеҹҹпјҲе®Ҫй«ҳпјү mPaint.getTextBounds(text, index, count, bounds) mPaint.getTextBounds(text, start, end, bounds) //иҺ·еҸ–ж–Үжң¬зҡ„е®ҪеәҰпјҢе’ҢдёҠйқўзұ»дјјпјҢдҪҶжҳҜжҳҜдёҖдёӘжҜ”иҫғзІ—з•Ҙзҡ„з»“жһң float measureText = mPaint.measureText(str); //иҺ·еҸ–ж–Үжң¬зҡ„е®ҪеәҰпјҢе’ҢдёҠйқўзұ»дјјпјҢдҪҶжҳҜжҳҜжҜ”иҫғзІҫеҮҶзҡ„гҖӮ float[] measuredWidth = new float[10]; //measuredWidthеҫ—еҲ°жҜҸдёҖдёӘеӯ—з¬Ұзҡ„е®ҪеәҰпјӣtextWidthsеӯ—з¬Ұж•° int textWidths = mPaint.getTextWidths(str, measuredWidth); mPaint.getTextWidths(text, start, end, widths)
дҪҝз”ЁdrawTextз»ҳеҲ¶ж–Үжң¬
public class PaintView extends View {
private Paint mPaint;
private String text = "дҪ жҳҜжҲ‘дё–з•Ңд№Ӣе…үпјҢжҲ‘еҝғеҸҰдёҖеҚҠ";
public PaintView(Context context) {
this(context,null);
}
public PaintView(Context context, @Nullable AttributeSet attrs) {
this(context, attrs,0);
}
public PaintView(Context context, @Nullable AttributeSet attrs, int defStyleAttr) {
super(context, attrs, defStyleAttr);
init(context, attrs, defStyleAttr);
}
private void init(Context context, AttributeSet attrs, int defStyleAttr) {
mPaint = new Paint();
}
@Override
protected void onDraw(Canvas canvas) {
super.onDraw(canvas);
mPaint.setColor(Color.BLUE);
mPaint.setStyle(Paint.Style.STROKE);//и®ҫзҪ®з”»з¬”зҡ„ж ·ејҸ
mPaint.setStrokeCap(Paint.Cap.BUTT);//зәҝеёҪ
mPaint.setStrokeJoin(Paint.Join.BEVEL);
int top = 100;
int baselineX = 0;
mPaint.setTextSize(50);
mPaint.setTextAlign(Paint.Align.LEFT);
canvas.drawLine(0, top, 2000, top, mPaint);
//ж–Үжң¬Metrics
Paint.FontMetrics fontMetrics = mPaint.getFontMetrics();
float baselineY = top - fontMetrics.top;
canvas.drawText(text, baselineX, baselineY, mPaint);
}
}
з»ҳеҲ¶ж–Үжң¬
з»ҳеҲ¶ж–Үжң¬ж—¶пјҢиҝҳжңүдёҖдёӘеҫҲйҮҚиҰҒзҡ„зҹҘиҜҶзӮ№е°ұжҳҜеҹәзәҝзҡ„зЎ®е®ҡ
DrawText еҹәзәҝзҡ„зЎ®е®ҡ
еңЁиҮӘе®ҡд№үжҺ§д»¶зҡ„ж—¶еҖҷпјҢжңүж—¶еҖҷдјҡз”ЁеҲ°DrawText ж–№жі•.
е…ҲжҠҠиҮӘе®ҡд№үTextViewзҡ„иҙҙеҮәжқҘ
@Override
protected void onDraw(Canvas canvas) {
super.onDraw(canvas);
int x = getPaddingLeft();
//dy д»ЈиЎЁзҡ„жҳҜпјҡй«ҳеәҰзҡ„дёҖеҚҠеҲ° baseLineзҡ„и·қзҰ»
Paint.FontMetricsInt fontMetrics = paint.getFontMetricsInt();
// top жҳҜдёҖдёӘиҙҹеҖј bottom жҳҜдёҖдёӘжӯЈеҖј topпјҢbttomзҡ„еҖјд»ЈиЎЁжҳҜ bottomжҳҜbaseLineеҲ°ж–Үеӯ—еә•йғЁзҡ„и·қзҰ»пјҲжӯЈеҖјпјү
// еҝ…йЎ»иҰҒжё…жҘҡзҡ„пјҢеҸҜд»ҘиҮӘе·ұжү“еҚ°е°ұеҘҪ
int dy = (fontMetrics.bottom - fontMetrics.top)/2 - fontMetrics.bottom;
int baseLine = getHeight()/2 + dy;
canvas.drawText(costom_text,x,baseLine,paint);
}/**
* Draw the text, with origin at (x,y), using the specified paint. The
* origin is interpreted based on the Align setting in the paint.
*
* @param text The text to be drawn
* @param x The x-coordinate of the origin of the text being drawn
* @param y The y-coordinate of the baseline of the text being drawn
* @param paint The paint used for the text (e.g. color, size, style)
*/
public void drawText(@NonNull String text, float x, float y, @NonNull Paint paint) {
native_drawText(mNativeCanvasWrapper, text, 0, text.length(), x, y, paint.mBidiFlags,
paint.getNativeInstance(), paint.mNativeTypeface);
}xпјҢy еҲҶеҲ«иЎЁзӨә еҹәзәҝзҡ„ејҖе§Ӣеқҗж ҮпјҢ并дёҚжҳҜ ж–Үеӯ—е·ҰдёҠи§’зҡ„еқҗж ҮпјҢеӣ дёәж–Үеӯ—зҡ„з»ҳеҲ¶жҳҜд»ҘеҹәзәҝдёәеҹәзЎҖзҡ„

еӣҫдёӯзҡ„ дә”и§’жҳҹ жүҖеңЁзҡ„зәҝ е°ұжҳҜеҹәзәҝ BaseLine,йӮЈд№ҲеҰӮдҪ•зЎ®е®ҡеҹәзәҝзҡ„x,yеқҗж Үе‘ў?
йҰ–еҶҷжҲ‘们е…ҲзЎ®е®ҡдёҖдёӢxеқҗж Ү пјҡint x = getPaddingLeft(); д№ҹе°ұжҳҜж–Үеӯ—и·қе·Ұиҫ№зҡ„и·қзҰ»
yеқҗж Үпјҡ
1гҖҒжҲ‘们е…Ҳи®Ўз®—дёҖдёӢж–Үеӯ—й«ҳеәҰзҡ„дёҖеҚҠеҲ° baseLineзҡ„и·қзҰ»гҖӮ
int dy = (fontMetrics.bottom - fontMetrics.top)/2 - fontMetrics.bottom;
2гҖҒд№ӢеҗҺжҲ‘们еҶҚдҪҝз”ЁжҺ§д»¶й«ҳеәҰзҡ„дёҖиҲ¬пјҢеҠ дёҠж–Үеӯ—й«ҳеәҰзҡ„дёҖеҚҠеҲ° baseLineзҡ„и·қзҰ»пјҢе°ұжҳҜеҹәзәҝзҡ„yеқҗж Ү
int baseLine = getHeight()/2 + dy;
д»ҘдёҠе°ұжҳҜжҖҺд№ҲеңЁAndroidдёӯдҪҝз”ЁPaintиҝӣиЎҢз»ҳеӣҫпјҢе°Ҹзј–зӣёдҝЎжңүйғЁеҲҶзҹҘиҜҶзӮ№еҸҜиғҪжҳҜжҲ‘们ж—Ҙеёёе·ҘдҪңдјҡи§ҒеҲ°жҲ–з”ЁеҲ°зҡ„гҖӮеёҢжңӣдҪ иғҪйҖҡиҝҮиҝҷзҜҮж–Үз« еӯҰеҲ°жӣҙеӨҡзҹҘиҜҶгҖӮжӣҙеӨҡиҜҰжғ…敬иҜ·е…іжіЁдәҝйҖҹдә‘иЎҢдёҡиө„и®Ҝйў‘йҒ“гҖӮ
е…ҚиҙЈеЈ°жҳҺпјҡжң¬з«ҷеҸ‘еёғзҡ„еҶ…е®№пјҲеӣҫзүҮгҖҒи§Ҷйў‘е’Ңж–Үеӯ—пјүд»ҘеҺҹеҲӣгҖҒиҪ¬иҪҪе’ҢеҲҶдә«дёәдё»пјҢж–Үз« и§ӮзӮ№дёҚд»ЈиЎЁжң¬зҪ‘з«ҷз«ӢеңәпјҢеҰӮжһңж¶үеҸҠдҫөжқғиҜ·иҒ”зі»з«ҷй•ҝйӮ®з®ұпјҡis@yisu.comиҝӣиЎҢдёҫжҠҘпјҢ并жҸҗдҫӣзӣёе…іиҜҒжҚ®пјҢдёҖз»ҸжҹҘе®һпјҢе°Ҷз«ӢеҲ»еҲ йҷӨж¶үе«ҢдҫөжқғеҶ…е®№гҖӮ
жӮЁеҘҪпјҢзҷ»еҪ•еҗҺжүҚиғҪдёӢи®ўеҚ•е“ҰпјҒ