您好,登录后才能下订单哦!
密码登录
登录注册
点击 登录注册 即表示同意《亿速云用户服务条款》
这篇文章主要讲解了“JavaScript如何实现无缝轮播图”,文中的讲解内容简单清晰,易于学习与理解,下面请大家跟着小编的思路慢慢深入,一起来研究和学习“JavaScript如何实现无缝轮播图”吧!

<div class="carousel-container"> //图片列表 <div class="carousel-list"></div> //上一张 <div class="carousel-arrow carousel-arrow-left"><</div> //下一张 <div class="carousel-arrow carousel-arrow-right">></div> //导航点 <div class="indicator"> <span class="active"></span> <span></span> <span></span> </div> </div>
简单布局样式就不说了,主要讲如何将图片横向排列起来
先给容器设置相对定位,通过overflow将超出部分隐藏
.carousel-container {
      position: relative;
      width: 500px;
      height: 300px;
      /* overflow: hidden; */
      background-color: #ccc;
 }
然后图片列表设置相对定位和flex盒子,这样每一个滑块就横向排列成一排了
.carousel-container .carousel-list {
      position: relative;
      display: flex;
      height: 100%;
      width: 100%;
 }
左右滑动按钮通过绝对定位+transform的方式移动到两边,导航点也是一样,就不一一详说了
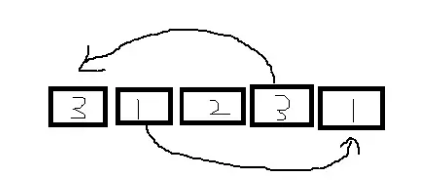
1、先实现向后滚动无缝连接,将最后一张复制一份放到最前面,当滚动到最后一张时,再次滚动,将要滚动到第一张时,先取消过渡transition,瞬间跳到最前面复制的那张上,然后继续运行动画到第一张,这样看起来就无缝了
2、向前滚动无缝连接,思路同上,复制第一张图片放到最后,当滚动到第一张,再次滚动时,瞬间跳到最后复制的那张图片上,继续滚动到轮播图的最后一张上。
先获取到dom元素,currentIndex是当前轮播到的图片下标
let currentIndex = 0;
const doms = {
      carouselList: document.querySelector('.carousel-list'),
      arrowLeft: document.querySelector('.carousel-arrow-left'),
      arrowRight: document.querySelector('.carousel-arrow-right'),
      indicator: document.querySelectorAll('.indicator span')
    }
先初始化dom,复制图片
// 复制第一张放最后,最后一张图片放第一张之前
    function init() {
      let lastImg = doms.carouselList.lastElementChild.cloneNode(true)
      let firstImg = doms.carouselList.firstElementChild.cloneNode(true)

      doms.carouselList.appendChild(firstImg)
      doms.carouselList.insertBefore(lastImg, doms.carouselList.firstElementChild)
      lastImg.style.position = 'absolute'
      lastImg.style.transform = 'translateX(-100%)'
    }
    //执行一下
    init()
实现到任意一张图片的方法
function moveTo(index) {
      doms.carouselList.style.transform = `translateX(-${index * 100}%)`
      doms.carouselList.style.transition = '.5s'

      // 去掉导航点选中效果
      let active = document.querySelector('.indicator span.active')
      active.classList.remove('active')
      // 添加选中效果
      doms.indicator[index].classList.add('active')
      currentIndex = index
    }
给导航点绑定点击跳转事件
// 给导航点添加事件
    doms.indicator.forEach((item, i) => {
      item.onclick = function () {
        moveTo(i);
      }
    })
给前后按钮绑上执行事件,判断边界图片,及时取消过渡效果,瞬间跳到复制的图片位置,调用moveTo到第一张或最后一张图片上。
let indicatorLength = doms.indicator.length;
    function preSlide() {
      if (currentIndex === 0) {
        doms.carouselList.style.transition = 'none'
        doms.carouselList.style.transform = `translateX(-${indicatorLength * 100}%)`
        doms.carouselList.clientHeight
        moveTo(indicatorLength - 1)
      } else {
        moveTo(currentIndex - 1)
      }
    }
    function nextSlide() {
      if (currentIndex === doms.indicator.length - 1) {
        doms.carouselList.style.transition = 'none'
        doms.carouselList.style.transform = 'translateX(100%)'
        doms.carouselList.clientHeight
        moveTo(0)
      } else {
        moveTo(currentIndex + 1)
      }
    }

    doms.arrowLeft.onclick = function () {
      preSlide();
    }

    doms.arrowRight.onclick = function () {
      nextSlide()
    }
最后使用定时器调用nertSlide方法就实现自动播放了
function start(time = 2000) {
      setInterval(() => {
        nextSlide()
      }, time)
    }
start()<!DOCTYPE html>
<html lang="en">
<head>
<meta charset="UTF-8">
<meta http-equiv="X-UA-Compatible" content="IE=edge">
<meta name="viewport" content="width=device-width, initial-scale=1.0">
<title>Document</title>
<style>
* {
margin: 0;
padding: 0;
box-sizing: border-box;
}
.carousel-container {
margin: 0 auto;
position: relative;
width: 500px;
height: 300px;
/* overflow: hidden; */
background-color: #ccc;
}
.carousel-container .carousel-list {
position: relative;
display: flex;
height: 100%;
width: 100%;
}
.carousel-container .carousel-list .slide {
flex: 0 0 100%;
height: 100%;
width: 100%;
}
.slide a {
display: flex;
justify-content: center;
align-items: center;
height: 100%;
width: 100%;
}
.slide a img {
width: 100%;
}
.carousel-container .carousel-arrow {
display: none;
position: absolute;
width: 36px;
height: 36px;
border-radius: 50%;
color: white;
text-align: center;
line-height: 36px;
cursor: pointer;
background-color: rgba(31, 45, 61, .2);
}
.carousel-container:hover .carousel-arrow {
display: block;
}
.carousel-container:hover .carousel-arrow:hover {
background-color: rgba(31, 45, 61, .4);
}
.carousel-container .carousel-arrow-left {
top: 50%;
left: 2%;
transform: translateY(-50%);
}
.carousel-container .carousel-arrow-right {
top: 50%;
right: 2%;
transform: translateY(-50%);
}
.carousel-container .indicator {
display: flex;
position: absolute;
left: 50%;
top: 90%;
transform: translateX(-50%)
}
.carousel-container .indicator span {
margin: 2px 5px;
padding: 3px;
width: 5px;
height: 5px;
border: 1px solid white;
border-radius: 5px;
}
.active {
background-color: #fff;
}
</style>
</head>
<body>
<div class="carousel-container">
<div class="carousel-list">
<div class="slide">
<a href="">
<img
src="https://ts4.cn.mm.bing.net/th?id=OIP-C.kB-Ovasi0GW67-rmwnAcwAHaEo&w=316&h=197&c=8&rs=1&qlt=90&o=6&dpr=1.25&pid=3.1&rm=2">
</a>
</div>
<div class="slide">
<a href="">
<img
src="https://ts1.cn.mm.bing.net/th?id=OIP-C.QPH1IBosDYBqaU3O6wV3YAHaEo&w=316&h=197&c=8&rs=1&qlt=90&o=6&dpr=1.25&pid=3.1&rm=2"></a>
</div>
<div class="slide">
<a href="">
<img
src="https://ts2.cn.mm.bing.net/th?id=OIP-C.P3NSGTdAYdyqy5zJpb5QXQHaEo&w=316&h=197&c=8&rs=1&qlt=90&o=6&dpr=1.25&pid=3.1&rm=2"
alt=""></a>
</div>
</div>
<div class="carousel-arrow carousel-arrow-left"><</div>
<div class="carousel-arrow carousel-arrow-right">></div>
<div class="indicator">
<span class="active"></span>
<span></span>
<span></span>
</div>
</div>
</body>
<script>
window.onload = function () {
const doms = {
carouselList: document.querySelector('.carousel-list'),
arrowLeft: document.querySelector('.carousel-arrow-left'),
arrowRight: document.querySelector('.carousel-arrow-right'),
indicator: document.querySelectorAll('.indicator span')
}
let currentIndex = 0;
function moveTo(index) {
doms.carouselList.style.transform = `translateX(-${index * 100}%)`
doms.carouselList.style.transition = '.5s'
// 去掉导航点选中效果
let active = document.querySelector('.indicator span.active')
active.classList.remove('active')
// 添加选中效果
doms.indicator[index].classList.add('active')
currentIndex = index
}
// 给导航点添加事件
doms.indicator.forEach((item, i) => {
item.onclick = function () {
moveTo(i);
}
})
// 复制第一张放最后,最后一张图片放第一张之前
function init() {
let lastImg = doms.carouselList.lastElementChild.cloneNode(true)
let firstImg = doms.carouselList.firstElementChild.cloneNode(true)
doms.carouselList.appendChild(firstImg)
doms.carouselList.insertBefore(lastImg, doms.carouselList.firstElementChild)
lastImg.style.position = 'absolute'
lastImg.style.transform = 'translateX(-100%)'
}
let indicatorLength = doms.indicator.length;
function preSlide() {
if (currentIndex === 0) {
doms.carouselList.style.transition = 'none'
doms.carouselList.style.transform = `translateX(-${indicatorLength * 100}%)`
doms.carouselList.clientHeight
moveTo(indicatorLength - 1)
} else {
moveTo(currentIndex - 1)
}
}
function nextSlide() {
if (currentIndex === doms.indicator.length - 1) {
doms.carouselList.style.transition = 'none'
doms.carouselList.style.transform = 'translateX(100%)'
doms.carouselList.clientHeight
moveTo(0)
} else {
moveTo(currentIndex + 1)
}
}
doms.arrowLeft.onclick = function () {
preSlide();
}
doms.arrowRight.onclick = function () {
nextSlide()
}
function start(time = 2000) {
setInterval(() => {
nextSlide()
}, time)
}
start()
init()
}
</script>
</html>感谢各位的阅读,以上就是“JavaScript如何实现无缝轮播图”的内容了,经过本文的学习后,相信大家对JavaScript如何实现无缝轮播图这一问题有了更深刻的体会,具体使用情况还需要大家实践验证。这里是亿速云,小编将为大家推送更多相关知识点的文章,欢迎关注!
免责声明:本站发布的内容(图片、视频和文字)以原创、转载和分享为主,文章观点不代表本网站立场,如果涉及侵权请联系站长邮箱:is@yisu.com进行举报,并提供相关证据,一经查实,将立刻删除涉嫌侵权内容。