您好,登录后才能下订单哦!
密码登录
登录注册
点击 登录注册 即表示同意《亿速云用户服务条款》
一、概述
DrawerLayout是一个可以方便的实现Android侧滑菜单的组件,我最近开发的项目中也有一个侧滑菜单的功能,于是DrawerLayout就派上用场了。如果你从未使用过DrawerLayout,那么本篇博客将使用一个简单的案例带你迅速掌握DrawerLayout的用法。
二、效果图
三、代码实现
主布局activity_main.xml
<?xml version="1.0" encoding="utf-8"?>
<LinearLayout xmlns:android="http://schemas.android.com/apk/res/android"
 xmlns:app="http://schemas.android.com/apk/res-auto"
 android:layout_width="match_parent"
 android:layout_height="match_parent"
 android:background="@android:color/white"
 android:fitsSystemWindows="true"
 android:orientation="vertical">

 <android.support.v7.widget.Toolbar
 android:id="@+id/toolbar"
 android:layout_width="match_parent"
 android:layout_height="wrap_content"
 android:background="@color/blueStatus"
 android:minHeight="?attr/actionBarSize"
 app:navigationIcon="?attr/homeAsUpIndicator"
 app:theme="@style/Theme.AppCompat.NoActionBar">

 </android.support.v7.widget.Toolbar>


 <include layout="@layout/title_layout" />

 <android.support.v4.widget.DrawerLayout xmlns:tools="http://schemas.android.com/tools"
 android:id="@+id/drawer_layout"
 android:layout_width="match_parent"
 android:layout_height="match_parent"
 tools:openDrawer="start">

 <ListView
  android:id="@+id/listView"
  android:layout_width="match_parent"
  android:layout_height="match_parent" />

 <LinearLayout
  android:layout_width="260dp"
  android:layout_height="match_parent"
  android:layout_gravity="right">

  <include layout="@layout/drawer_content" />
 </LinearLayout>
 </android.support.v4.widget.DrawerLayout>
</LinearLayout>
To use a DrawerLayout, position your primary content view as the first child with a width and height of match_parent. Add drawers as child views after the main content view and set the layout_gravity appropriately. Drawers commonly use match_parent for height with a fixed width.
当你使用DrawerLayout的时候,DrawerLayout的第一个元素就是主要内容区域(在本案例中是ListView),它的宽高必须是match_parent。
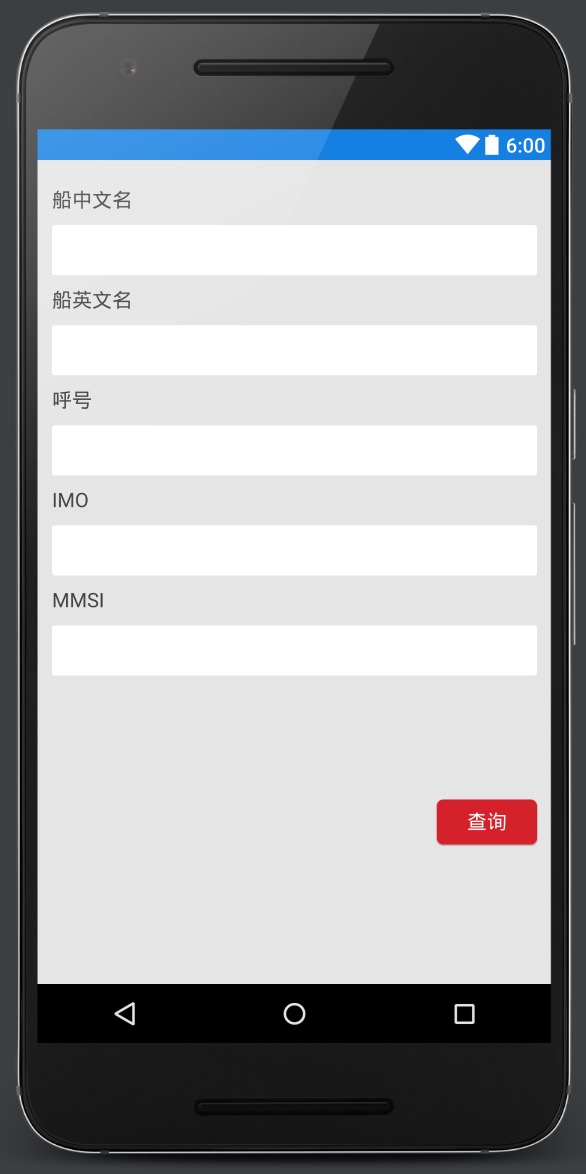
在主要内容区域的后面添加侧滑视图(在本案例中是drawer_content.xml),并且通过设置layout_gravity来决定它是左滑还是右滑,通常这个侧滑视图的高度设为match_parent。
drawer_content.xml
<?xml version="1.0" encoding="utf-8"?>

 <LinearLayout xmlns:android="http://schemas.android.com/apk/res/android"
  android:layout_width="match_parent"
  android:layout_height="match_parent"
  android:background="@color/background"
  android:orientation="vertical"
  android:padding="@dimen/activity_horizontal_margin">

  <TextView

   android:layout_width="wrap_content"
   android:layout_height="40dp"
   android:text="船中文名" />

  <EditText

   android:layout_width="match_parent"
   android:layout_height="40dp"
   android:background="@drawable/btn_round_white"
   android:padding="@dimen/margin_8" />

  <TextView

   android:layout_width="wrap_content"
   android:layout_height="40dp"
   android:text="船英文名" />

  <EditText


   android:layout_width="match_parent"
   android:layout_height="40dp"
   android:background="@drawable/btn_round_white"
   android:padding="@dimen/margin_8" />

  <TextView

   android:layout_width="wrap_content"
   android:layout_height="40dp"
   android:text="呼号" />

  <EditText


   android:layout_width="match_parent"
   android:layout_height="40dp"
   android:background="@drawable/btn_round_white"
   android:padding="@dimen/margin_8" />

  <TextView

   android:layout_width="wrap_content"
   android:layout_height="40dp"
   android:text="IMO" />

  <EditText


   android:layout_width="match_parent"
   android:layout_height="40dp"
   android:background="@drawable/btn_round_white"
   android:padding="@dimen/margin_8" />

  <TextView

   android:layout_width="wrap_content"
   android:layout_height="40dp"
   android:text="MMSI" />

  <EditText


   android:layout_width="match_parent"
   android:layout_height="40dp"
   android:background="@drawable/btn_round_white"
   android:padding="@dimen/margin_8" />

  <RelativeLayout
   android:layout_width="match_parent"
   android:layout_height="0dp"
   android:layout_weight="1">

   <Button
    android:id="@+id/btn_confirm"

    android:layout_width="80dp"
    android:layout_height="36dp"
    android:layout_alignParentRight="true"
    android:layout_centerInParent="true"
    android:layout_gravity="center_vertical"
    android:background="@drawable/btn_round_red"
    android:gravity="center"
    android:text="查询"
    android:textColor="@color/white" />
  </RelativeLayout>
 </LinearLayout>
这个布局文件就是侧滑视图,如图:
MainActivity.java
package com.leohan.drawerlayoutdemo;

import android.os.Bundle;
import android.support.v4.view.GravityCompat;
import android.support.v4.widget.DrawerLayout;
import android.support.v7.app.AppCompatActivity;
import android.support.v7.widget.Toolbar;
import android.view.Gravity;
import android.view.View;
import android.widget.Button;
import android.widget.ImageView;
import android.widget.LinearLayout;
import android.widget.ListView;
import android.widget.TextView;

import java.util.ArrayList;
import java.util.HashMap;
import java.util.List;
import java.util.Map;

import butterknife.ButterKnife;
import butterknife.InjectView;
import butterknife.OnClick;

public class MainActivity extends AppCompatActivity {

 @InjectView(R.id.toolbar)
 Toolbar toolbar;
 @InjectView(R.id.tv_search)
 TextView tvSearch;
 @InjectView(R.id.listView)
 ListView listView;
 @InjectView(R.id.drawer_layout)
 DrawerLayout drawerLayout;

 private List data = new ArrayList();
 private ShipRecordAdapter adapter = new ShipRecordAdapter(this, data);

 @Override
 protected void onCreate(Bundle savedInstanceState) {
 super.onCreate(savedInstanceState);
 setContentView(R.layout.activity_main);
 ButterKnife.inject(this);

 setSupportActionBar(toolbar);
 listView.setAdapter(adapter);
 getData();
 }


 @Override
 public void onBackPressed() {
 if (drawerLayout.isDrawerOpen(GravityCompat.START)) {
  drawerLayout.closeDrawer(GravityCompat.START);
 } else {
  super.onBackPressed();
 }
 }

 /**
 * 获取类别数据
 */
 private void getData() {
 for (int i = 0; i < 6; i++) {
  Map<String, Object> map = new HashMap<>();
  data.add(map);
 }
 adapter.notifyDataSetChanged();
 }

 @OnClick(R.id.tv_search)
 public void onClick(View view) {
 switch (view.getId()) {
  case R.id.tv_search:
  if (drawerLayout.isDrawerOpen(Gravity.RIGHT)) {
   drawerLayout.closeDrawer(Gravity.RIGHT);
  } else {
   drawerLayout.openDrawer(Gravity.RIGHT);
  }
  break;
 }
 }
}
由于这里的侧滑视图是从右侧滑动出现的,因此侧滑视图的layout_gravity设置为right或者end,如果是左滑就设置为left或者start。当我们手动控制侧滑视图的打开或者关闭的时候,需要执行以下代码:
//close
drawerLayout.closeDrawer(Gravity.RIGHT);
//open
drawerLayout.openDrawer(Gravity.RIGHT);
至此DrawerLayout的基本使用就已经掌握了,更深入的了解DrawerLayout,请参考Google官方文档Creating a Navigation Drawer。
项目源码:https://github.com/leoleohan/DrawerLayoutDemo
以上就是本文的全部内容,希望对大家的学习有所帮助,也希望大家多多支持亿速云。
免责声明:本站发布的内容(图片、视频和文字)以原创、转载和分享为主,文章观点不代表本网站立场,如果涉及侵权请联系站长邮箱:is@yisu.com进行举报,并提供相关证据,一经查实,将立刻删除涉嫌侵权内容。